JSON in SQL Server: The Ultimate Guide
SQL Server has quite a few features for storing and working with JSON data.
In this guide, you'll learn:
- What JSON is and why you might want to use it
- Creating a table with a JSON field
- How to add, read, update, and delete JSON data
- Tips for performance, validating and working with JSON
Let's get into the guide.

What is JSON and Why Should I Use It?
JSON stands for JavaScript Object Notation, and it's a way to format and store data.
Data can be represented in a JSON format in SQL Server so it can be read and understood by other applications or parts of an application.
It's similar to HTML or XML - it represents your data in a certain format that is readable by people but designed to be readable by applications.
Why Use JSON In Your Database?
So why would you use JSON data in your database?
If you need a structure that's flexible.
A normalised database structure, one with tables and columns and relationships, works well for most cases. Recent improvements in development practices also mean that altering a table is not as major as it was in the past, so adjusting your database once it's in production is possible.
However, if your requirements mean that your data structure needs to be flexible, then a JSON field may be good for your database.
One example may be where a user can add custom attributes. If it was done using a normalised database, this may involve altering tables, or creating an Entity Attribute Value design, or some other method.
If a JSON field was used for this, it would be much easier to add and maintain these custom attributes.
The JSON data can also be stored in your database and processed by an ORM (Object Relational Mapper) or your application code, so your database may not need to do any extra work.
What Does JSON Data Look Like?
Here's a simple example of JSON data:
1{
2  "id": "1",
3  "username": "sstorm",
4  "location": "United States"
5}
It uses a combination of different brackets, colons, and quotes to represent your data.
Let's take a look at some more examples.
Name/Value Pair
JSON data is written as name/value pairs. A name/value pair is two values enclosed in quotes.
This is an example of a name/value pair:
1"username": "sstorm"
The name is "username" and the value is "sstorm". They are separated by a colon ":".
This means for the attribute of username, the value is sstorm. Names in JSON need to be enclosed in double quotes.
Objects
JSON data can be enclosed in curly brackets which indicate it's an object.
1{"username": "sstorm"}
This is the same data as the earlier example, but it's now an object. This means it can be treated as a single unit by other areas of the application.
How does this help? It's good for when there are multiple attributes:
1{
2  "username": "sstorm",
3  "location": "United States"
4}
Additional attributes, or name/value pairs, can be added by using a comma to separate them.
You'll also notice in this example the curly brackets are on their own lines and the data is indentented. This is optional: it's just done to make it more readable.
Arrays
JSON also supports arrays, which is a collection of records within an object. Arrays in JSON are included in square brackets and have a name:
 1{
 2  "username": "sstorm",
 3  "location": "United States",
 4  "posts": [
 5    {
 6      "id":"1",
 7      "title":"Welcome"
 8    },
 9    {
10      "id":"4",
11      "title":"What started it all"
12    }
13  ]
14}
In this example, this object has an attribute called "posts". The value of posts is an array, which we can see by the opening square bracket "[".
Inside the square bracket, we have a set of curly brackets, indicating an object, and inside those, we have an id of 1 and a title of Welcome. We have another set of curly brackets indicating another object.
These two objects are posts and they are contained in an array.
And that covers the basics of what JSON is.
If JSON is new to you, don't worry, it gets easier as you work with it more.
If you're experienced with JSON, you'll find the rest of the guide more useful as we go into the details of working with JSON in SQL Server.
How to Create and Populate JSON Field in SQL Server
So you've learned a bit about JSON data and why you might want to use it.
How do we create a field in SQL Server?
Creating a JSON Field
We create a new field to store our JSON data. Unlike other databases, SQL Server does not have a JSON-specific data type. However, we can use an NVARCHAR field. We can also add a constraint to ensure it is valid JSON.
Here's an example.
1CREATE TABLE product (
2  id INT,
3  product_name VARCHAR(200),
4  attributes NVARCHAR(MAX)
5);
We have created a table called product. It has an id and a product name. There's also an attributes column, which has the data type of NVARCHAR. The length of MAX allows up to 2GB of data.
Adding a JSON column is as easy as that.
What about validation? How do we know the text we add to this field is valid JSON and not just a text string?
We can add a Check Constraint to the table to ensure the data is valid. Check Constraints are inspected whenever data is added or updated in the table.
Here's what a check constraint would look like:
1ALTER TABLE product
2ADD CONSTRAINT CHECK(ISJSON(attributes)=1);
Or, we could add the constraint at the time we create the table:
1CREATE TABLE product (
2  id INT,
3  product_name VARCHAR(200),
4  attributes NVARCHAR(MAX),
5  CONSTRAINT ck_product_json CHECK(ISJSON(attributes)=1)
6);
The ISJSON field returns 1 if the specified field is JSON-compliant. In this case, whenever we make changes to the attributes field, it must be a valid JSON document so that this check constraint passes.
With this JSON validation, the data is automatically validated for us. We won't be able to store invalid data in the table.
Also, we get to use the various SQL Server JSON functions on the JSON data to make working with it easier.
Adding Data to a JSON Field
Now we've got our field for storing JSON data, how do we add data to it?
We simply insert a record into our table as though it's a text value.
With the check constraint that uses the ISJSON function, the data will be validated before it is inserted, and only valid data will be inserted.
We can add our first product like this:
1INSERT INTO product (id, product_name, attributes)
2VALUES (1, 'Chair', '{"color":"brown", "material":"wood", "height":"60cm"}');
We can run this statement and the record is inserted. If we select the data from the table, this is what we see:
1SELECT
2id,
3product_name,
4attributes
5FROM product;
Here are our results:
| id | product_name | attributes | | --- | --- | | 1 | Chair | {"color": "brown", "material":"wood", "height":"60cm"} |
The JSON data is shown exactly as we entered it.
If we try to insert an invalid JSON field, we'll get an error.
Here's the INSERT statement:
1INSERT INTO product (id, product_name, attributes)
2VALUES (100, 'Bad Chair', '"color":"brown:height}');
This is what we'll see:
1The INSERT statement conflicted with the CHECK constraint "ck_product_json".
2The conflict occurred in database "main", table "dbo.product", column 'attributes'.
Using the method above, we needed to enter the data in exactly the right format.
Inserting Arrays
If you want to insert JSON data that contains arrays, you can enter it using text in a JSON format.
Here's how to insert an array by just specifying it in a JSON format.
1INSERT INTO product (id, product_name, attributes)
2VALUES (2, 'Desk', '{"color":"black", "material":"metal", "drawers":[{"side":"left", "height":"30cm"}, {"side":"left", "height":"40cm"}]}');
This will insert a new product that has an array of drawers. As you can probably see by this statement, reading it (and writing it) is a bit tricky.
You can insert simpler arrays using this method too.
1INSERT INTO product (id, product_name, attributes)
2VALUES (3, 'Side Table', '{"color":"brown", "material":["metal", "wood"]}');
The INSERT statements will work, and the data will look like this:
1SELECT
2id,
3product_name,
4attributes
5FROM product;
Here are the results:
| id | product_name | attributes |
|---|---|---|
| 1 | Chair | {"color": "brown", "material":"wood", "height":"60cm"} |
| 2 | Desk | {"color": "black", "drawers": [{"side": "left", "height": "30cm"}, {"side": "left", "height": "40cm"}], "material": "metal"} |
| 3 | Side Table | {"color": "brown", "material": ["metal", "wood"]} |
How to Read and Filter JSON Data in SQL Server
Once you've got some JSON data in a table, the next step is to read it.
How do we do that?
We can run a simple SELECT statement to see the data in the table.
1SELECT
2id,
3product_name,
4attributes
5FROM product;
| id | product_name | attributes |
|---|---|---|
| 1 | Chair | {"color": "brown", "material":"wood", "height":"60cm"} |
| 2 | Desk | {"color": "black", "drawers": [{"side": "left", "height": "30cm"}, {"side": "left", "height": "40cm"}], "material": "metal"} |
| 3 | Side Table | {"color": "brown", "material": ["metal", "wood"]} |
This shows us the data in the JSON column, and it looks just like a text value.
The good thing with this is that any application can easily read this field and work with it how they want (display it, filter it, and so on).
What if we wanted to do more in our database?
Selecting Individual Attributes
The JSON data is stored in something that looks like a text field. However, it's quite easy to get attributes and values out of this text field and display them.
We can extract a value from the JSON field and display it in a separate column. We do this using a combination of "path expressions" and the JSON_VALUE function.
We need to use the JSON_VALUE function to search for a particular attribute in the JSON value. And we need to use a "path expression" to specify the attribute.
How do we do this?
First, let's write the path expression, and then put that into our JSON_VALUE function.
The path expression lets us specify the attribute we want to search for. It starts with a $ symbol, and we specify a dot then the name of the attribute we're looking for.
For example, to specify the "color" attribute, out path expression would look like this:
1'$.color'
To specify the "material" attribute, we can use this path expression:
1'$.material'
If we had a height attribute enclosed in a dimensions attribute, our path expression would look like this:
1'$.dimensions.height'
We use the dot to specify the next level in the hierarchy of attributes.
How do we use this to filter our data? We combine this path expression with the JSON_VALUE function.
The JSON_VALUE function takes two parameters:
1JSON_VALUE (column, path_expression)
We can use this in an example.
Displaying a Field using JSON_VALUE
Let's say we want to display the color attribute in a separate column in our results.
First, we write the path expression for the color attribute:
1'$.color'
Then, we add this to our JSON_VALUE function:
1JSON_VALUE(attributes, '$.color')
Finally, we add this to our SELECT clause to show it as a separate column.
1SELECT
2id,
3product_name,
4JSON_VALUE(attributes, '$.color') AS color,
5attributes
6FROM product;
This query will show all records, and show the color attribute as a separate column.
| id | product_name | color | attributes |
|---|---|---|---|
| 1 | Chair | brown | {"color": "brown", "material":"wood", "height":"60cm"} |
| 2 | Desk | black | {"color": "black", "drawers": [{"side": "left", "height": "30cm"}, {"side": "left", "height": "40cm"}], "material": "metal"} |
| 3 | Side Table | brown | {"color": "brown", "material": ["metal", "wood"]} |
We can see the separate column here.
Path Expression Examples
We can see another field using JSON_VALUE by specifying the attribute name:
1SELECT
2id,
3product_name,
4JSON_VALUE(attributes, '$.height') AS height,
5attributes
6FROM product;
Here we are extracting the attribute called height. This is available in some records but not others.
| id | product_name | height | attributes |
|---|---|---|---|
| 1 | Chair | 60cm | {"color": "brown", "material":"wood", "height":"60cm"} |
| 2 | Desk | null | {"color": "black", "drawers": [{"side": "left", "height": "30cm"}, {"side": "left", "height": "40cm"}], "material": "metal"} |
| 3 | Side Table | null | {"color": "brown", "material": ["metal", "wood"]} |
A null value is shown for records that don't have this attribute.
What about attributes that are arrays, such as "material" in this example?
1SELECT
2id,
3product_name,
4JSON_VALUE(attributes, '$.material') AS material,
5attributes
6FROM product;
| id | product_name | material | attributes |
|---|---|---|---|
| 1 | Chair | wood | {"color":"brown", "material":"wood", "height":"60cm"} |
| 2 | Desk | metal | {"color": "black", "drawers": [{"side": "left", "height": "30cm"}, {"side": "left", "height": "40cm"}], "material": "metal"} |
| 3 | Side Table | null | {"color": "brown", "material": ["metal", "wood"]} |
What if we want to see an attribute that's inside another attribute? For example, the first of the "drawer" attributes?
Because "drawer" is an array, we can't use the dot notation to get the attribute like this:
1JSON_VALUE(attributes, '$.drawers.side')
This will return a null value as there is no attribute called side: it's part of an array.
However, we can use a number to reference the position in the array.
You can return the first object using [0]:
1JSON_VALUE(attributes, '$.drawers[0]')
The second object can be found using [1], the third object using [2], and so on.
So, our query to extract the first item in the array is:
1SELECT
2id,
3product_name,
4JSON_VALUE(attributes, '$.drawers[0]') AS drawer,
5attributes
6FROM product;
The results are:
| id | product_name | drawer | attributes |
|---|---|---|---|
| 1 | Chair | null | {"color":"brown", "material":"wood", "height":"60cm"} |
| 2 | Desk | null | {"color": "black", "drawers": [{"side": "left", "height": "30cm"}, {"side": "left", "height": "40cm"}], "material": "metal"} |
| 3 | Side Table | null | {"color": "brown", "material": ["metal", "wood"]} |
The only record that has an attribute of "drawer" is id 2, the Chair. But why isn't it showing in the results?
It's because the drawers attribute is an array. It contains a series of other attributes, unlike color and height and material which are single values.
The JSON_VALUE function only returns single values, or "scalar values" as they are called in the documentation.
To return objects or arrays, we need to use the JSON_QUERY function.
It works in the same way. We provide a JSON field and a path expression.
Here's what it looks like.
1SELECT
2id,
3product_name,
4JSON_QUERY(attributes, '$.drawers[0]') AS drawer,
5attributes
6FROM product;
Here are the results:
| id | product_name | drawer | attributes |
|---|---|---|---|
| 1 | Chair | null | {"color":"brown", "material":"wood", "height":"60cm"} |
| 2 | Desk | {"side":"left", "height":"30cm"} | {"color": "black", "drawers": [{"side": "left", "height": "30cm"}, {"side": "left", "height": "40cm"}], "material": "metal"} |
| 3 | Side Table | null | {"color": "brown", "material": ["metal", "wood"]} |
We can see the differences in the results using the JSON_QUERY function. It shows the drawer attribute.
So, as you can see, there are a range of ways you can use the JSON functions with a path expression to get the attribute you want.
Filtering on JSON Data in SQL Server
Let's say we wanted to see our Chair product, which has a brown color, wood material, and a height of 60cm. But we want to filter on the JSON attributes for this example.
Let's try this query.
1SELECT
2id,
3product_name,
4attributes
5FROM product
6WHERE attributes = '{"color":"brown", "material":"wood", "height":"60cm"}';
We can run this query. Here's what we see:
| id | product_name | attributes |
|---|---|---|
| 1 | Chair | {"color":"brown", "material":"wood", "height":"60cm"} |
This works because the column is simply an NVARCHAR column, and as long as we provide the exact full string, it will work.
Often we need to filter on one of the keys or values. How can we do that?
What if we try using the LIKE keyword with a partial match?
1SELECT
2id,
3product_name,
4attributes
5FROM product
6WHERE attributes LIKE '%"color":"brown"%';
| id | product_name | attributes |
|---|---|---|
| 1 | Chair | {"color":"brown", "material":"wood", "height":"60cm"} |
| 3 | Side Table | {"color": "brown", "material": ["metal", "wood"]} |
This does give us the result we want. However, using wildcard searches can be quite slow if there is a lot of data in the table.
There are several features in SQL Server that make it possible to filter on JSON data.
Using JSON_VALUE to Filter Data
Let's say we want to find all products where the color is brown. The color is a part of the attributes JSON column in our table.
Our path expression would look like this:
1'$.color'
We can write the JSON_VALUE function like this:
1JSON_VALUE(attributes, '$.color')
We then add this to our SELECT statement
1SELECT
2id,
3product_name,
4attributes
5FROM product
6WHERE JSON_VALUE(attributes, '$.color') = 'brown';
We've added this JSON_VALUE function to our WHERE clause, and added a condition where the color is equal to "brown".
The results of this query are shown below.
| id | product_name | attributes |
|---|---|---|
| 1 | Chair | {"color":"brown", "material":"wood", "height":"60cm"} |
| 3 | Side Table | {"color": "brown", "material": ["metal", "wood"]} |
We can see that the results only show records where the color attribute is brown.
Viewing JSON Data as a Table
So far we've seen examples of using different functions to read and filter JSON data.
The result has been that all of the JSON data has been displayed in a single column.
SQL Server includes a function that lets you expand the JSON fields and display them in a table. This table shows a few columns: key, value, and type.
This can be useful for data in your tables, or if you're loading JSON from an external source and want to translate it into your database tables.
The function is called OPENJSON:
1OPENJSON(json_doc)
The json_doc parameter is the JSON value that will be translated.
Using a JSON Variable
Here's what it looks like in our database. We'll use it on a JSON value, then see how to use it for our table.
To use it on a JSON value, we need to declare and set a value first.
1DECLARE @json NVARCHAR(MAX);
2SET @JSON = N'
3  {"color":"brown", "material":"wood", "height":"60cm"}
4';
5
6SELECT *
7FROM OPENJSON(@json);
The result is the JSON data in a table structure:
| key | value | type |
|---|---|---|
| color | brown | 1 |
| material | wood | 1 |
| height | 60cm | 1 |
Using OPENJSON With Arrays
You can use this method even if there are arrays inside the JSON data.
1DECLARE @json NVARCHAR(MAX);
2SET @JSON = N'
3  {"color": "brown", "material": ["metal", "wood"]}
4';
5
6SELECT *
7FROM OPENJSON(@json);
The result is the JSON data in a table structure:
| key | value | type |
|---|---|---|
| color | brown | 1 |
| material | ["metal", "wood"] | 4 |
Specifying the Schema with OPENJSON
Another way you can use this function is to specify the schema of the columns found in the result. This is done using the WITH clause in your SELECT query.
Here's an example:
 1DECLARE @json NVARCHAR(MAX);
 2SET @JSON = N'
 3  {"color":"brown", "material":"wood", "height":"60cm"}
 4';
 5
 6SELECT *
 7FROM OPENJSON(@json)
 8WITH (
 9  color VARCHAR(50),
10  material VARCHAR(100),
11  height VARCHAR(10)
12);
This will transpose the data into columns, and specify data types, which can be useful to INSERT data.
| color | material | height |
|---|---|---|
| brown | wood | 60cm |
Showing JSON Columns as Table Columns
If you want to get JSON data from a table and show it in a table format using OPENJSON, you'll need to use the CROSS APPLY feature to reference a table.
Here's an example using our table:
1SELECT
2p.id,
3p.product_name,
4p.attributes,
5a.[key],
6a.[value]
7FROM product p
8CROSS APPLY OPENJSON (p.attributes) a;
I've used square brackets around key and value as they are reserved words.
This is what the results show:
| id | product_name | attributes | key | value |
|---|---|---|---|---|
| 1 | Chair | {"color":"brown", "material":"wood", "height":"60cm"} | color | brown |
| 1 | Chair | {"color":"brown", "material":"wood", "height":"60cm"} | material | wood |
| 1 | Chair | {"color":"brown", "material":"wood", "height":"60cm"} | height | 60cm |
| 2 | Desk | {"color":"black", "material":"metal", "drawers":[{"side":"left", "height":"30cm"}, {"side":"left", "height":"40cm"}]} | color | black |
| 2 | Desk | {"color":"black", "material":"metal", "drawers":[{"side":"left", "height":"30cm"}, {"side":"left", "height":"40cm"}]} | material | metal |
| 2 | Desk | {"color":"black", "material":"metal", "drawers":[{"side":"left", "height":"30cm"}, {"side":"left", "height":"40cm"}]} | drawers | [{"side":"left", "height":"30cm"}, {"side":"left", "height":"40cm"}] |
| 3 | Side Table | {"color":"brown", "material":["metal", "wood"]} | color | brown |
| 3 | Side Table | {"color":"brown", "material":["metal", "wood"]} | material | ["metal", "wood"] |
We can see that each row is shown several times, as there are several attributes it's joined to (color, material, drawers, height).
Showing JSON Columns as Table Columns with a Schema
We can also use this concept and the WITH keyword to define a schema, to show the data in a different way:
 1SELECT
 2p.id,
 3p.product_name,
 4p.attributes,
 5a.color,
 6a.material,
 7a.height
 8FROM product p
 9CROSS APPLY OPENJSON (p.attributes)
10WITH (
11  color VARCHAR(50),
12  material VARCHAR(100),
13  height VARCHAR(10)
14) AS a;
Notice that the WITH clause is used to define the columns returned from the attributes field. We have also added the color, material, and height into the SELECT clause.
Here are the results:
| id | product_name | attributes | color | material | height |
|---|---|---|---|---|---|
| 1 | Chair | {"color":"brown", "material":"wood", "height":"60cm"} | brown | wood | 60cm |
| 2 | Desk | {"color":"black", "material":"metal", "drawers":[{"side":"left", "height":"30cm"}, {"side":"left", "height":"40cm"}]} | black | metal | |
| 3 | Side Table | {"color":"brown", "material":["metal", "wood"]} | brown |
We can see that the columns have been split out and are showing separately.
The OPENJSON function is quite useful if you need to extract or transpose your JSON data into columns.
How to Update JSON Data in SQL Server
Reading JSON is one thing. What if you need to update JSON data?
You could extract the string, do some substring and replacement work on the string, and add it into the field, but that's error-prone and a lot of work.
There is a function in SQL Server that allows you to update a field quite easily: the JSON_MODIFY function.
This can be used to:
- Add a new key and value
- Update the value for an existing key
The JSON_MODIFY function syntax looks like this:
1JSON_MODIFY(json_doc, path, new_value)
The parameters are:
- json_doc: the JSON field to be updated
- path: the path to add a new value for
- new_value: the value to add for the path
The function returns the updated JSON string.
Let's see some examples of this.
Insert a New Item
One way to update JSON data is to add a new item to an existing JSON value. This can be done with the JSON_MODIFY function.
This function will return the updated JSON value. So, because we're updating an existing row in the table, we use the UPDATE statement and this function.
Here's the first item in our table:
1SELECT
2id,
3product_name,
4attributes
5FROM product
6WHERE id = 1;
| id | product_name | attributes |
|---|---|---|
| 1 | Chair | {"color":"brown", "material":"wood", "height":"60cm"} |
Let's say we want to add a new attribute name and value, in addition to the color, height, and material that already exist. This new attribute would be "width", and the value is 100cm.
1UPDATE product
2SET attributes = JSON_MODIFY(attributes, '$.width', '100cm')
3WHERE id = 1;
The path is "$.width" as it's a width attribute at the top level (not within another attribute).
We can run the same SELECT statement as above to see the updated value.
| id | product_name | attributes |
|---|---|---|
| 1 | Chair | {"color":"brown", "material":"wood", "height":"60cm", "width":"100cm"} |
We can see that "width" has been added to the list of attributes.
Updating an Existing Value
If you want to replace a value of an attribute inside a JSON field with another value, you can also use the JSON_MODIFY function.
The path must refer to an existing attribute key. If it does not exist, then the attribute will be added, as we saw in the earlier example.
Let's see some examples.
Here's our first product ID:
| id | product_name | attributes |
|---|---|---|
| 1 | Chair | {"color":"brown", "material":"wood", "height":"60cm"} |
We can update the value of color to black by using this JSON_MODIFY function. Because we are updating an existing value, we use the UPDATE statement.
1UPDATE product
2SET attributes = JSON_MODIFY(attributes, '$.color', 'white')
3WHERE id = 1;
We can select from this table and see the record is updated:
| id | product_name | attributes |
|---|---|---|
| 1 | Chair | {"color":"white", "material":"wood", "height":"60cm"} |
Append to Existing Value
The example above showed how to update an existing key or value in a JSON field.
SQL Server offers an "append" keyword as part of the JSON_MODIFY function. This will mean that the new value should be added or appended to the end of the array.
Without "append", it will replace the existing value.
Let's see an example. Say we have our Side Table product with a materials array of "metal" and "wood":
| id | product_name | attributes |
|---|---|---|
| 3 | Side Table | {"color":"brown", "material":["metal", "wood"]} |
We want to also say it has a material of plastic. Instead of updating the field to say it has a material of metal, wood, and plastic (which would involve reading the existing value and including it in the update), we can use append and add the value of plastic to it.
Here's the statement to do that. The word "append" goes before our JSON path inside the string.
1UPDATE product
2SET attributes = JSON_MODIFY(attributes, 'append $.material', 'plastic')
3WHERE id = 3;
Once we run this statement, we can select from our table again and see our updated value:
| id | product_name | attributes |
|---|---|---|
| 3 | Side Table | {"color":"brown", "material":["metal", "wood", "plastic"]} |
This only works if the target element is an array, which material is.
Strict and Lax Mode
Another parameter is available when using JSON_MODIFY. You can specify either "strict" or "lax" inside the path parameter before the actual path. This determines how to treat path values that don't exist.
Strict means the path must exist, and Lax means it does not have to exist. Lax is the default.
Here's what happens in each situation.
| Parameter Value | Path Exists | Path Does Not Exist |
|---|---|---|
| lax | Update existing value at path | Insert new value at path |
| strict | Update existing value at path | Returns an error |
It can be useful to use strict if you need this for your application.
How to Delete from a JSON Field in SQL Server
There are two DELETE operations you can do when working with JSON fields:
- delete an attribute from a JSON field
- delete a row from your table
Deleting a Row using JSON_VALUE
Deleting a row from your table is done in the same way as regular SQL. You can write an SQL statement to delete the row that matches your ID, or using JSON_VALUE.
For example, to delete all rows where the color attribute is brown:
1DELETE FROM product
2WHERE JSON_VALUE(attributes, '$.color') = 'brown';
This will remove the matching records from the table.
Removing an Attribute from a JSON Field
The other way to delete JSON data is to remove an attribute from a JSON field.
This is different from updating, as you're removing the attribute entirely rather than just updating its value to something else.
We can do this with an UPDATE statement and the JSON_MODIFY function. We specify a new_value of NULL.
The JSON_MODIFY function used in this way will remove data from a JSON field.
Let's see an example by removing an attribute from product ID 2.
1SELECT
2id,
3product_name,
4attributes
5FROM product
6WHERE id = 1;
| id | product_name | attributes |
|---|---|---|
| 1 | Chair | {"color":"brown", "material":"wood", "height":"60cm"} |
We can run an UPDATE statement with JSON_MODIFY to remove the "height" attribute.
1UPDATE product
2SET attributes = JSON_MODIFY(attributes, '$.height', NULL)
3WHERE id = 2;
We can then select the data from the table again to see that it has been removed:
| id | product_name | attributes |
|---|---|---|
| 1 | Chair | {"color":"brown", "material":"wood"} |
The attribute of height is no longer in the JSON field.
Validating JSON Data
We've seen in the examples so far in this guide that using an NVARCHAR with a check constraint in SQL Server automatically validates data for you. It ensures you can only insert valid JSON data into the field.
The function that SQL Server uses can also be used in regular SQL, not just in the check constraint. This function is called ISJSON. You provide it with a value, and it returns 1 if it's a valid JSON string and 0 if it is not.
The syntax is:
1ISJSON (value)
Here are some examples.
Example of Valid JSON String
Let's say we have this JSON string:
1'{"color": "black", "depth": "100cm", "material": "wood"}'
We can test if this is valid by looking at it for quotes and other symbols in the right places. Or we can just pass it to the ISJSON function.
1SELECT
2ISJSON('{"color": "black", "depth": "100cm", "material": "wood"}') AS valid_test;
| valid_test |
|---|
| 1 |
The result is 1 so it's a valid JSON value.
Example of an Invalid JSON String
What if the value is not valid?
We can see this sample JSON string:
1'{"color": "black", "depth" "100cm", "material": "wood"}'
At first glance it may seem valid. Let's use the JSON_VALID function to check.
1SELECT
2ISJSON('{"color": "black", "depth" "100cm", "material": "wood"}') AS valid_test;
| valid_test |
|---|
| 0 |
The result is 0 so it's not a valid JSON value. The result does not say where the issue is in the provided string, but it tells you it's invalid so you can look closer at it.
Improve the Performance of JSON Queries
The JSON support and features in SQL Server are pretty good, and each version includes more features.
So, given that you can add JSON columns to tables, extract fields, and get all the flexibility of JSON fields with validation, wouldn't it be better to just store all of your data in JSON fields rather than normalised tables?
Well, sometimes that might be a good idea. But then you may be better off using a NoSQL database rather than SQL Server.
Another reason why using primarily JSON fields to store your data is not a good idea is that it can struggle with performance.
Select Performance
For example, let's say we want to select all products where the color is brown. We can use the JSON_VALUE function in the WHERE clause that we saw earlier in this guide:
1SELECT
2id,
3product_name,
4attributes
5FROM product
6WHERE JSON_VALUE(attributes, '$.color') = 'brown';
Let's see the execution plan for this:
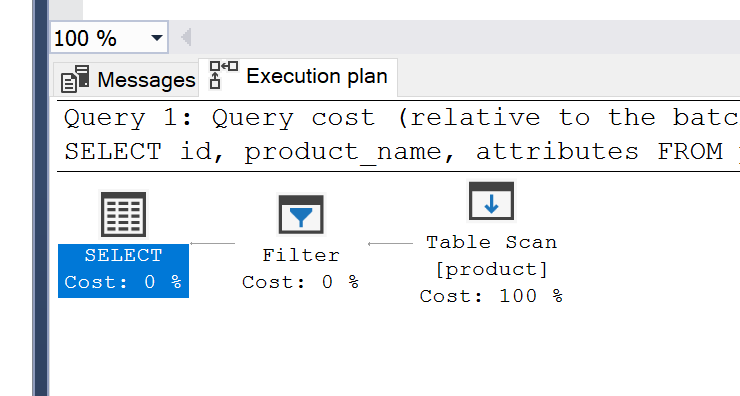
The execution plan shows a Full Table Scan step, which is a slow type of access. This might be OK for our table, which only has a few records, but once you start working with larger tables it can be quite slow.
So, using the JSON_VALUE function in the WHERE clause will mean a full table scan is used.
What can we do?
One Solution to Selecting Data
Fortunately, SQL Server allows you to define a virtual column on the table, and create an index on that virtual column. This should make our query faster.
A virtual column is a column that is a calculation based on another column in the table.
Let's see how we can do that.
First, we create a new column that contains the color attribute:
1ALTER TABLE product
2ADD color
3AS JSON_VALUE(attributes, '$.color');
We can select from the product table to see it.
1SELECT
2id,
3product_name,
4color,
5attributes
6FROM product;
| id | product_name | color | attributes |
|---|---|---|---|
| 1 | Chair | brown | {"color":"brown", "material":"wood", "height":"60cm"} |
| 3 | Desk | black | {"color": "black", "drawers": [{"side": "left", "height": "30cm"}, {"side": "left", "height": "40cm"}], "material": "metal"} |
| 4 | Side Table | brown | {"color": "brown", "material": ["metal", "wood"]} |
Now, we can create an index on this new column.
1CREATE INDEX idx_prod_color ON product(color);
Now, let's select from the table again, filtering on the virtual column instead of the JSON field.
1SELECT
2id,
3product_name,
4color,
5attributes
6FROM product
7WHERE color = 'brown';
The results are:
| id | product_name | color | attributes |
|---|---|---|---|
| 1 | Chair | brown | {"color":"brown", "material":"wood", "height":"60cm"} |
| 3 | Desk | black | {"color": "black", "drawers": [{"side": "left", "height": "30cm"}, {"side": "left", "height": "40cm"}], "material": "metal"} |
| 4 | Side Table | brown | {"color": "brown", "material": ["metal", "wood"]} |
We can check the execution plan to see how it was run.
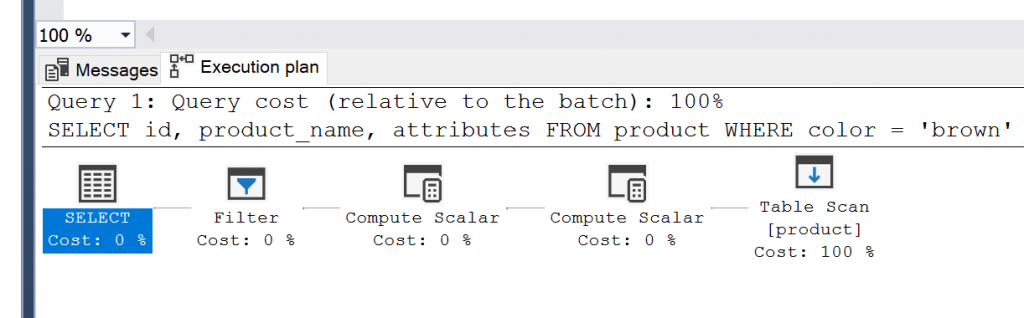
We can see that the step is still called "Table Scan". It looks like nothing has changed.
This could be because of the size of the table (only 3 rows) or the fact that "brown" exists in more than half of the rows.
But, this demonstrates the concept of creating a virtual column and an index (also that an index is not the right solution every time!).
Having said all of that, if you're creating virtual columns to be able to access data in SQL Server JSON fields more efficiently just to make your application and database work, then perhaps the JSON field is not right for your database. But only you would know that - each case is different.
Tips for Working with JSON in SQL Server
In this guide, we've looked at what JSON is, seen how to create JSON fields in SQL Server, and seen a range of ways we can work with them.
So, what's the best way to work with JSON fields in SQL Server?
Here are some tips I can offer for using JSON in SQL Server. They may not apply to your application or database but they are things to consider.
Just because you can, doesn't mean you should
JSON is flexible and quite powerful, but just because you can store data in a JSON field, doesn't mean you should. Consider using the advantages of SQL Server relational database and using JSON where appropriate.
Treat the JSON field like a black box
The JSON field can be used to store valid JSON data sent or received by your application. While there are functions for reading from and working with the JSON field, it might be better to just store the JSON data in the field, retrieve it from your application, and process it there.
This is the concept of a black box. The application puts data in and reads data from it, and the database doesn't care about what's inside the field.
It may or may not work for your situation, but consider taking this approach.
Search by the Primary Key and other fields
We've seen that it can be slow to search by attributes inside the JSON field. Consider filtering by the primary key and other fields in the table, rather than attributes inside the JSON field. This will help with performance.
Conclusion
I hope you found this guide useful. Have you used JSON fields in SQL Server? What has your experience been like? Do you have any questions? Feel free to use the comments section on the post.