Aqua Data Studio vs DBeaver: A Comparison
Aqua Data Studio and DBeaver are two feature-packed SQL editors that developers can use to work with SQL queries and do much more on a database.
In this post, I'll compare the major features of both of these tools.
Disclaimer: This post is sponsored by Idera, who is the owner of Aqua Data Studio.
General Features
This section compares many of the general features of both Aqua Data Studio and DBeaver, such as:
- the operating systems they run on
- the databases they support
- the user interface of the tools
Let's take a look.
Operating Systems
Aqua Data Studio: Windows, macOS, Linux
DBeaver: Windows, macOS, Linux
Both Aqua Data Studio and DBeaver run on Windows, macOS, and Linux.
This is great to see, as developers use a variety of operating systems, and many other editors only run on one operating system.
Databases
Both tools support a wide range of databases.
This table shows a list of the supported databases, ordered by their popularity (sourced from db-engines.com).
| Database | Aqua Data Studio | DBeaver |
|---|---|---|
| Oracle | Yes | Yes |
| MySQL | Yes | Yes |
| Microsoft SQL Server | Yes | Yes |
| PostgreSQL | Yes | Yes |
| MongoDB | Yes | Enterprise only |
| IBM DB2 | Yes | Yes |
| SQLite | Yes | Yes |
| Snowflake | Yes | Yes |
| Apache Cassandra | Yes | Enterprise only |
| MariaDB | Yes | Yes |
| Amazon DynamoDB | No | Yes |
| Microsoft Azure SQL Database | Yes | Yes |
| Apache Hive | Yes | Yes |
| Teradata | Yes | Yes |
| Azure Databricks | No | Yes |
| Google BigQuery | Yes | Yes |
| SAP HANA | Yes | Yes |
| Firebird | No | Yes |
| Couchbase | No | Enterprise Only |
There are a few things I observed when looking at this list of compatible databases.
First, the list is long - and that's a great thing. There are a lot of databases compatible with both tools.
You've got the four main databases I teach here on Database Star and four of the most popular: Oracle, SQL Server, MySQL, and Postgres. You've got a few other well-known databases such as DB2 and SQLite. There are also a few other databases that are supported that are not as widely used but are still great technologies.
Secondly, DBeaver looks like it supports more databases, but some are only supported on their higher-level Enterprise plan.
Both tools also support a JDBC or ODBC connection, if the database is not listed or if this type of connection works best for you.
There are more databases supported than I've shown in this table, so you can see the full list of databases supported here for Aqua Data Studio and DBeaver.
Versions
Aqua Data Studio and DBeaver both come with different versions or plans.
Aqua Data Studio has two options available:
- Standard: their main version to develop, access, manage, and visually analyse data for relational, cloud, and NoSQL databases.
- Ultimate: it also includes all the features above but adds a Task Scheduler for AquaScript projects, Random Table and Data generator and Manage Unit Tests.
In DBeaver, there are 4 versions available:
- Community: a free-to-use version
- Cloudbeaver: a web-based lightweight version for working with databases
- Enterprise: a full-featured version of DBeaver that includes everything in the Community edition plus more
- Team: a tool focused on development teams
So, each vendor offers different versions that may be more suitable to your needs
Connections
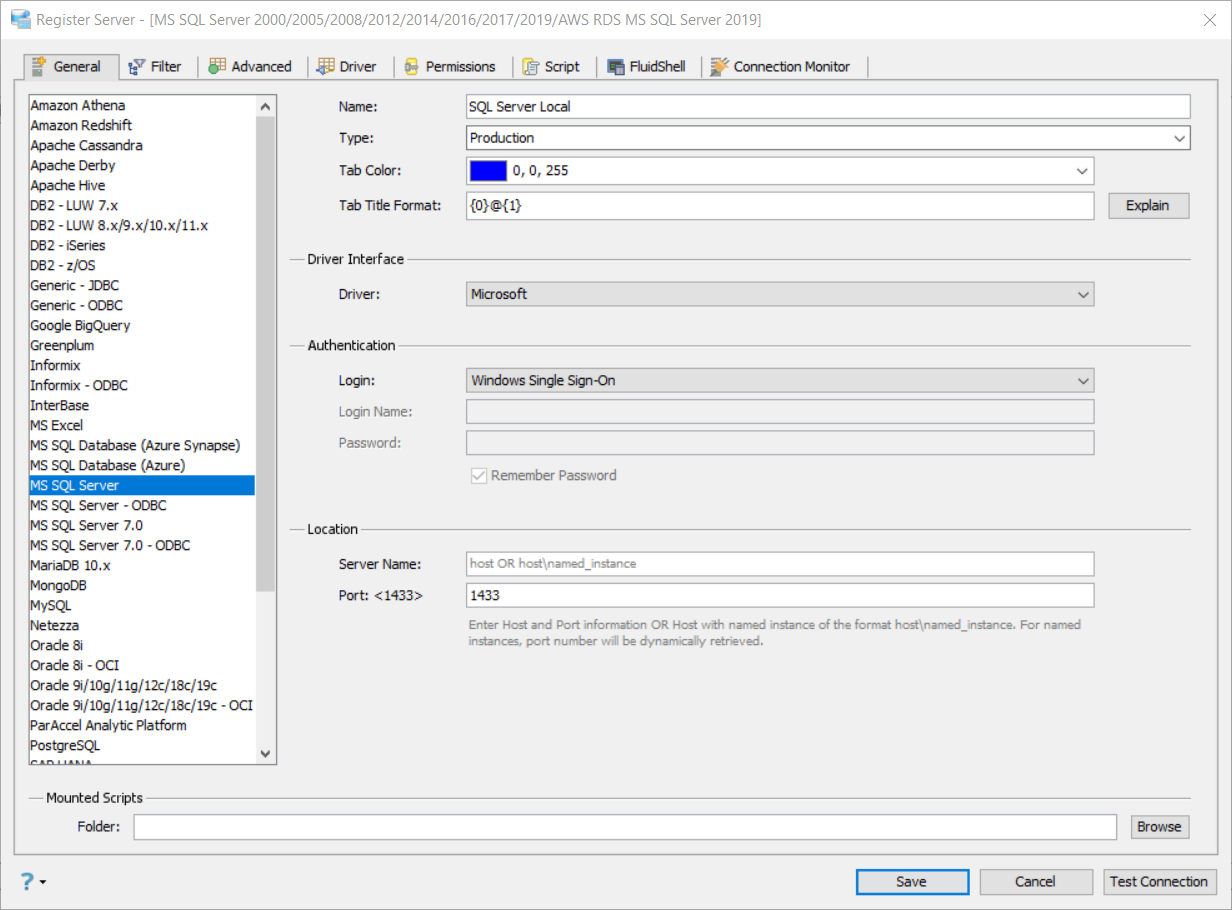
The connection process is similar in both tools, and they both make it quite easy to make a connection to a database, regardless of which database vendor you're using.
Here's what the connection in Aqua Data Studio looks like:
Here's what it looks like in DBeaver. It shows a range of databases that are supported.
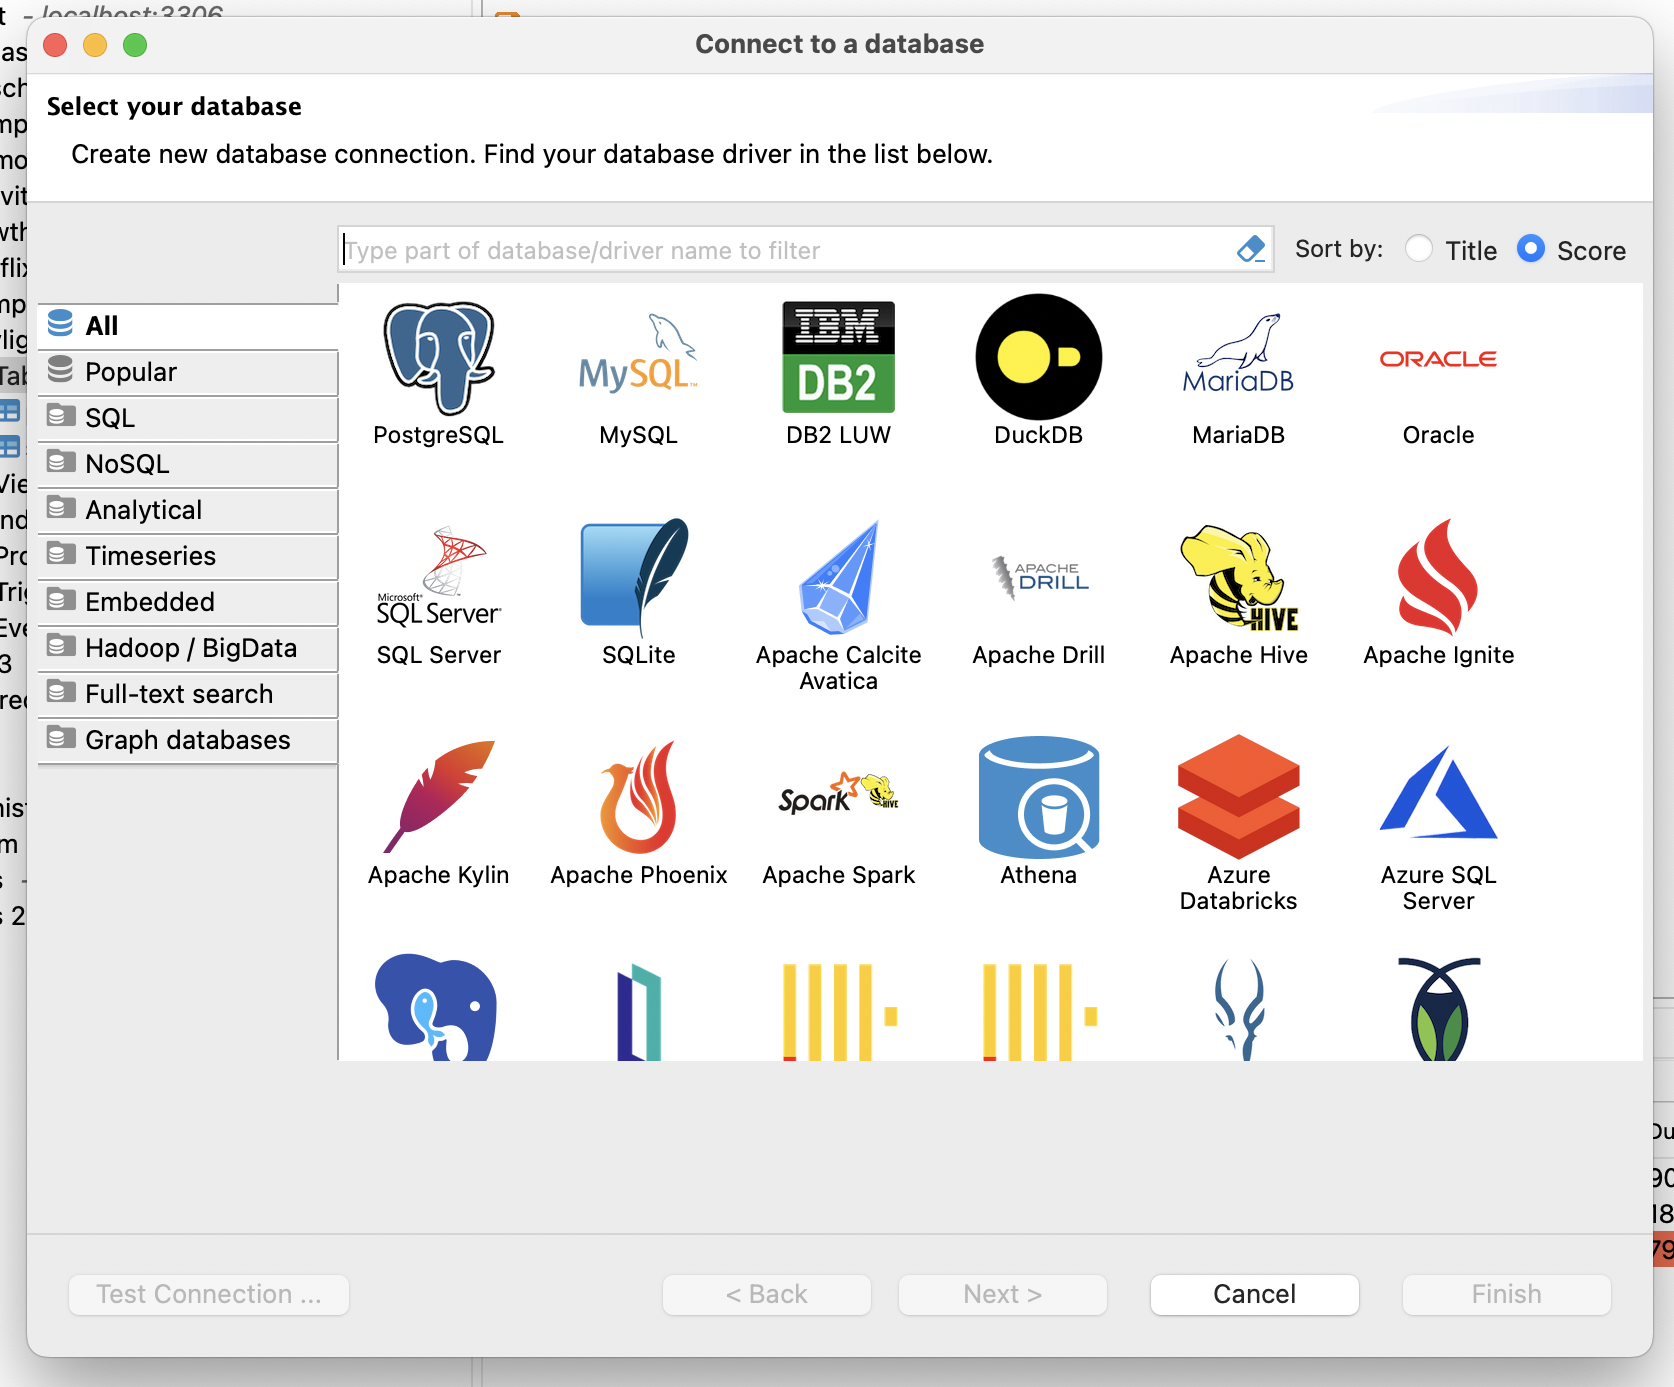
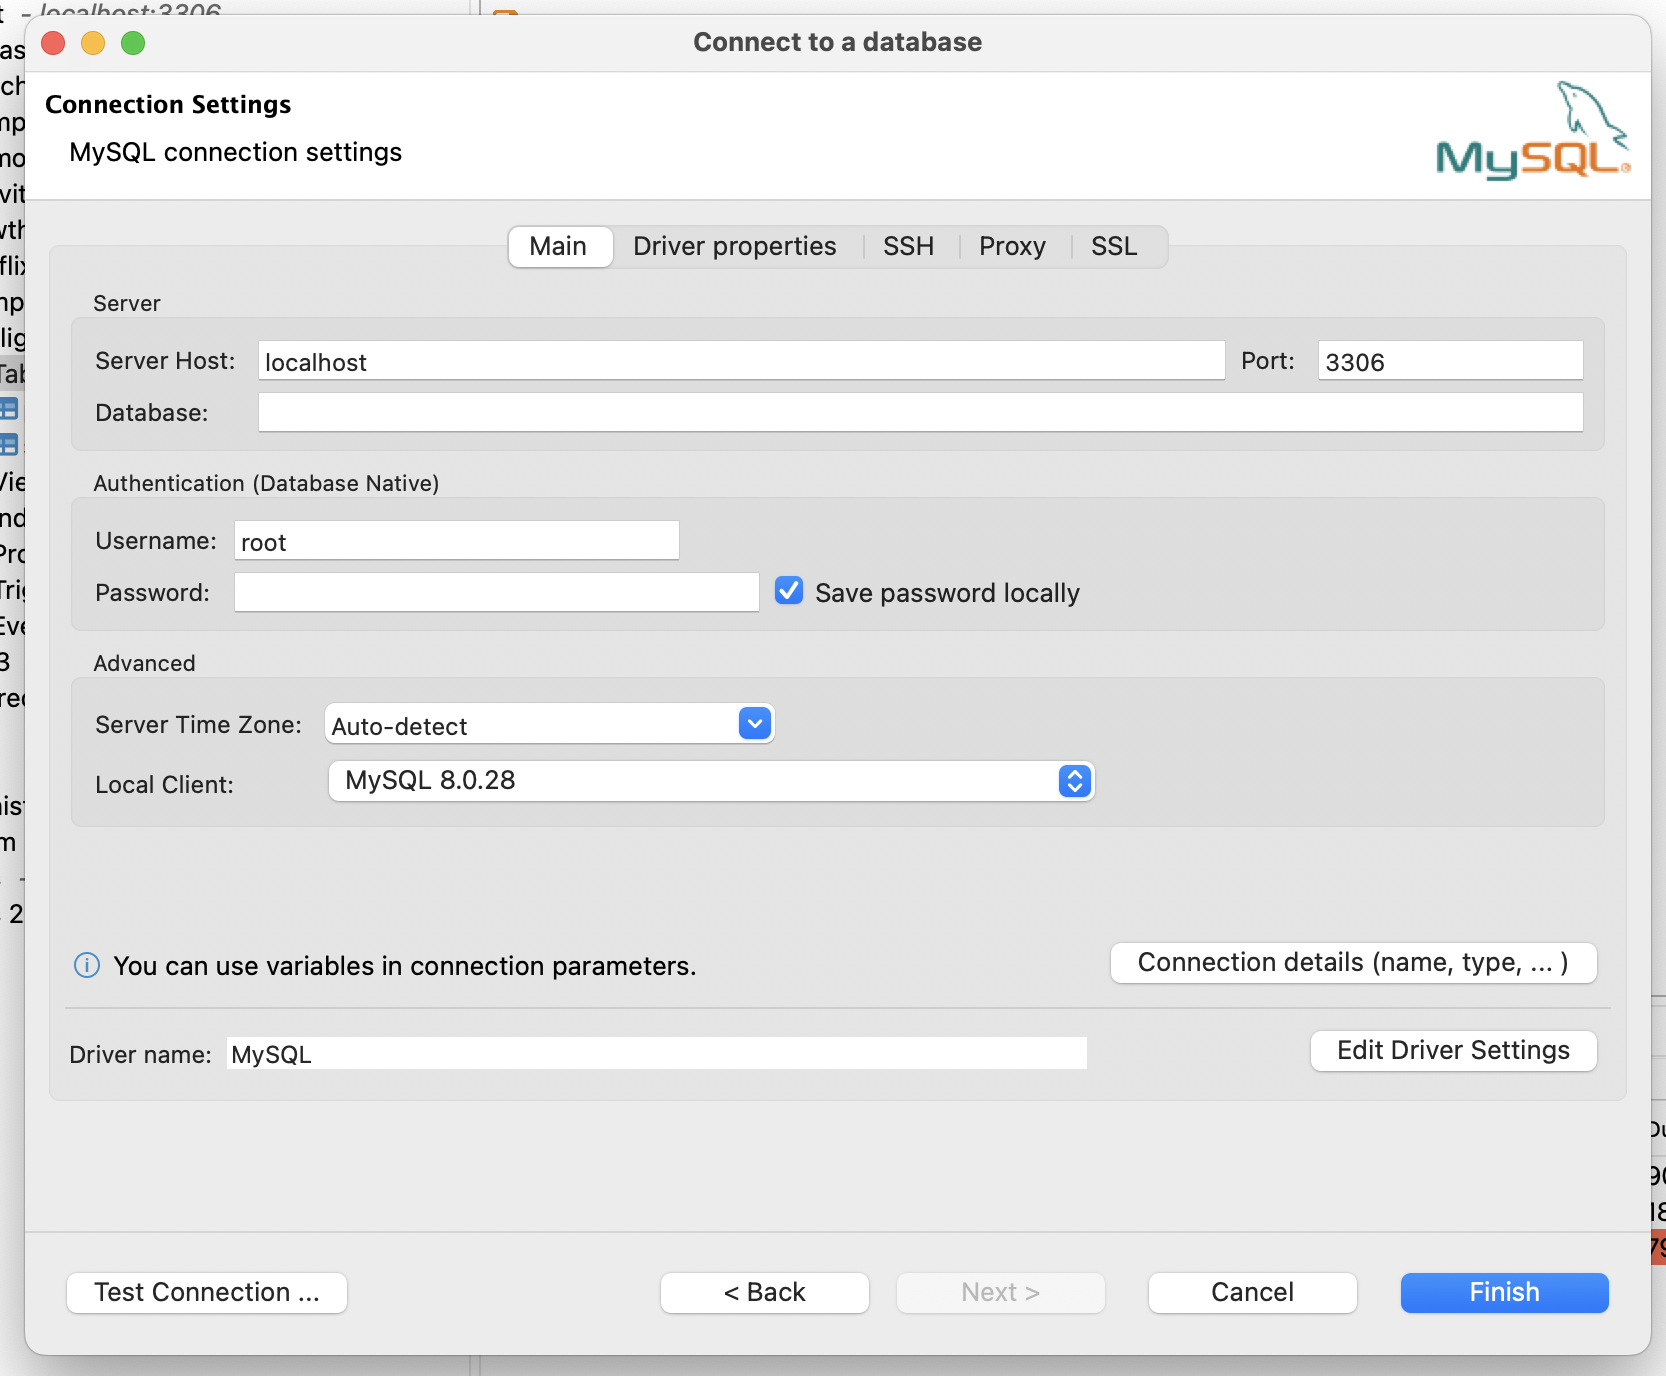
If you select a vendor and click Next, you'll be able to enter all of the connection details you need.
Themes (Dark Theme)
Both Aqua Data Studio and DBeaver use a light theme as the default but can be changed.
In both tools, you can change the theme or the appearance of the user interface.
In ADS, this is done by going to File > Options, then on the left panel, expand General, and click on Appearance.
There are a few options available:
- Aqua Data Studio - the default light theme
- Aqua Data Studio (Dark)
- Metal (Debug)
Here's what the Dark theme looks like on ADS:
In Dbeaver, there are several themes available. They can be changed by going to Preferences, then User Interface, then Appearance.
The options available are Classic, Dark, Light, and System.
Here's what the Dark theme looks like in DBeaver.
It's good that both tools offer a Dark theme as it's a popular setting for developers.
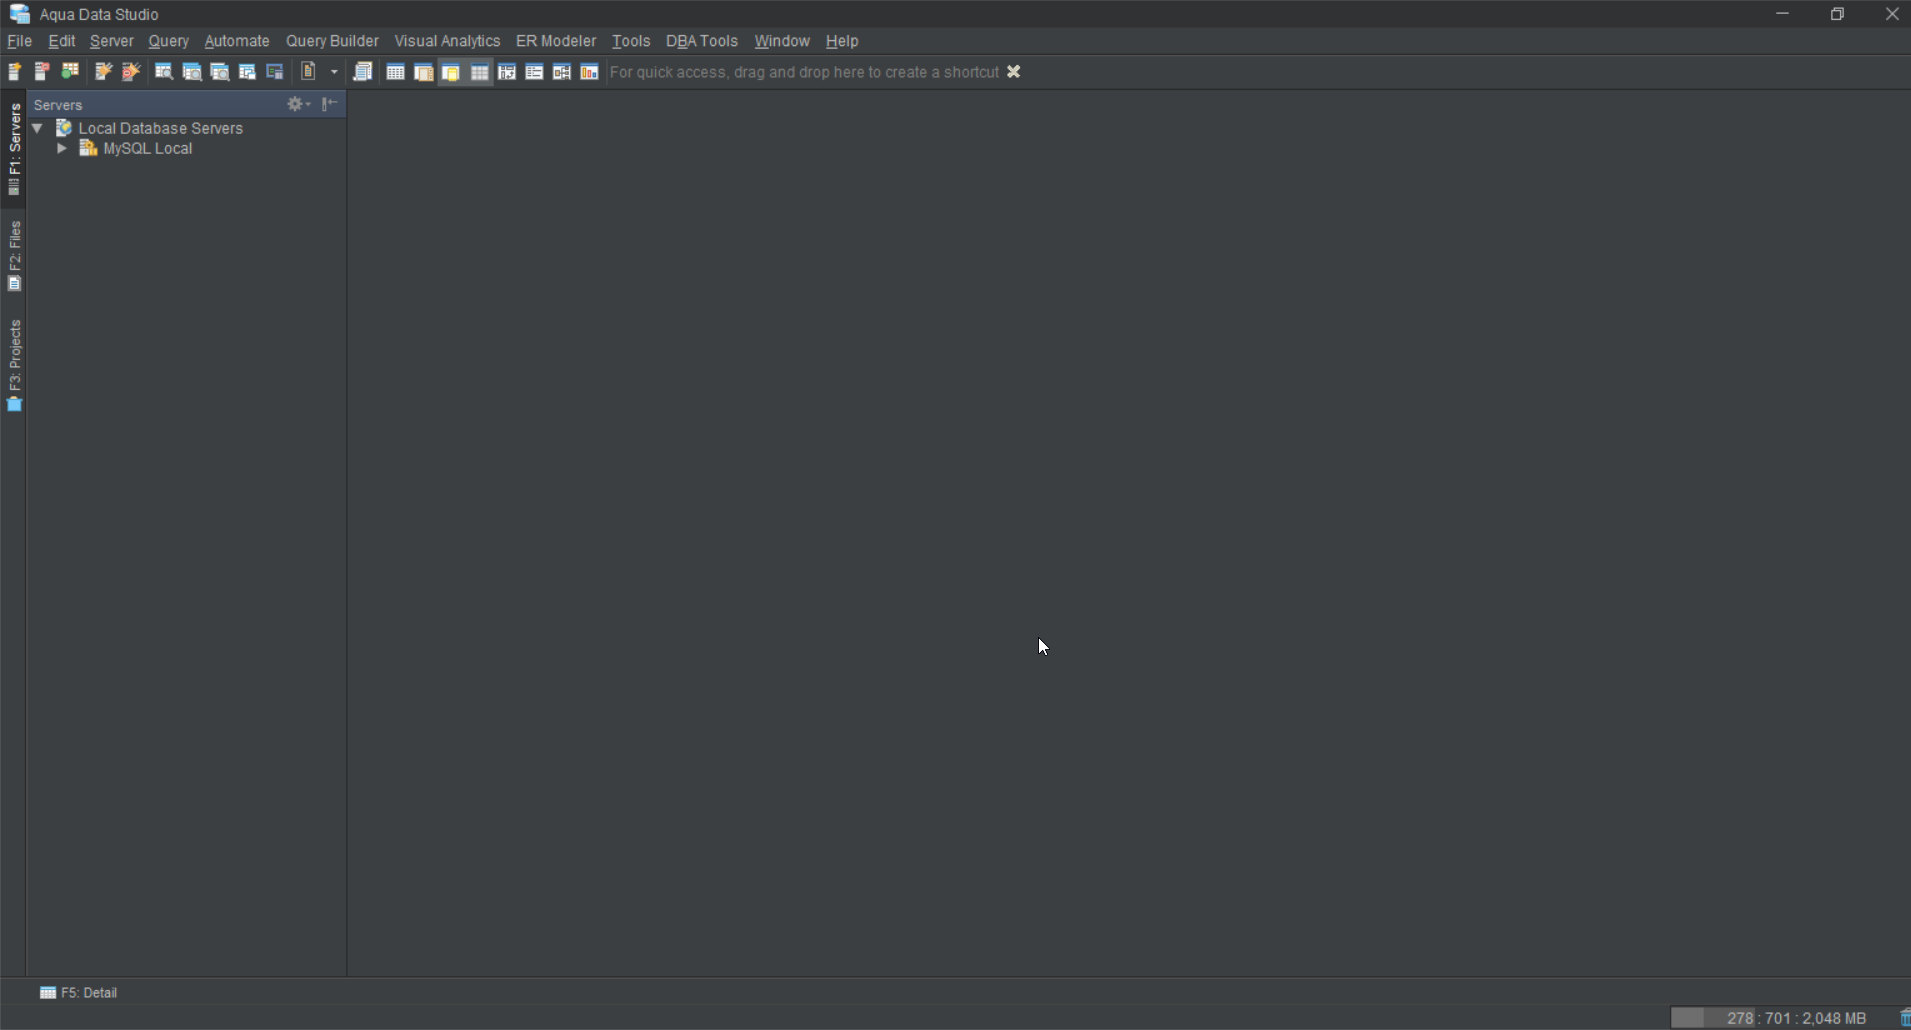
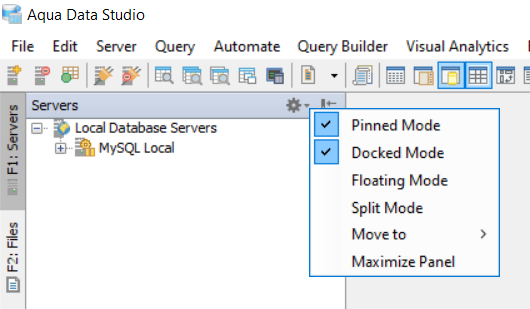
Workspace and Docking
Aqua Data Studio has a concept of docking, which is a flexible framework for working with panels in the window.
Many SQL editors have a feature like this, but in ADS it just works really well.
There are many areas of the tool, such as:
- Servers
- Files
- Projects
- Query Analyzer
For each of these areas, you can:
- Show or hide each of these sections
- Pin these sections to the left, right, bottom, or top of the screen
- Float these sections so they can be moved around independently of the main window
When I tried out this functionality, I found it easy to use and understand.
Within these panels on the left (Servers, Files, and Projects) is a range of functionality, such as:
- Right-click on objects and create scripts
- Edit properties
- View more information on each entry
- Refresh the list
In DBeaver, you can move tabs around the screen so they are side-by-side or tabbed with another editor. You can minimise or show the side panels as well.
It works in a similar way to Aqua Data Studio but doesn't have the same flexibility. For example, you can't float these sections in a separate window.
SQL Editor
This section explains the different features of working with SQL within the tool. It covers the general "query editor" feature where you'll enter and run queries, as well as many other related features such as code formatting, execution plans, and SQL history.
SQL Editor Tool/Query Analyser
In Aqua Data Studio, the feature for working with SQL queries is called the Query Analyzer.
You can open it from the menu bar or by clicking on the Query Analyzer button on the toolbar.
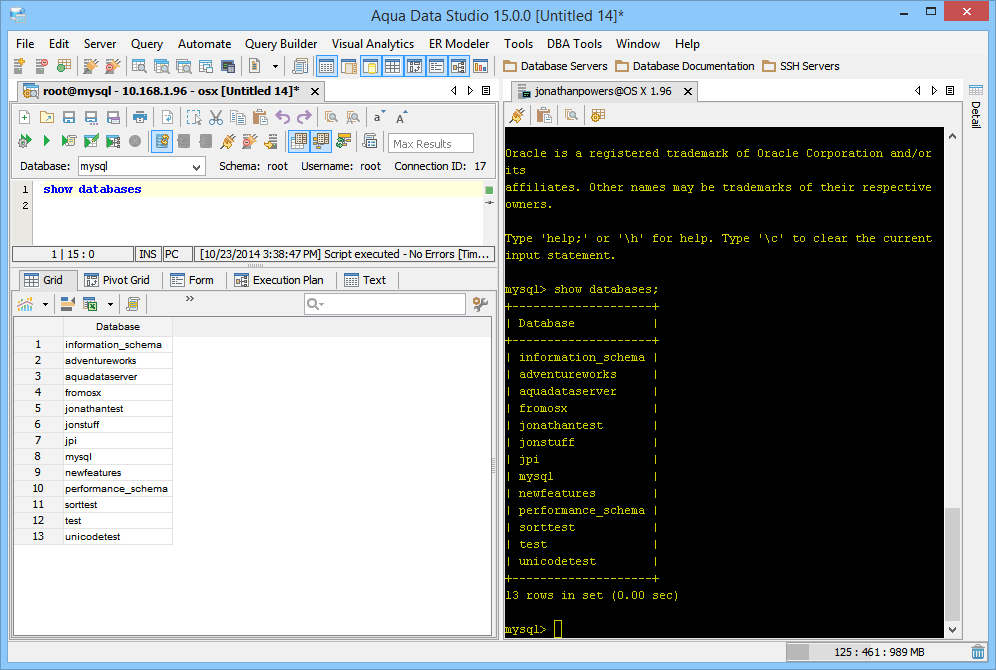
Here's what the Query Analyzer looks like.
It supports multiple tabs (one for each Query Analyser), which is a common feature and it works well in Aqua Data Studio.
The buttons on the toolbar cover a range of functions you would expect to find in an SQL editor, such as saving and opening files, saving results, cut, copy, paste, undo, and redo. There are also buttons for executing the query and the execution plan, which we'll see more of later in this post.
The SQL syntax is also highlighted in the Query Analyser, as you can see in this image:

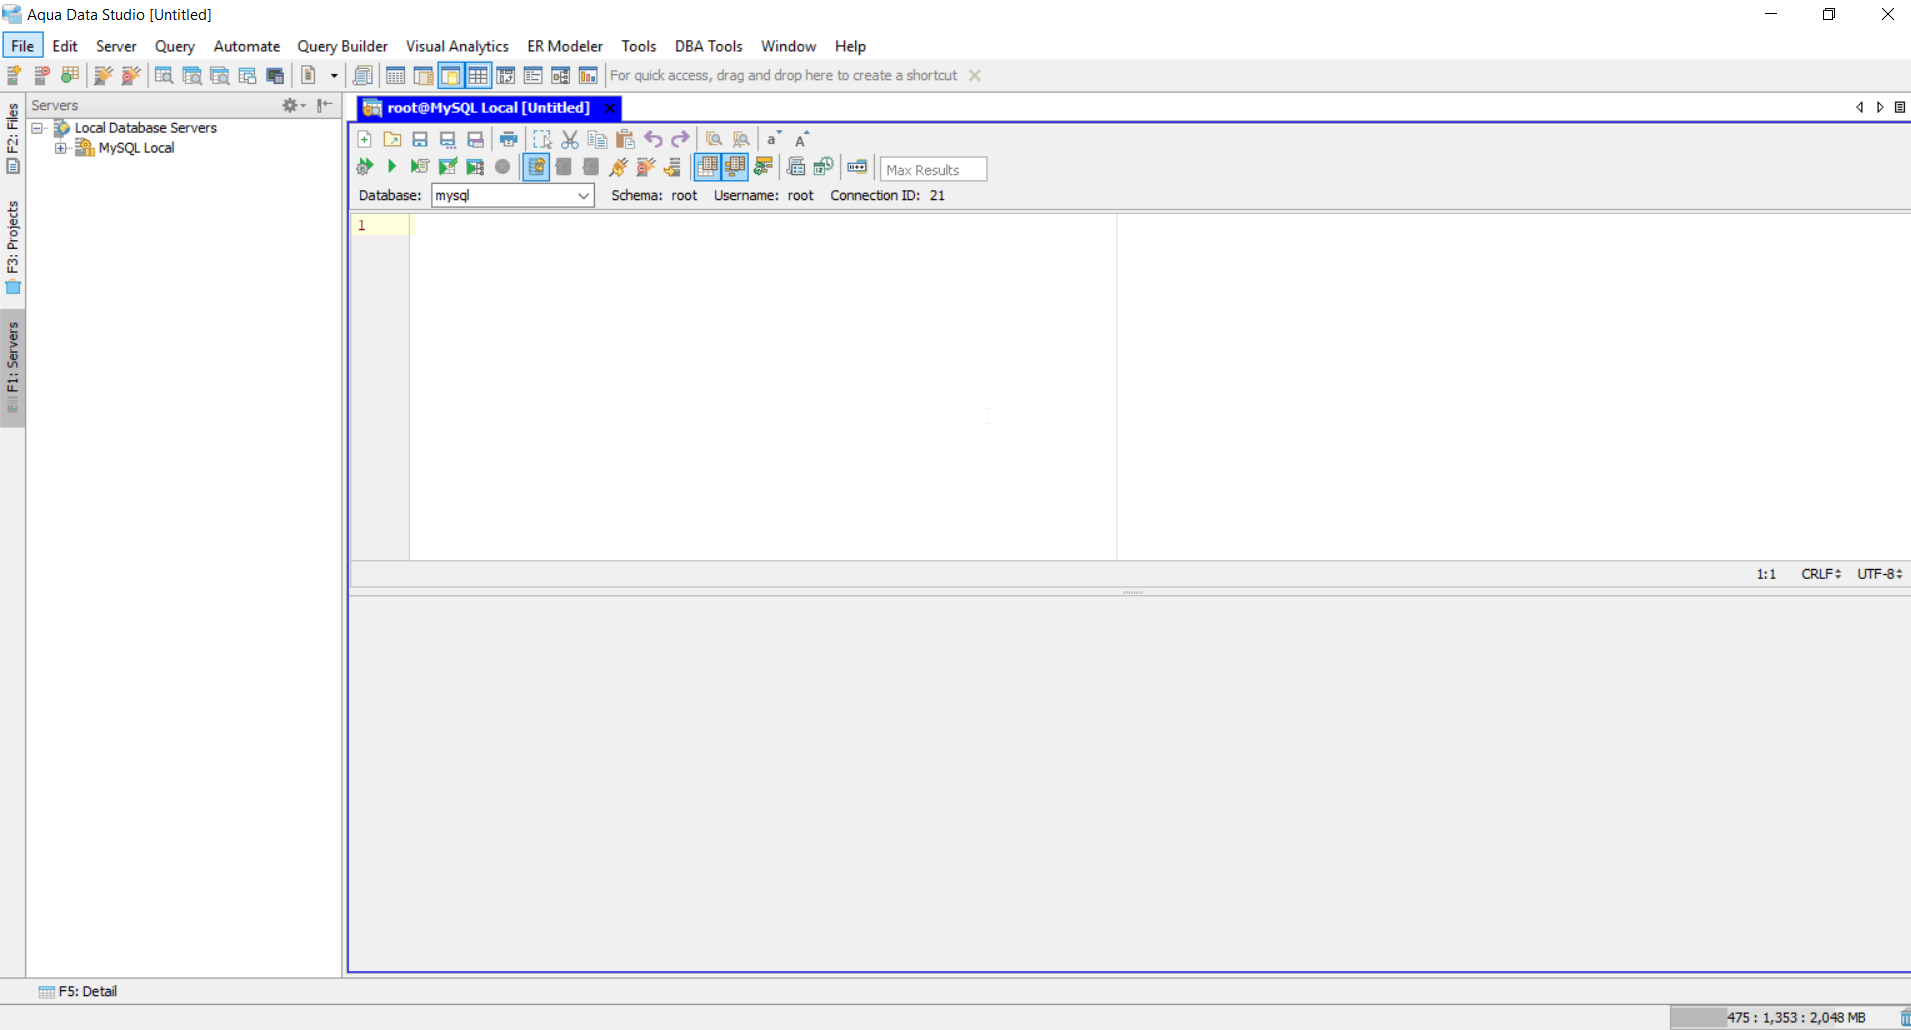
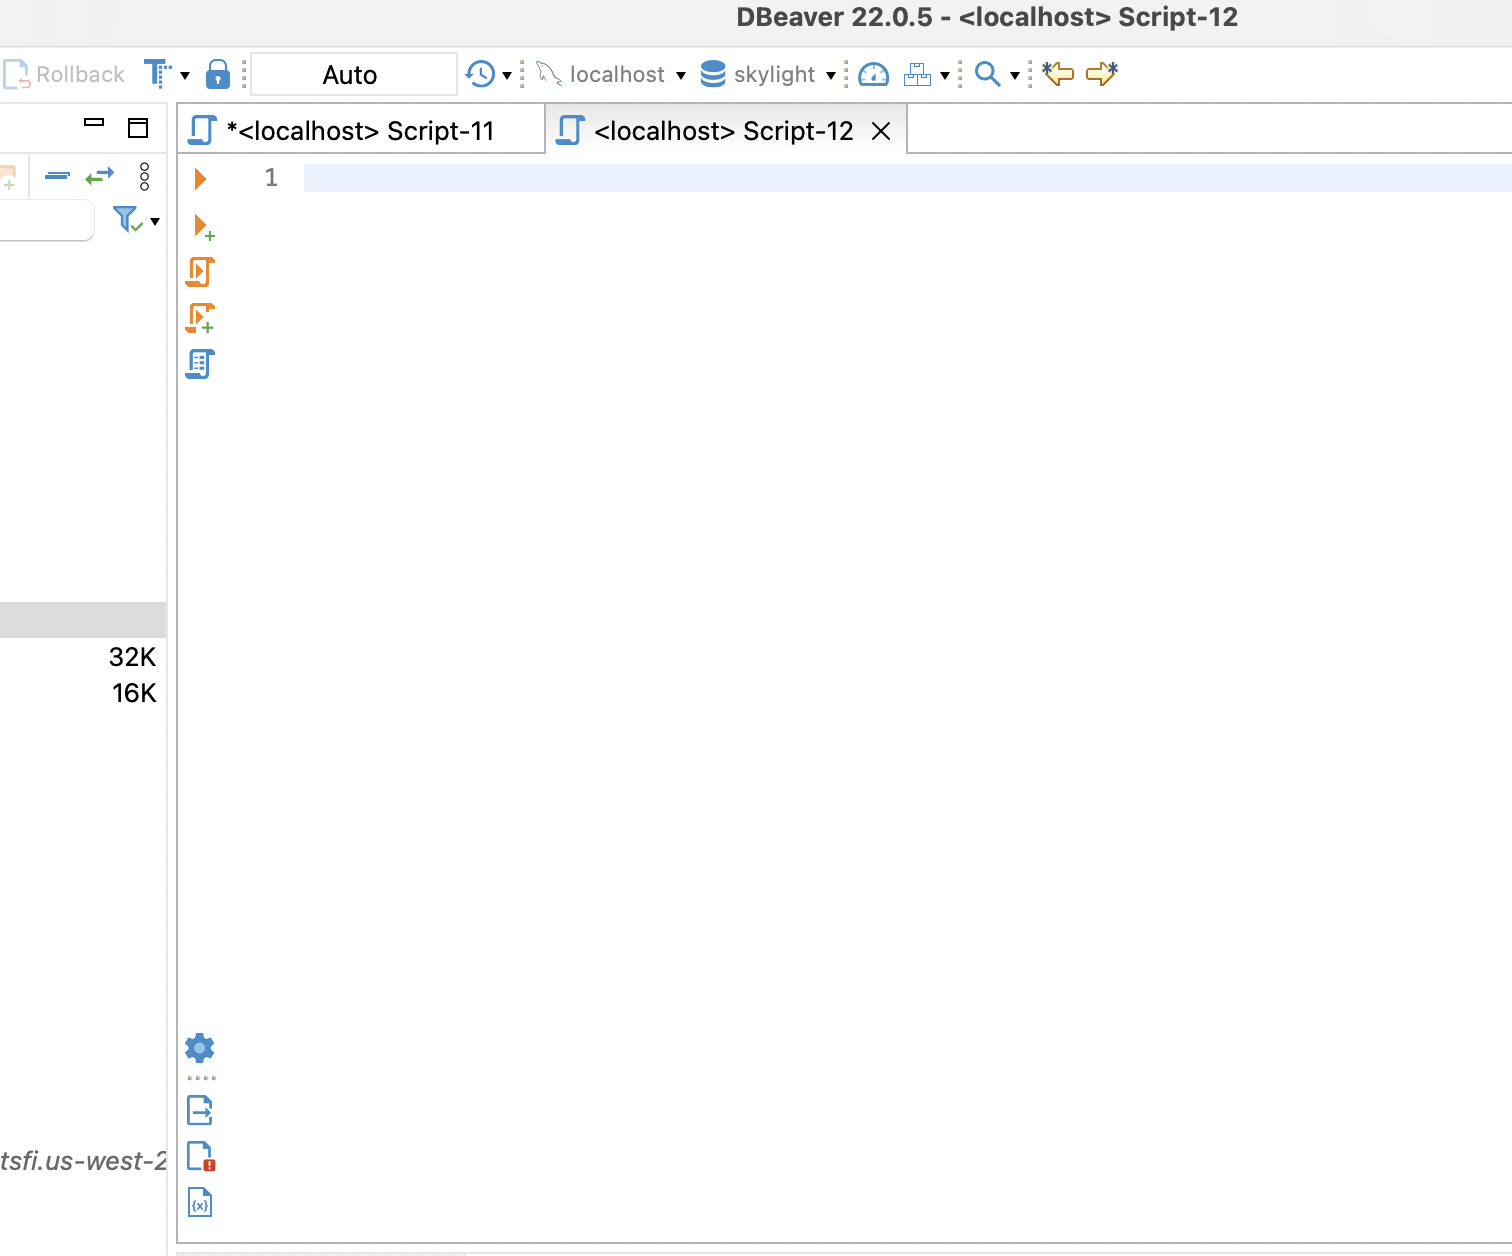
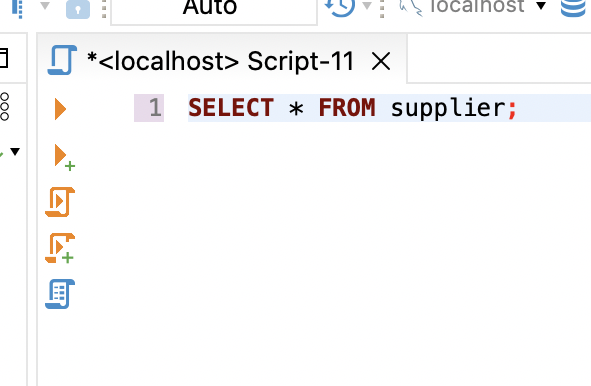
In DBeaver, the SQL editor is called a Script. You can open a new script by clicking on Open SQL Script, and then clicking the New button.
A new script looks like this:
DBeaver offers similar buttons for executing a script and the execution plan. It has a lot fewer buttons on its toolbar, but many of the same options can be found in the menus.
The SQL keywords are highlighted automatically:
Auto Complete
Auto Complete is a feature of many editors that suggests words to complete what you're writing, in order to save time and reduce errors with your SQL.
When you're writing an SQL query, the auto complete feature can be used to write table names, column names, and other objects.
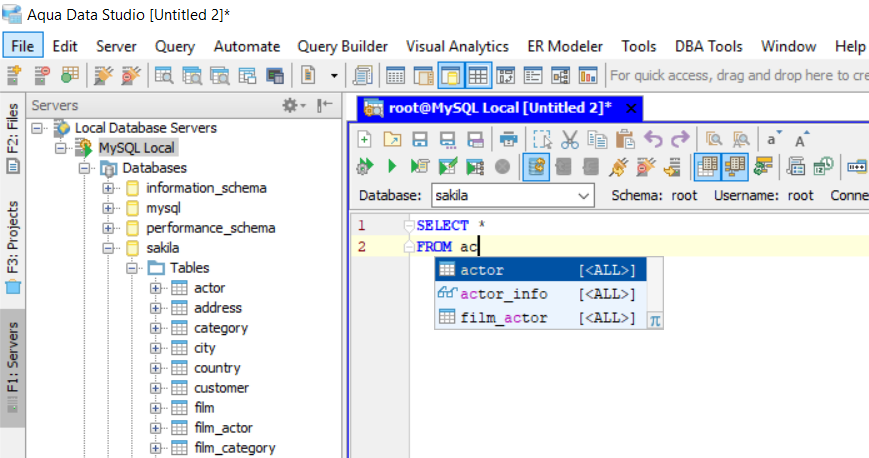
For example, if you type "SELECT * FROM cu", and you have a table called customer, the auto complete will suggest the table "customer" to you. You can select it and the word customer is added to the script.
This works in a similar way in both Aqua Data Studio and DBeaver.
In Aqua Data Studio, it looks like this:
It can appear automatically, or you can trigger it by pressing Ctrl + Space.
In DBeaver, it looks like this:
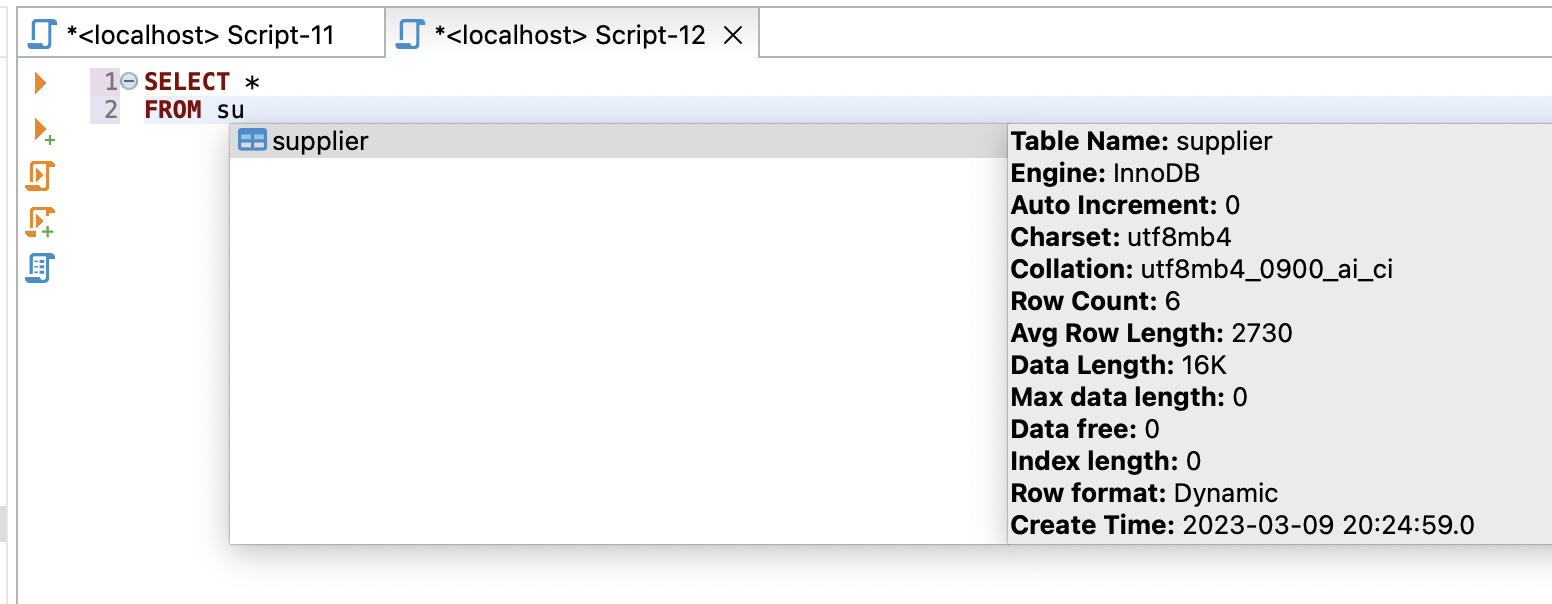
It can also be triggered by pressing Ctrl + Space.
Code Formatting or Beautifier
A common feature in many editors is the ability to automatically format your code. This allows you to click a button and have your SQL formatted according to some defined rules.
It allows you to ensure your code looks readable and adheres to a common format.
In Aqua Data Studio, you can do this by right-clicking on the Query Analyser window and selecting Format Script.
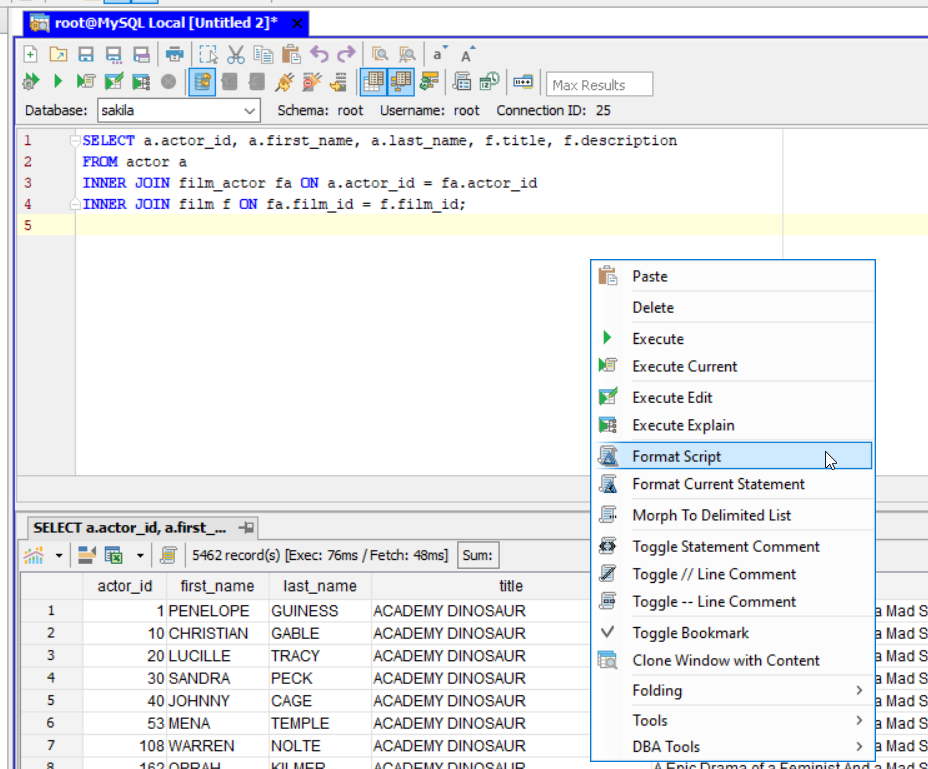
A window will appear allowing you to change some settings for how the formatting is done.
Here's an example of code before the formatting:
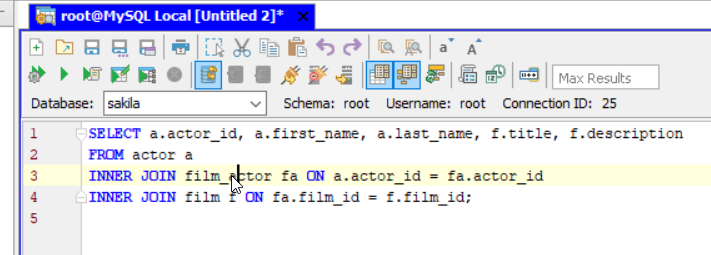
And here's what happens after formatting.
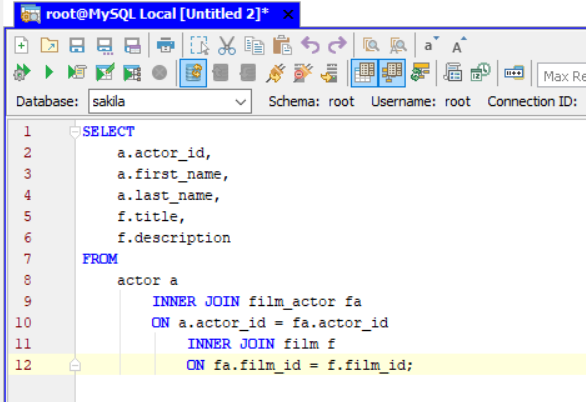
You can see the query has been reformatted.
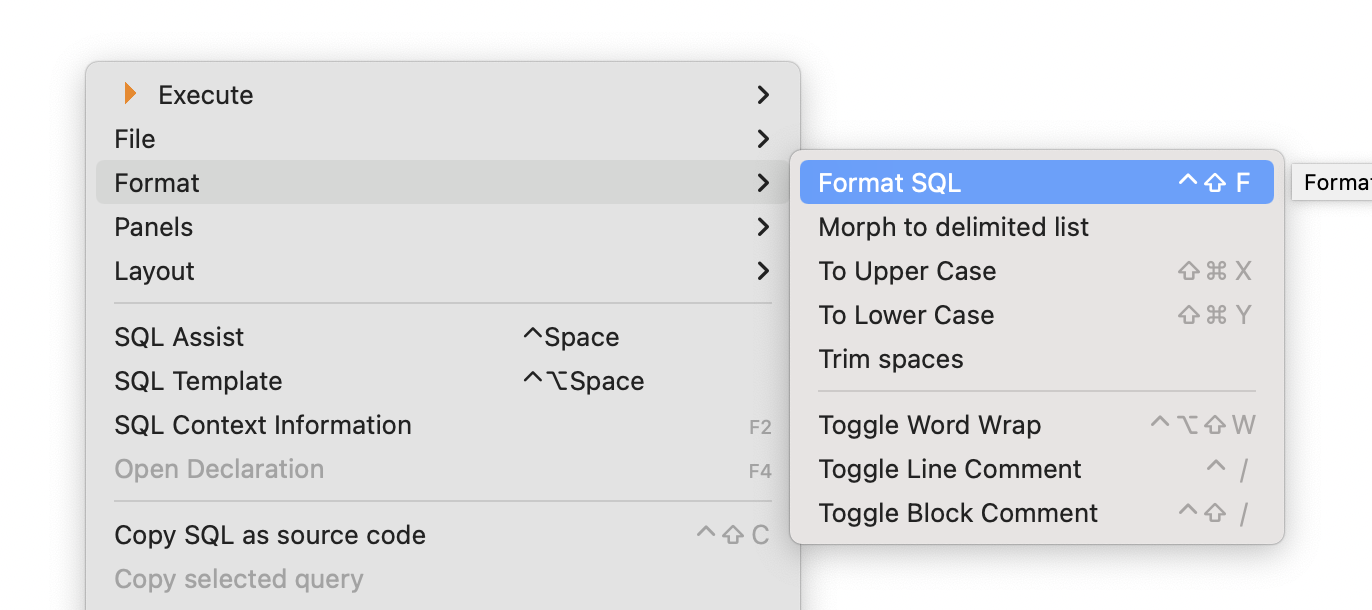
In DBeaver, the SQL can be formatted by right-clicking in the editor, then selecting Format > Format SQL.
Here's the query before it was formatted.
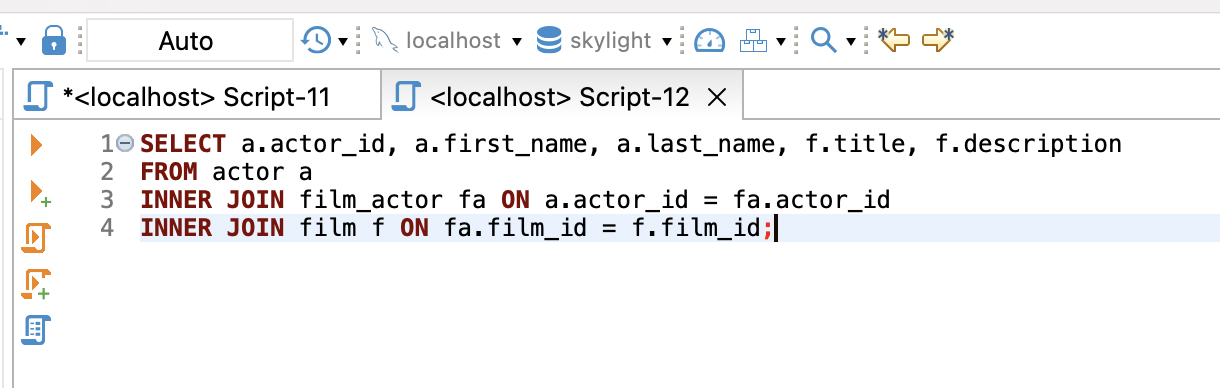
And here's the query after formatting.
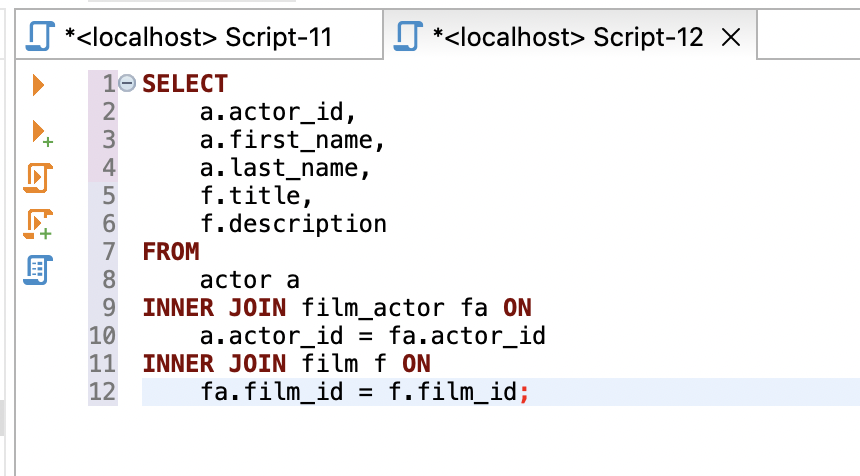
We can see that the formatting has also been updated. The settings for formatting in DBeaver can be changed by going to Preferences, then going to Editors > SQL Editor > Formatting.
Query Results
The query result is the panel that is shown when you run a query. For SELECT queries, this shows the result of the query.
In both Aqua Data Studio and DBeaver, they are shown at the bottom of the screen by default.
In Aqua Data Studio, it looks like this:

You can do a few things with these results:
- Pin them so they are still displayed when another query is run
- See the count of records, the execution time, and the fetch time
- Filter and sort columns
- Search the results
- And more
You can also export the results, which we will see in the next section.
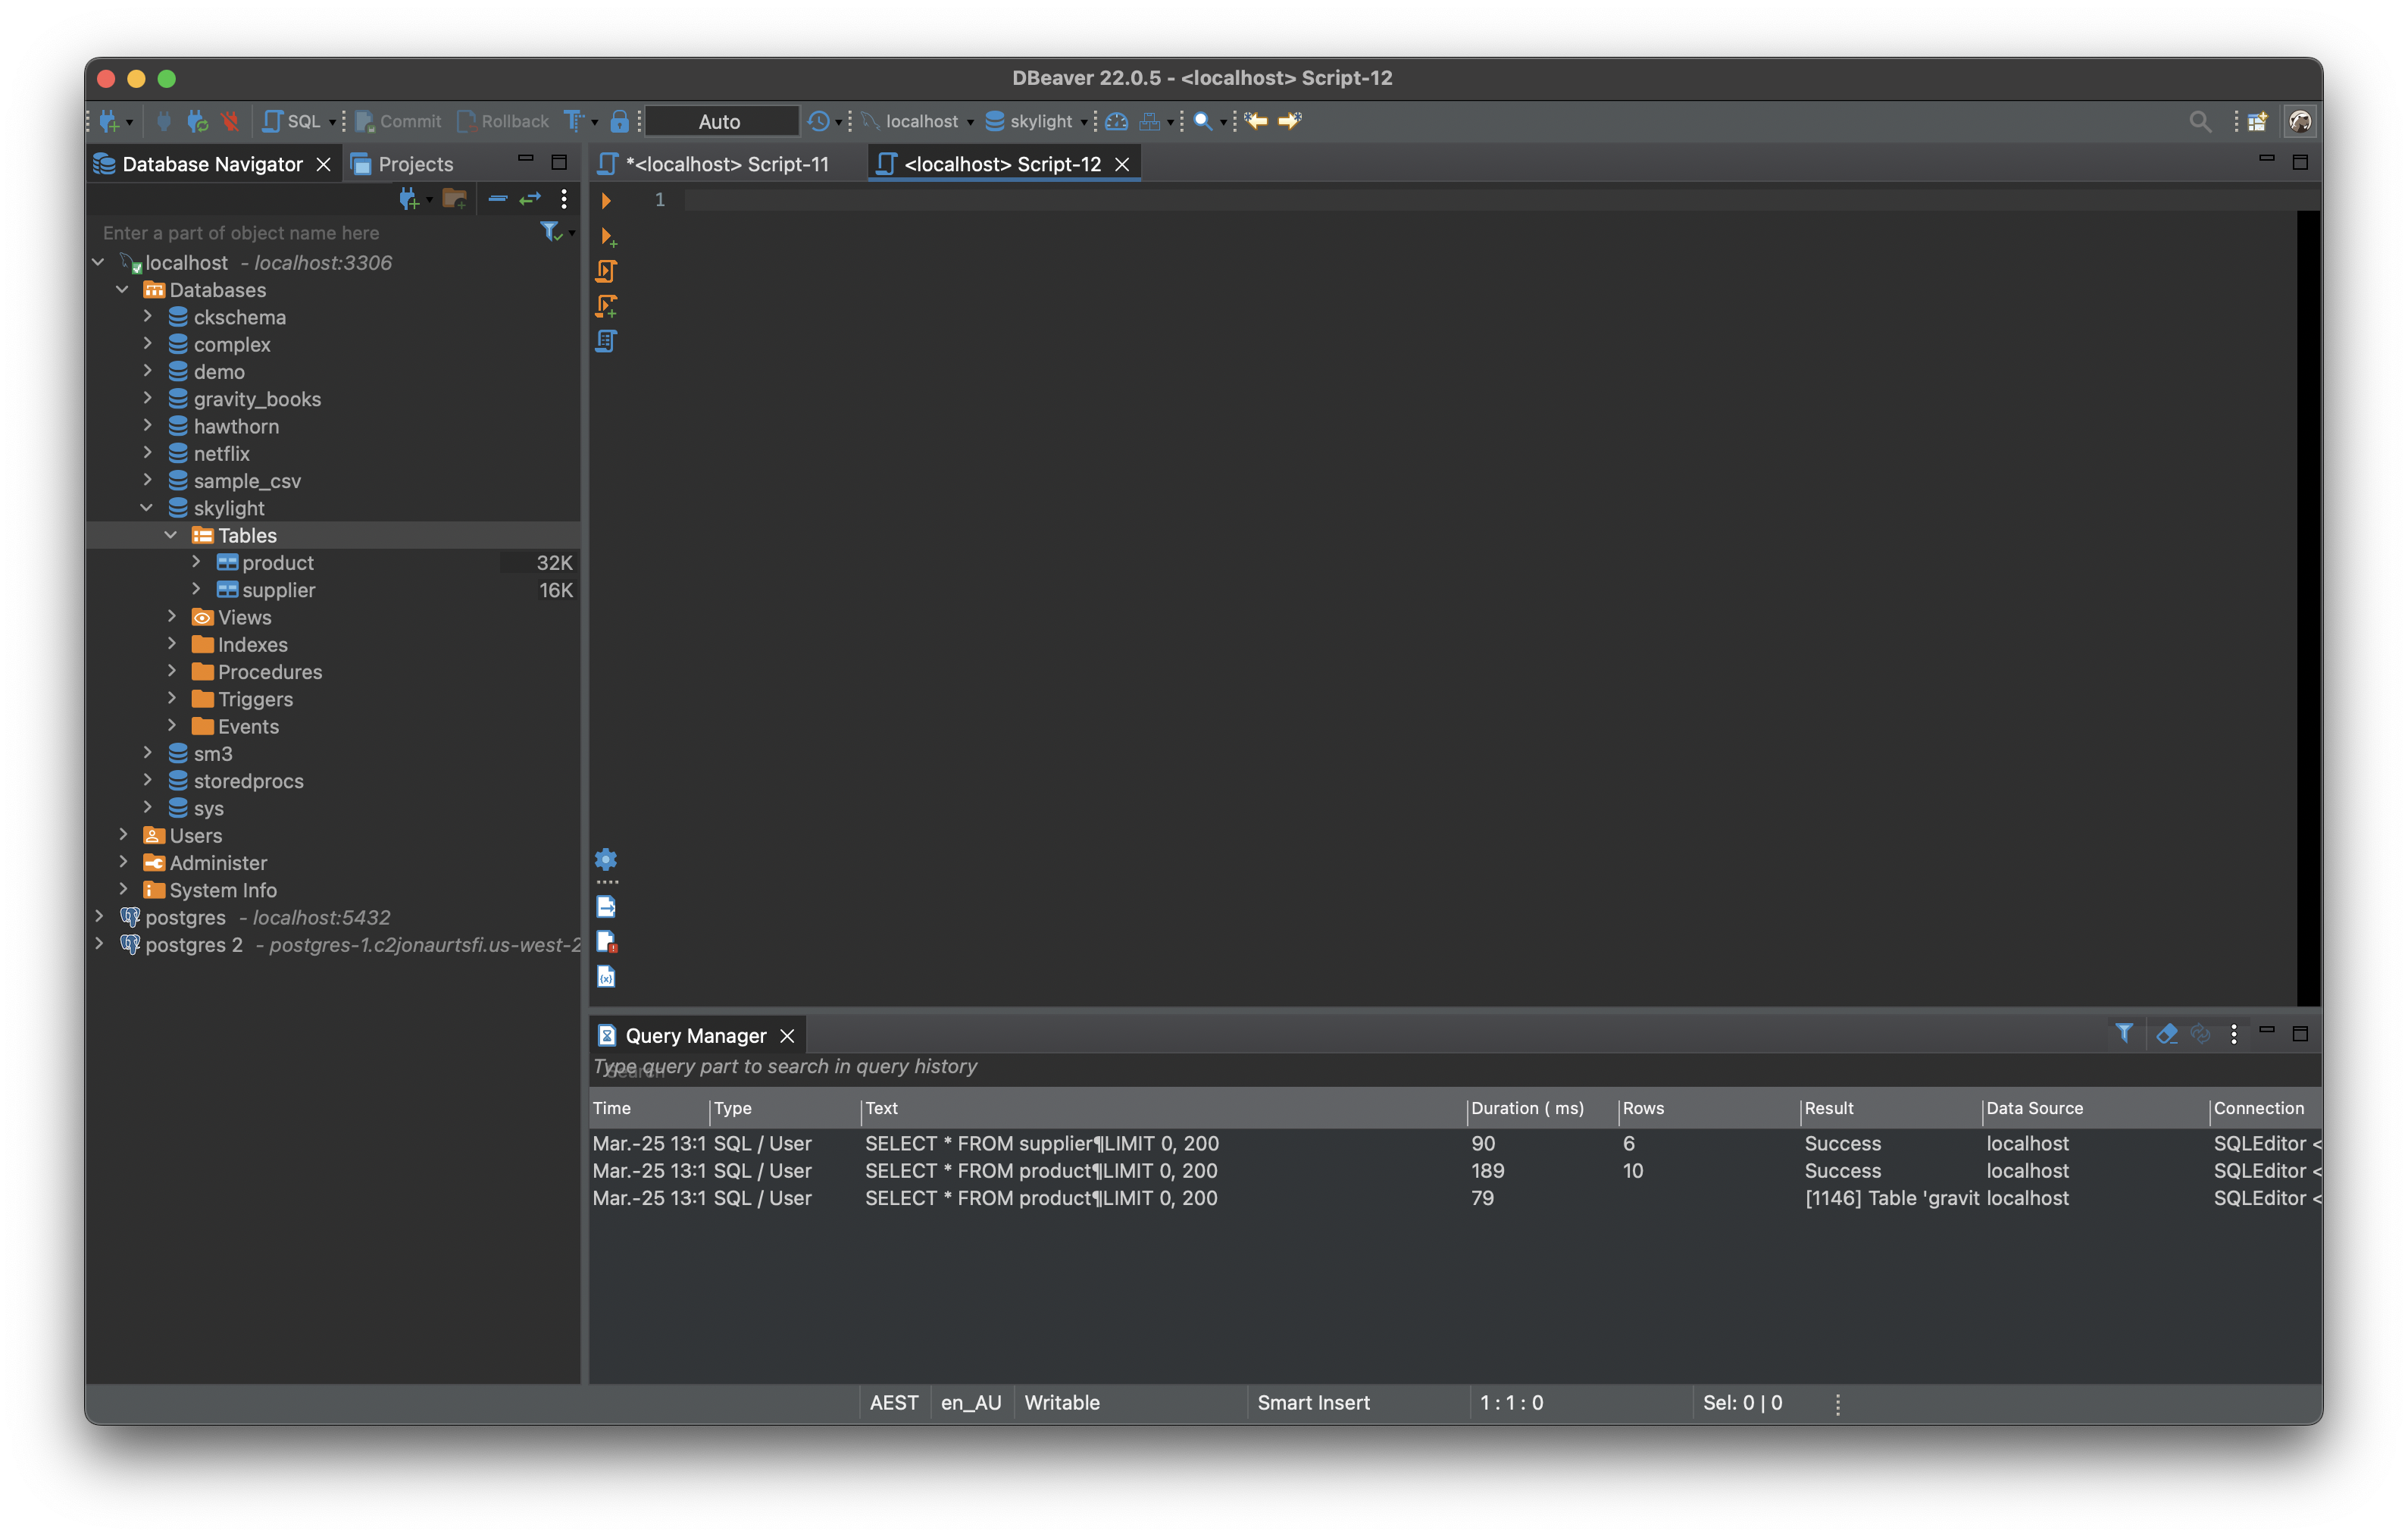
In DBeaver, the query results panel looks like this.
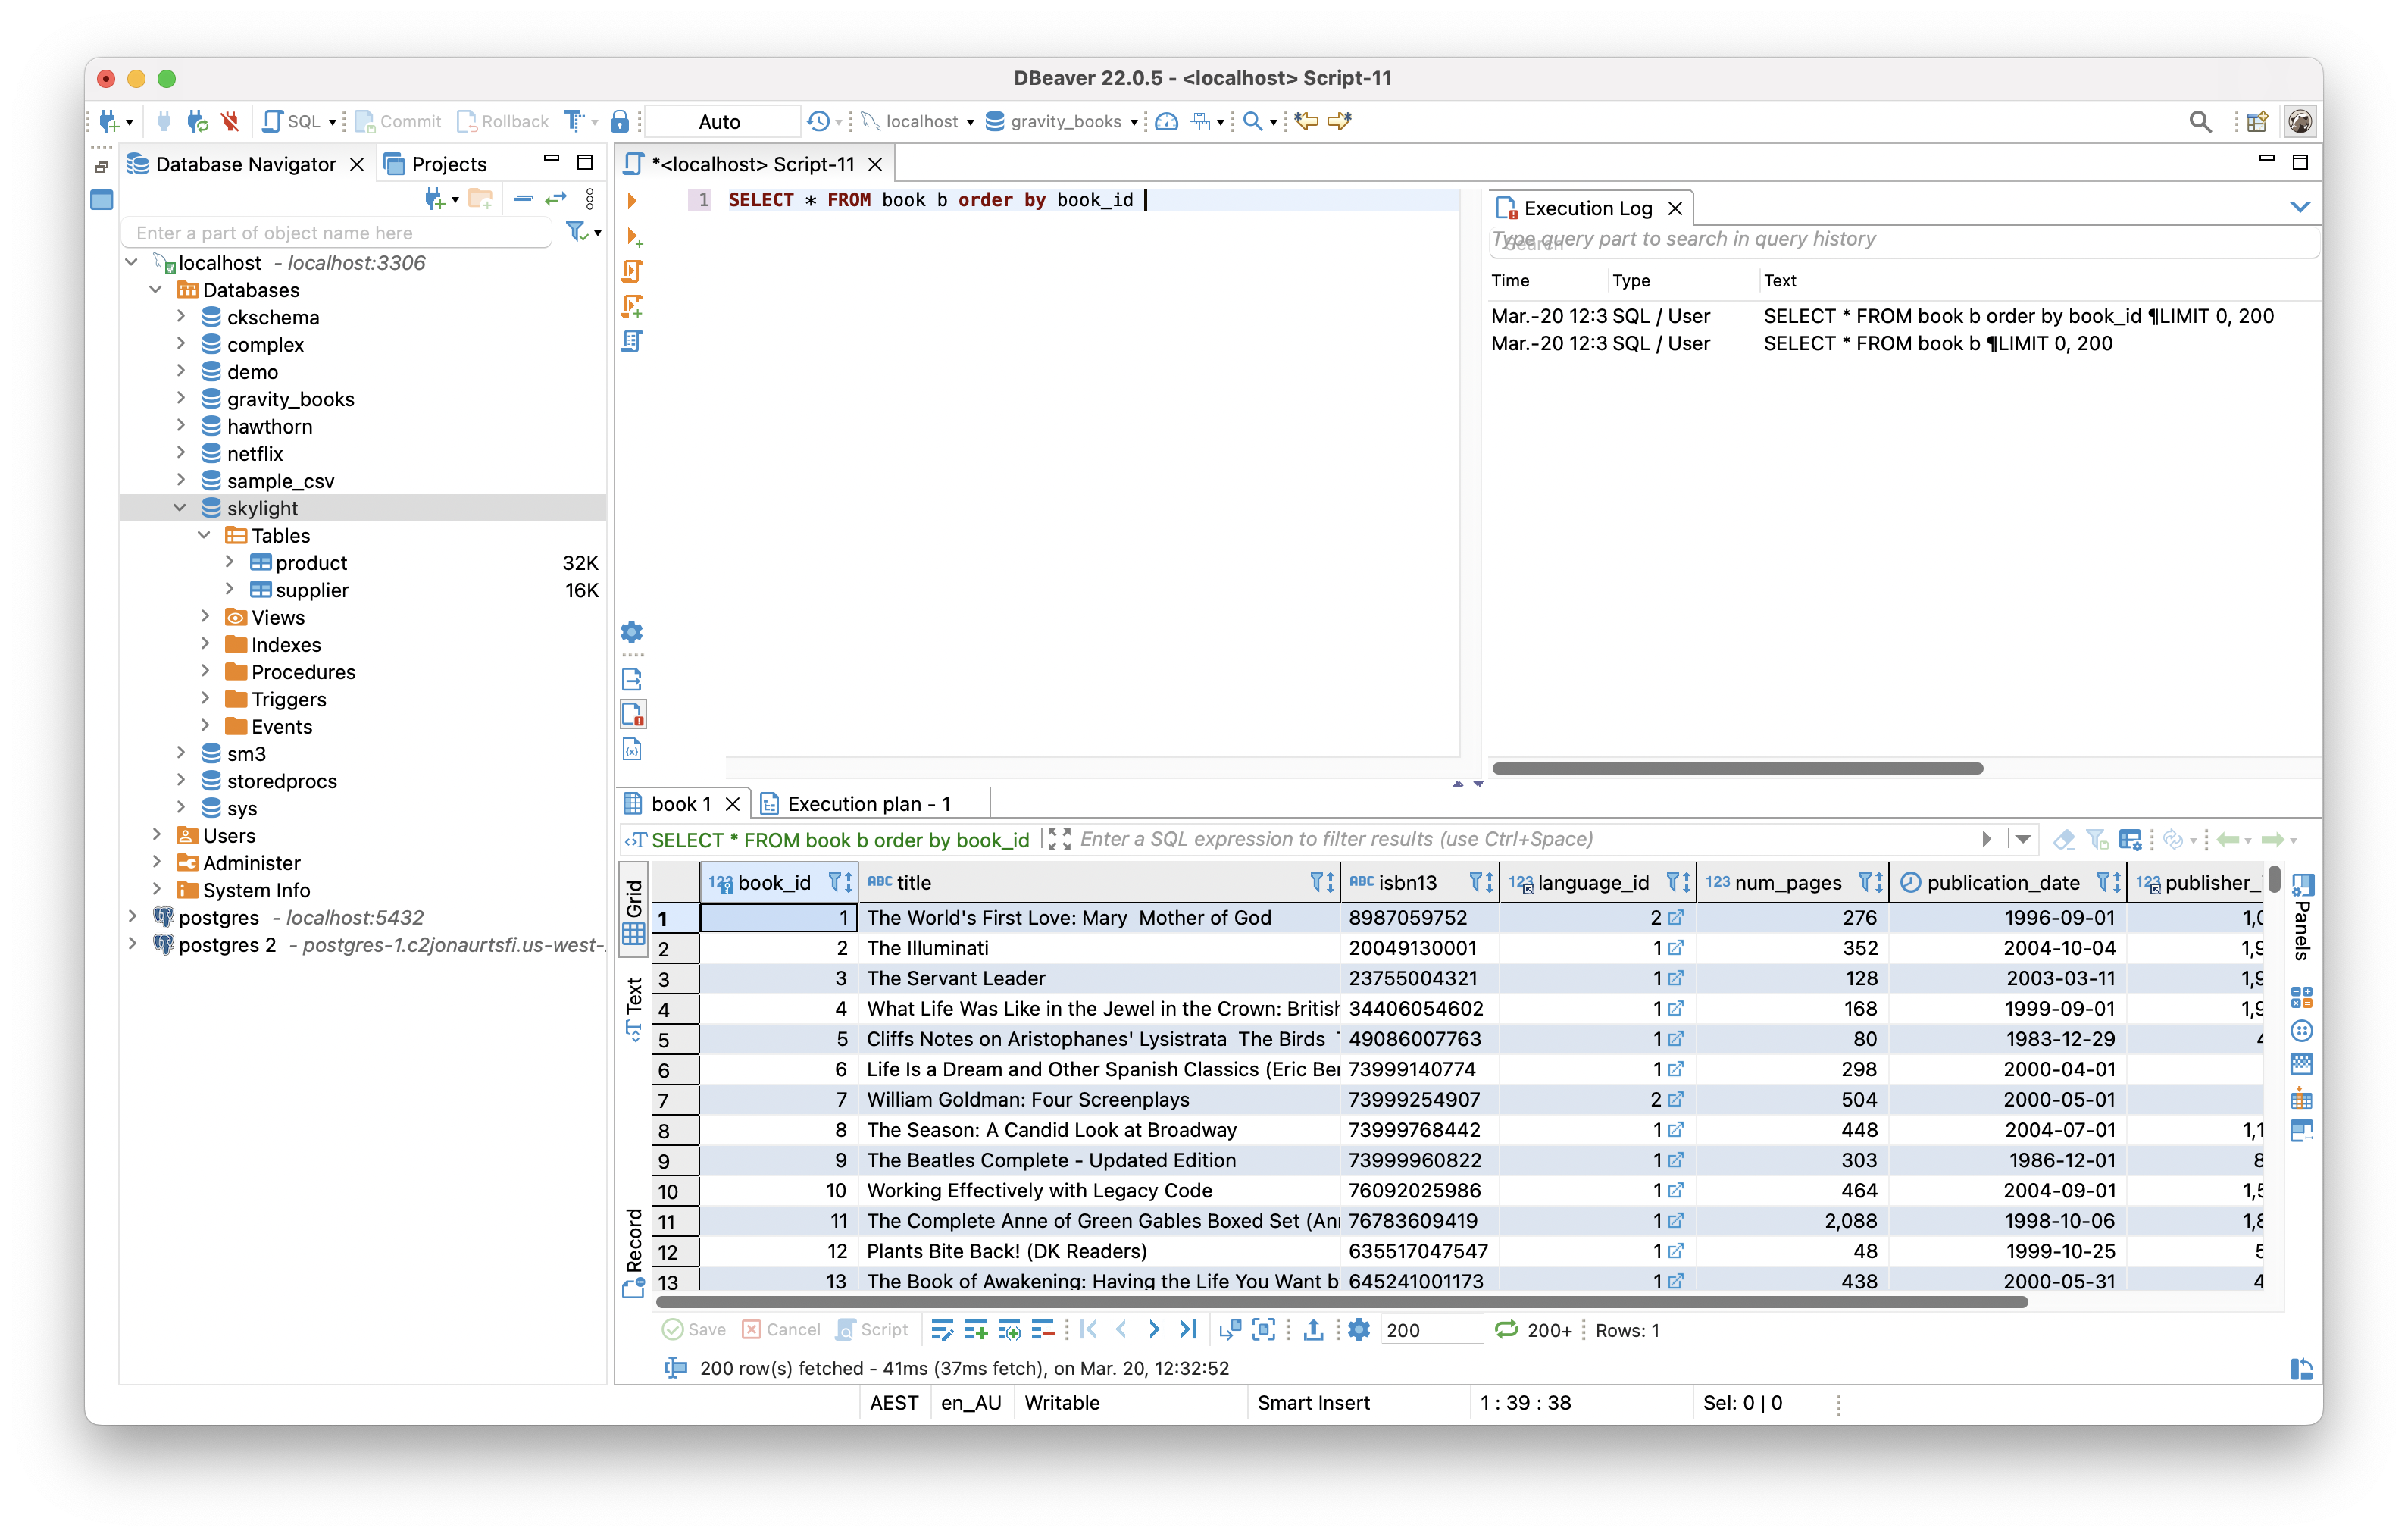
You can do a few things with the results:
- Pin the results tab
- Filter and sort columns
- Search the results
- View the results as text or a grid
- Export results
- Fetch the next batch of rows
Overall the functionality seems very similar between the two tools.
Exporting Results
You can export the results of your query in both Aqua Data Studio and DBeaver.
This is helpful if you want to share your results with other people or perform further analysis on it outside of the tool.
In Aqua Data Studio, you can do this by clicking on the Save Results panel on the toolbar.
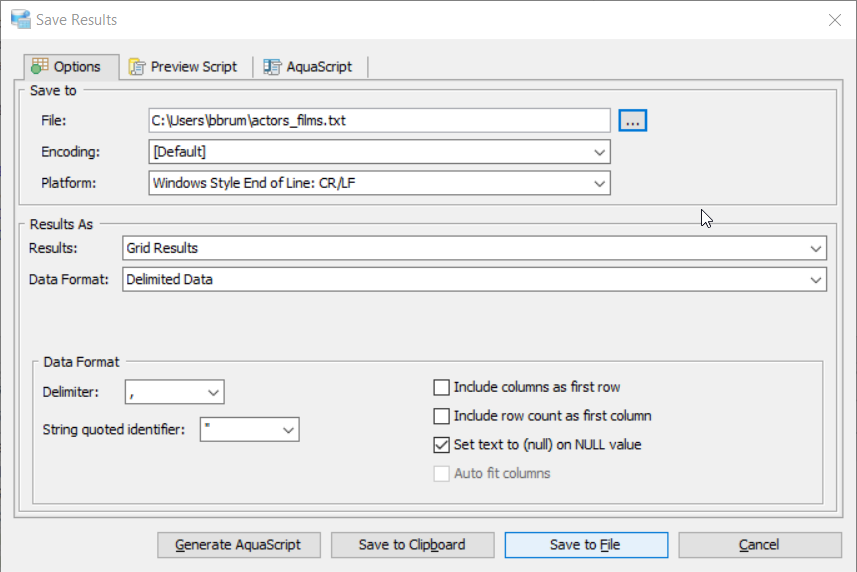
You'll see this window, where you can specify a range of settings for your file. In this example, I've saved my results into a text file that is comma separated.
You can save your results as:
- Delimited data (for example, CSV)
- Insert statements
- XML document
- HTML document
- Excel worksheet
In DBeaver, it's done by clicking the Export Result Set to File button on the bottom of the screen.
You'll see this window, where you can select from a range of file formats and proceed with the export process.
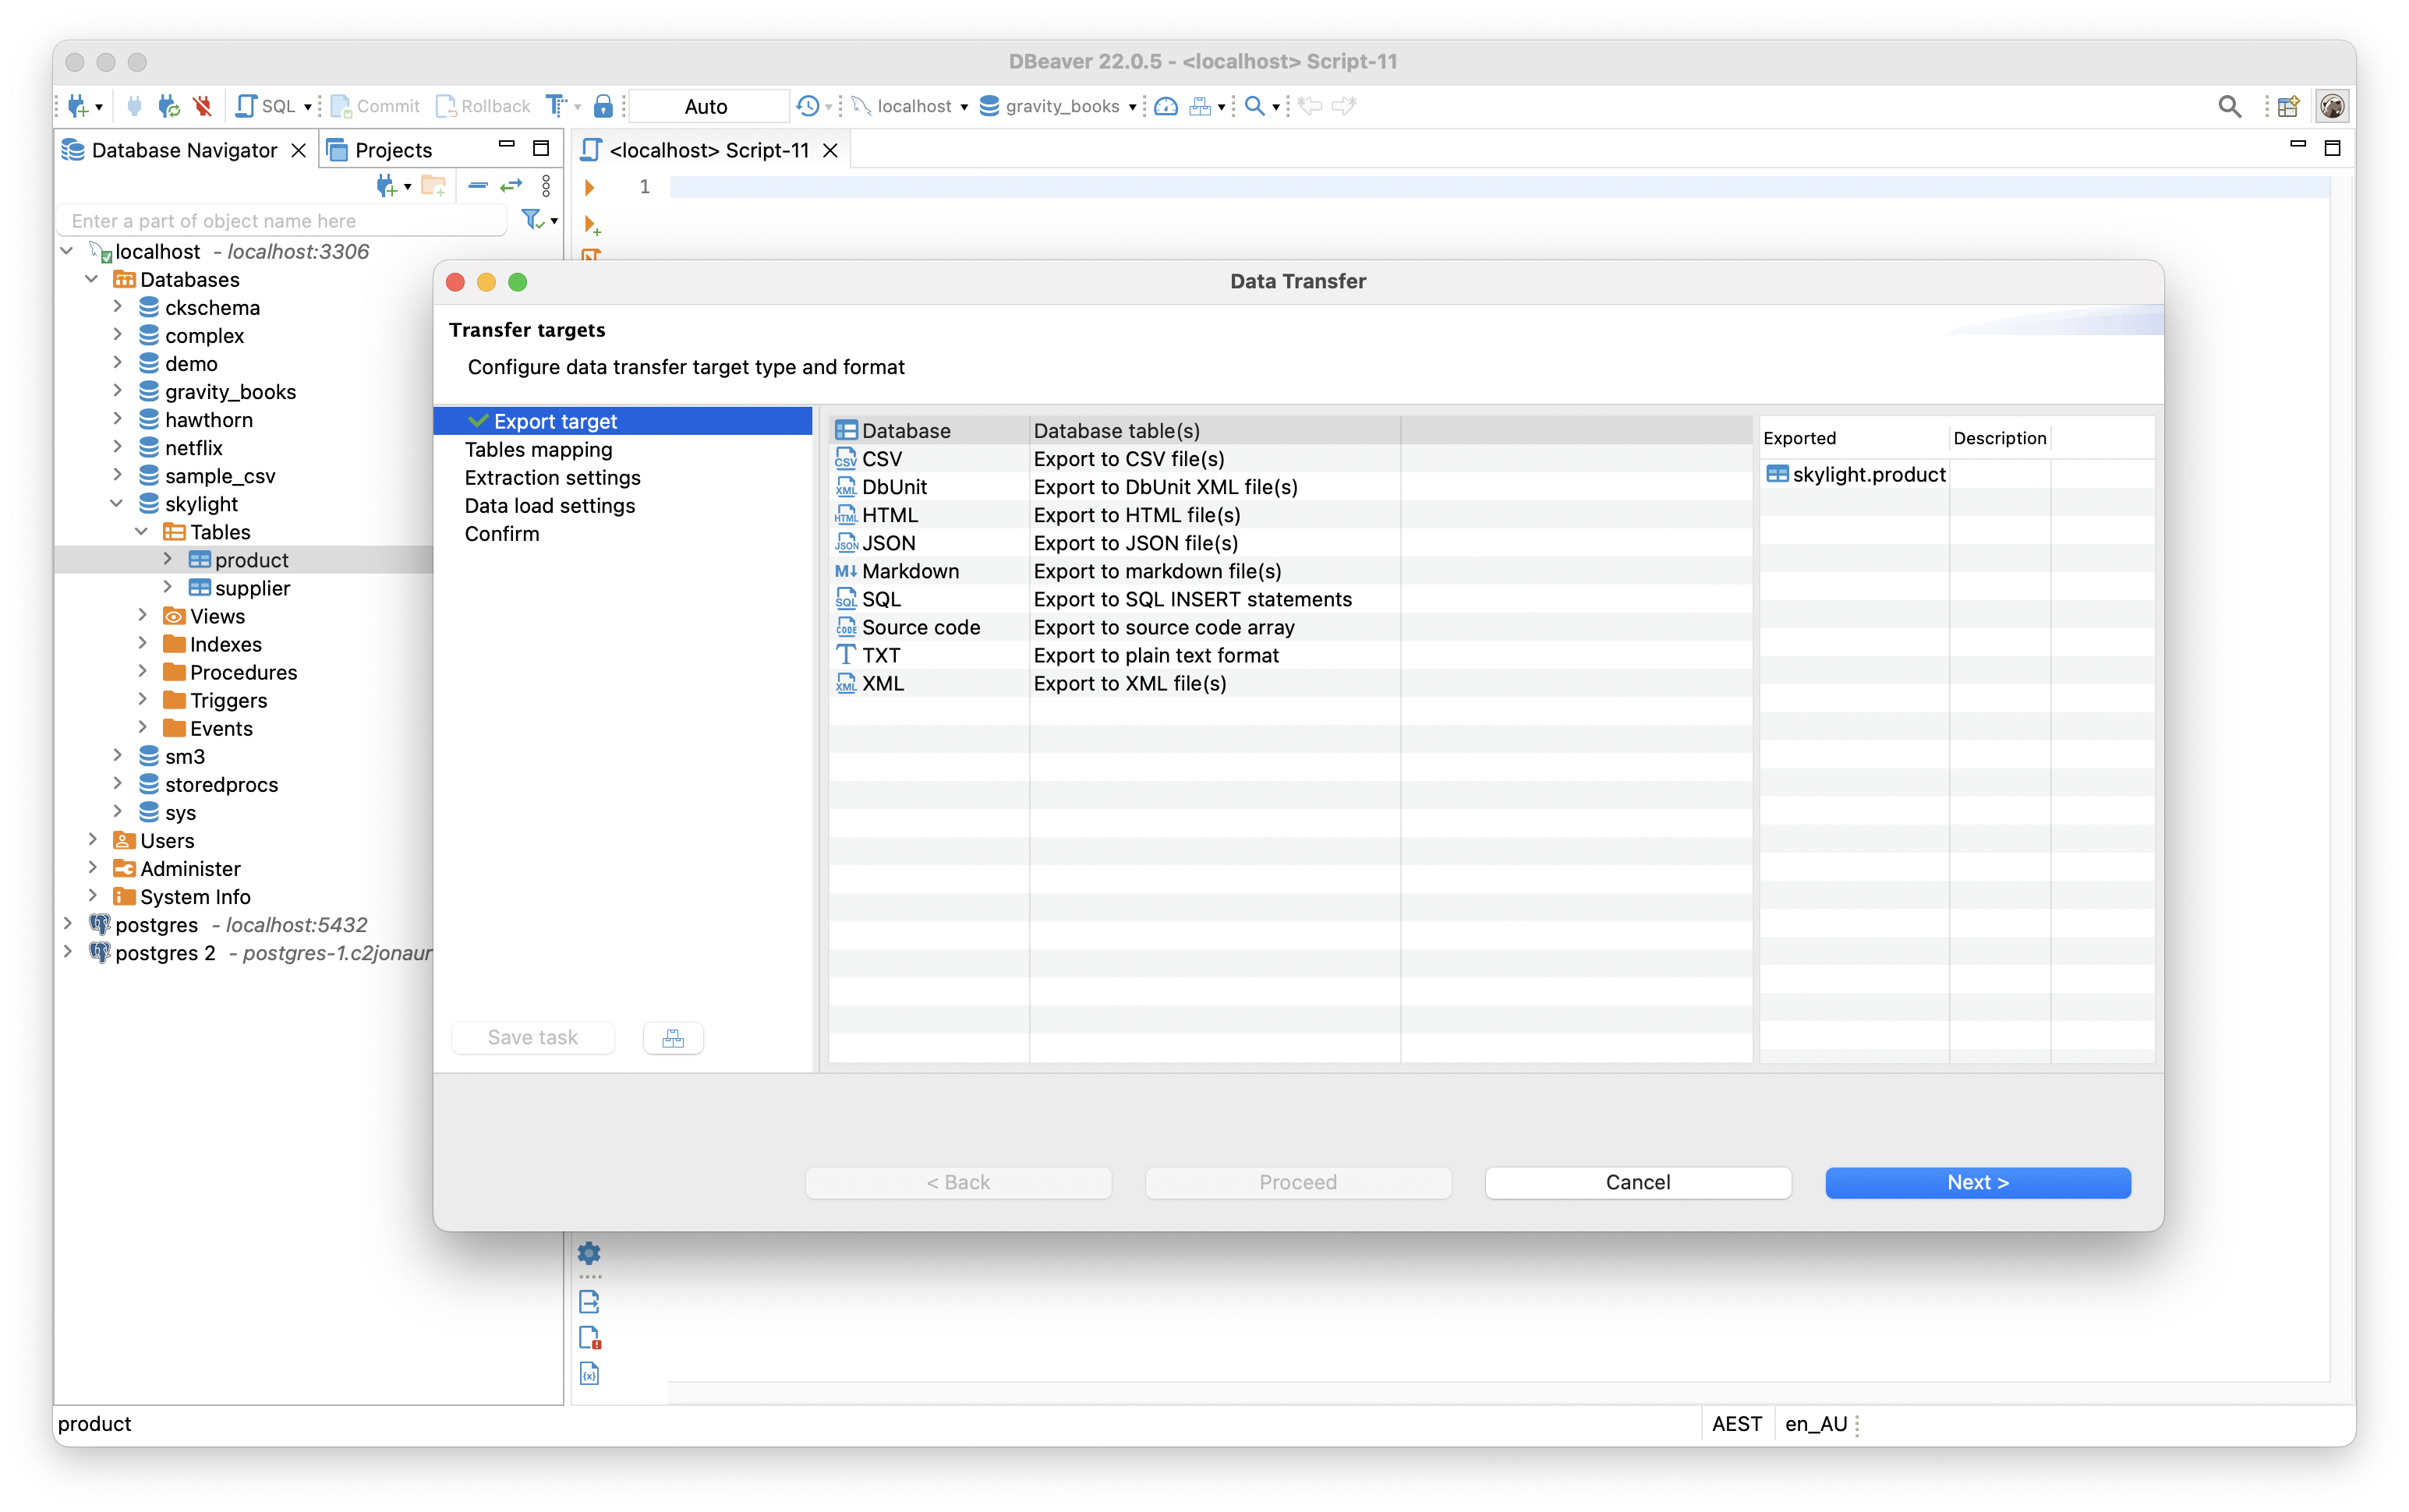
The file formats shown are:
- CSV file
- DbUnit XML
- HTML
- JSON
- Markdown
- SQL
- Source code
- Text
- XML
Explain Plan/Execution Plan
A common feature of many SQL editors is the ability to display an explain plan, or an execution plan. This is an estimate of how the database will execute the query, and can give you insight into how well it would perform and where any slow areas may be.
Both Aqua Data Studio and DBeaver have the ability to display an execution plan.
In Aqua Data Studio, click on the Explain Plan button on the toolbar within the Query Analyzer. You'll see an output like this:
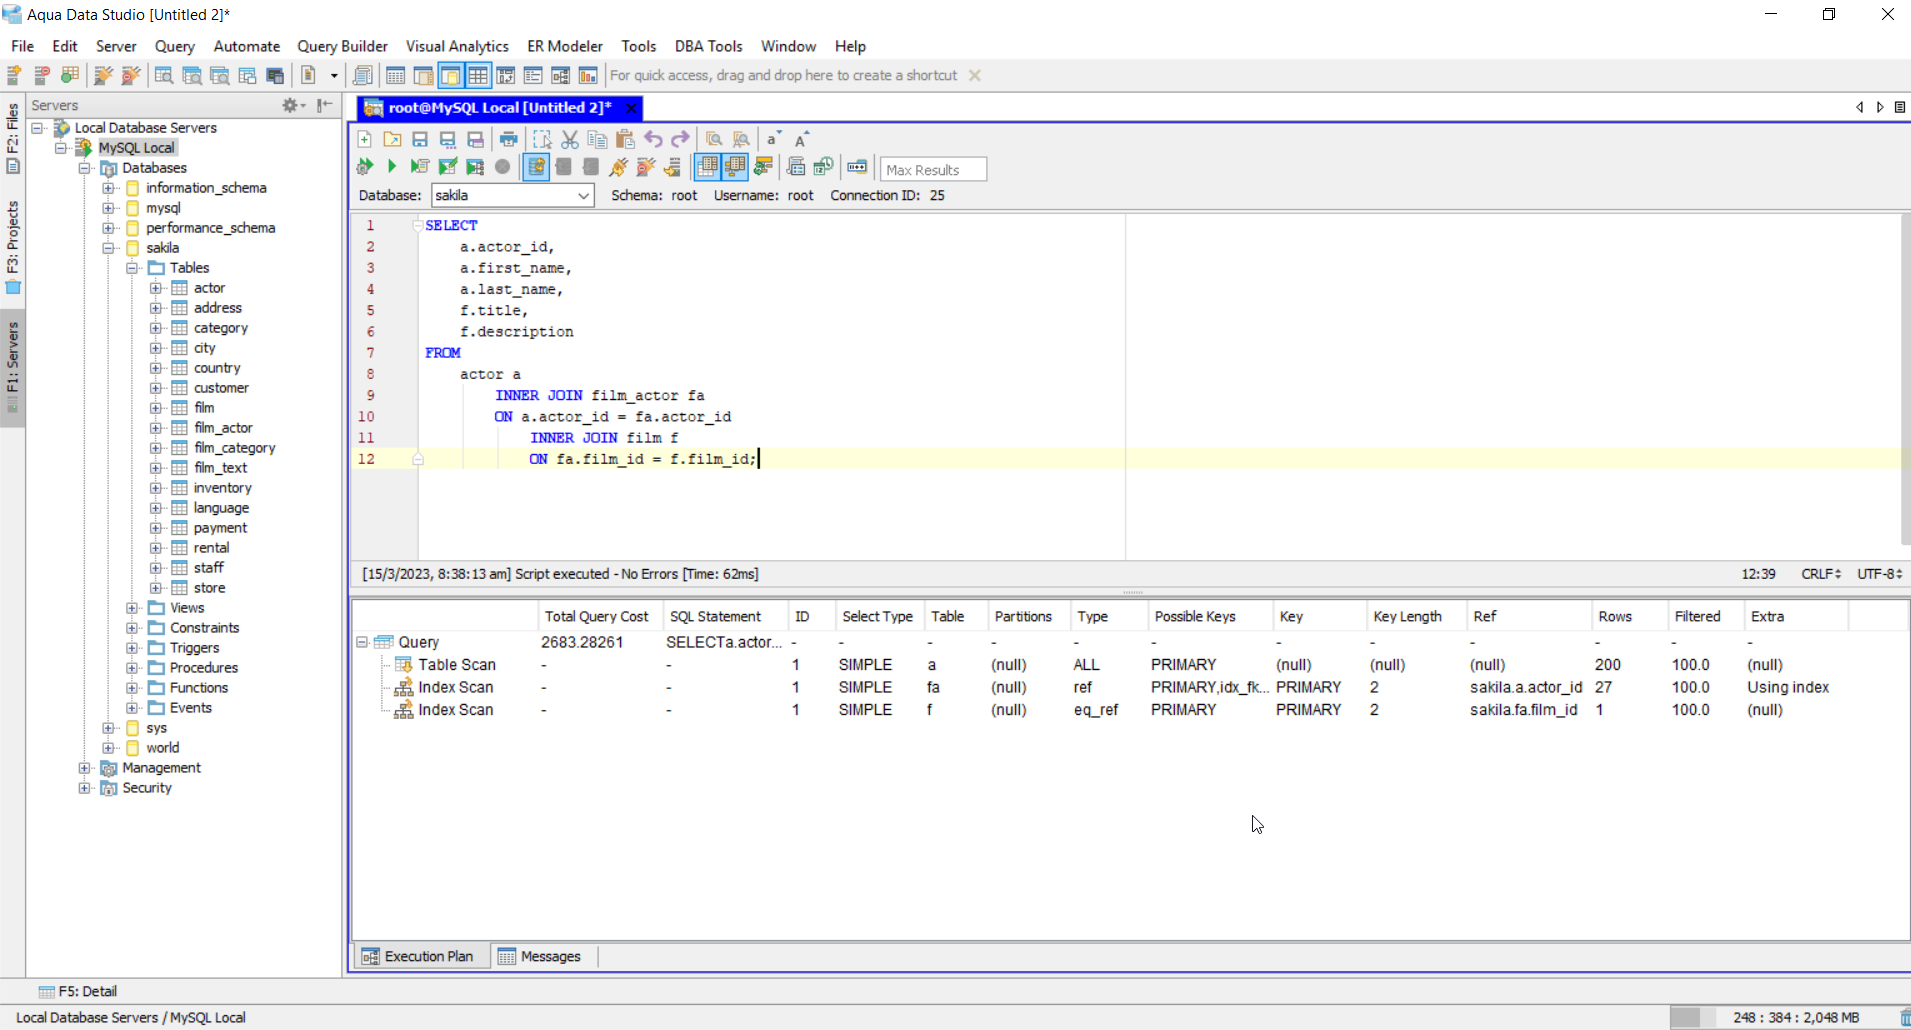
It shows many helpful pieces of information, including:
- The step in the query that was executed (for example, Table Scan, or Index Scan)
- The total query cost
- The SQL statement
- The table or table alias used
- Possible keys
- Columns or references used
In DBeaver, you click on the Explain Execution Plan button inside the SQL editor.
The output looks like this:
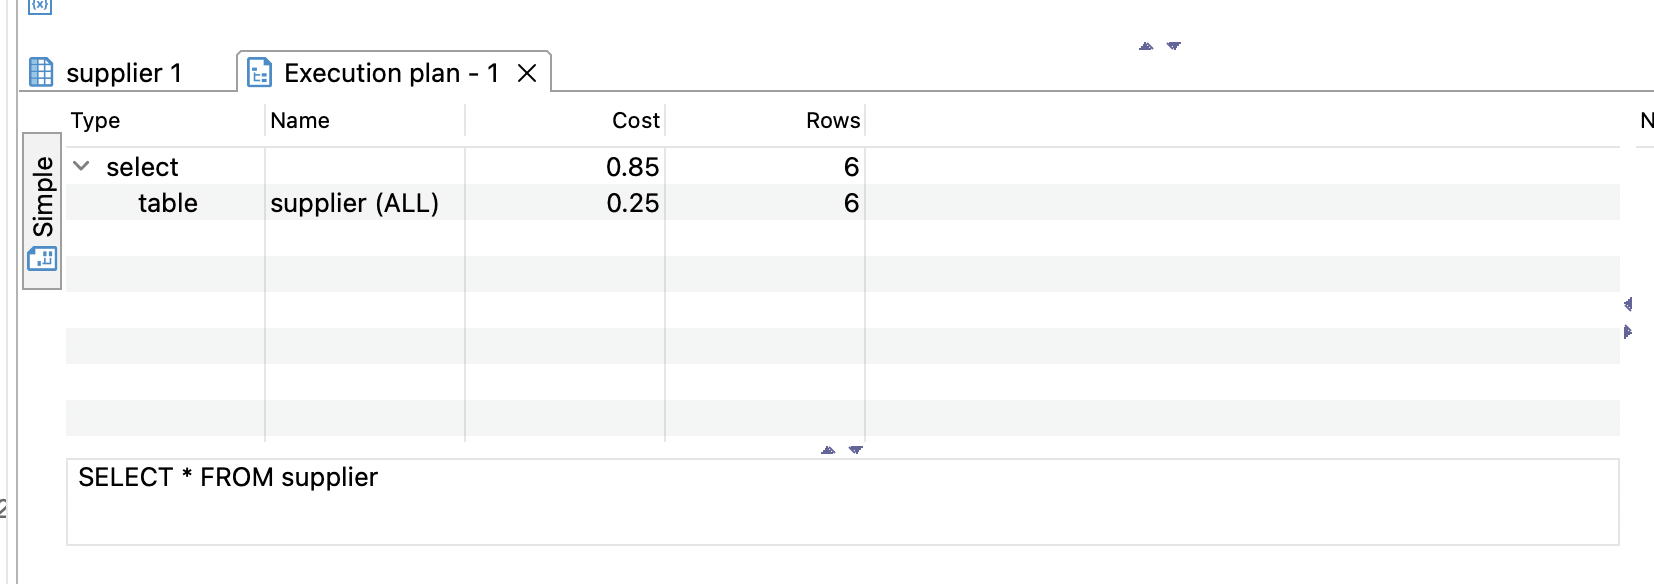
Within DBeaver you see much less than Aqua Data Studio. The information you see in DBeaver includes:
- The name of the step
- The cost of the step and total cost
- The number of rows in each step and the total number
I've found the Aqua Data Studio functionality more comprehensive and I think this would be more useful when working with complex or slower queries to try to improve performance.
SQL History
In some SQL editors, it's possible to view a list of all of the SQL statements that you have executed in the past. This can be helpful if you want to return to a previous query that you didn't save.
This feature is called SQL History and is available in both Aqua Data Studio and DBeaver.
In Aqua Data Studio, you can view the SQL History by clicking the SQL History button on the toolbar.
This is what it looks like:
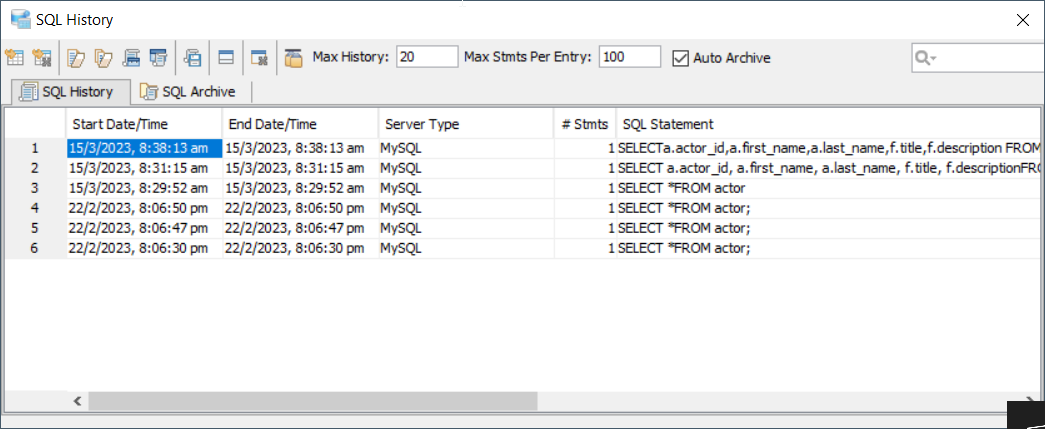
You can see a tab titled SQL History with a table, and each entry is a query that you have run previously.
It shows the start time and end time for each query, which indicates how long it took to run. It shows the database server type, the number of statements included, and the actual SQL statement.
You can do a lot with the entries in this table using the buttons on the toolbar at the top, including running the query again.
In DBeaver, this is called the Execution Log. You can open it by clicking the "Show execution log" button at the bottom left of the SQL editor panel.
It opens a panel on the right, called Execution Log.
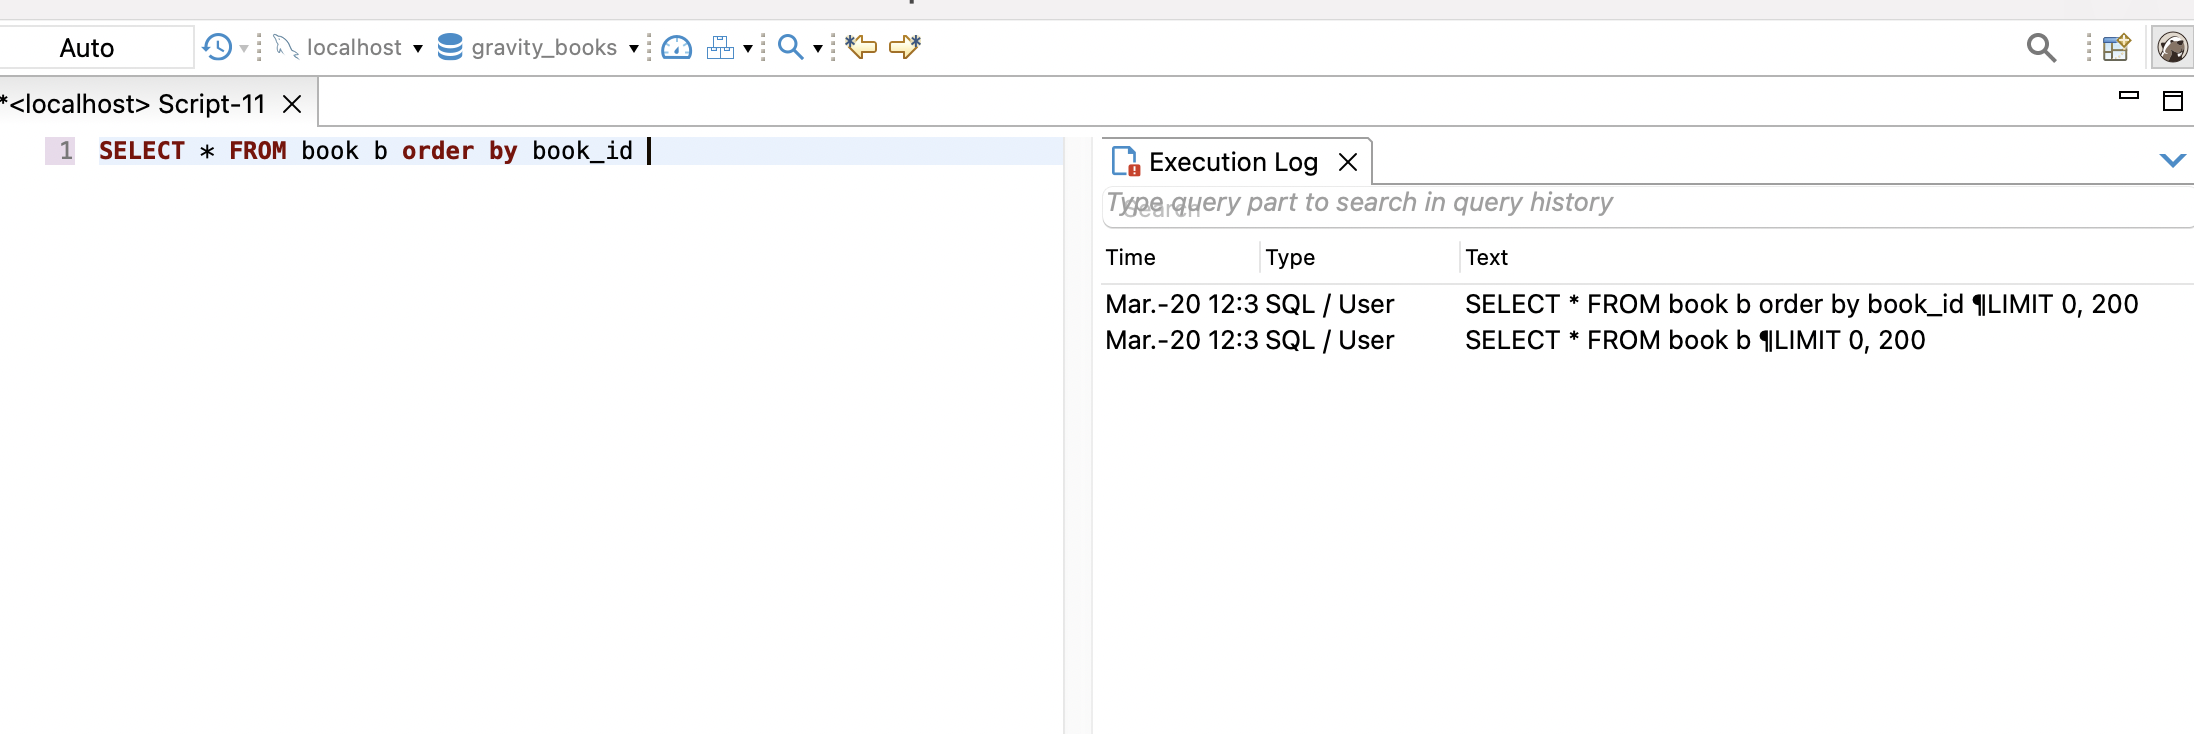
It shows the time the query was run, the type of query, the SQL statement that was run, the duration of the query, the number of rows, and the result (such as Success).
There are a range of things you can do with this panel if you right-click on one of the entries, similar to what you can do in Aqua Data Studio.
MongoJS Query Analyser
Aqua Data Studio has a handy feature called MongoJS Query Analyser.
This feature lets you write JavaScript statements against a MongoDB database, inside a full Query Analyser window with all of the features this window comes with.
You can see the results in a tree view, a grid view, or a text view.
Normally, these commands would have to be run on a command-line interface. However, with this tool in Aqua Data Studio, you can run it as though it is part of the editor.
So, if you work with a MongoDB database, this feature may be useful for you.
DBeaver does not have an equivalent feature.
GUI for Object Creation
You can create objects in SQL by writing a Create statement, such as Create Table or Create View.
In Aqua Data Studio, you can also create objects with a user interface.
To do this, right-click on the object type (such as Tables) in the left panel under your database, and select Create Table.
You'll see a new tab that looks like this.

You can specify a range of information for this new object, including the name as a bare minimum.
Depending on the type of object being created, you can specify much more information. For example, if you're creating a table, you can specify the columns and data types, constraints, comments, and even preview the SQL that will get run when you create the table.
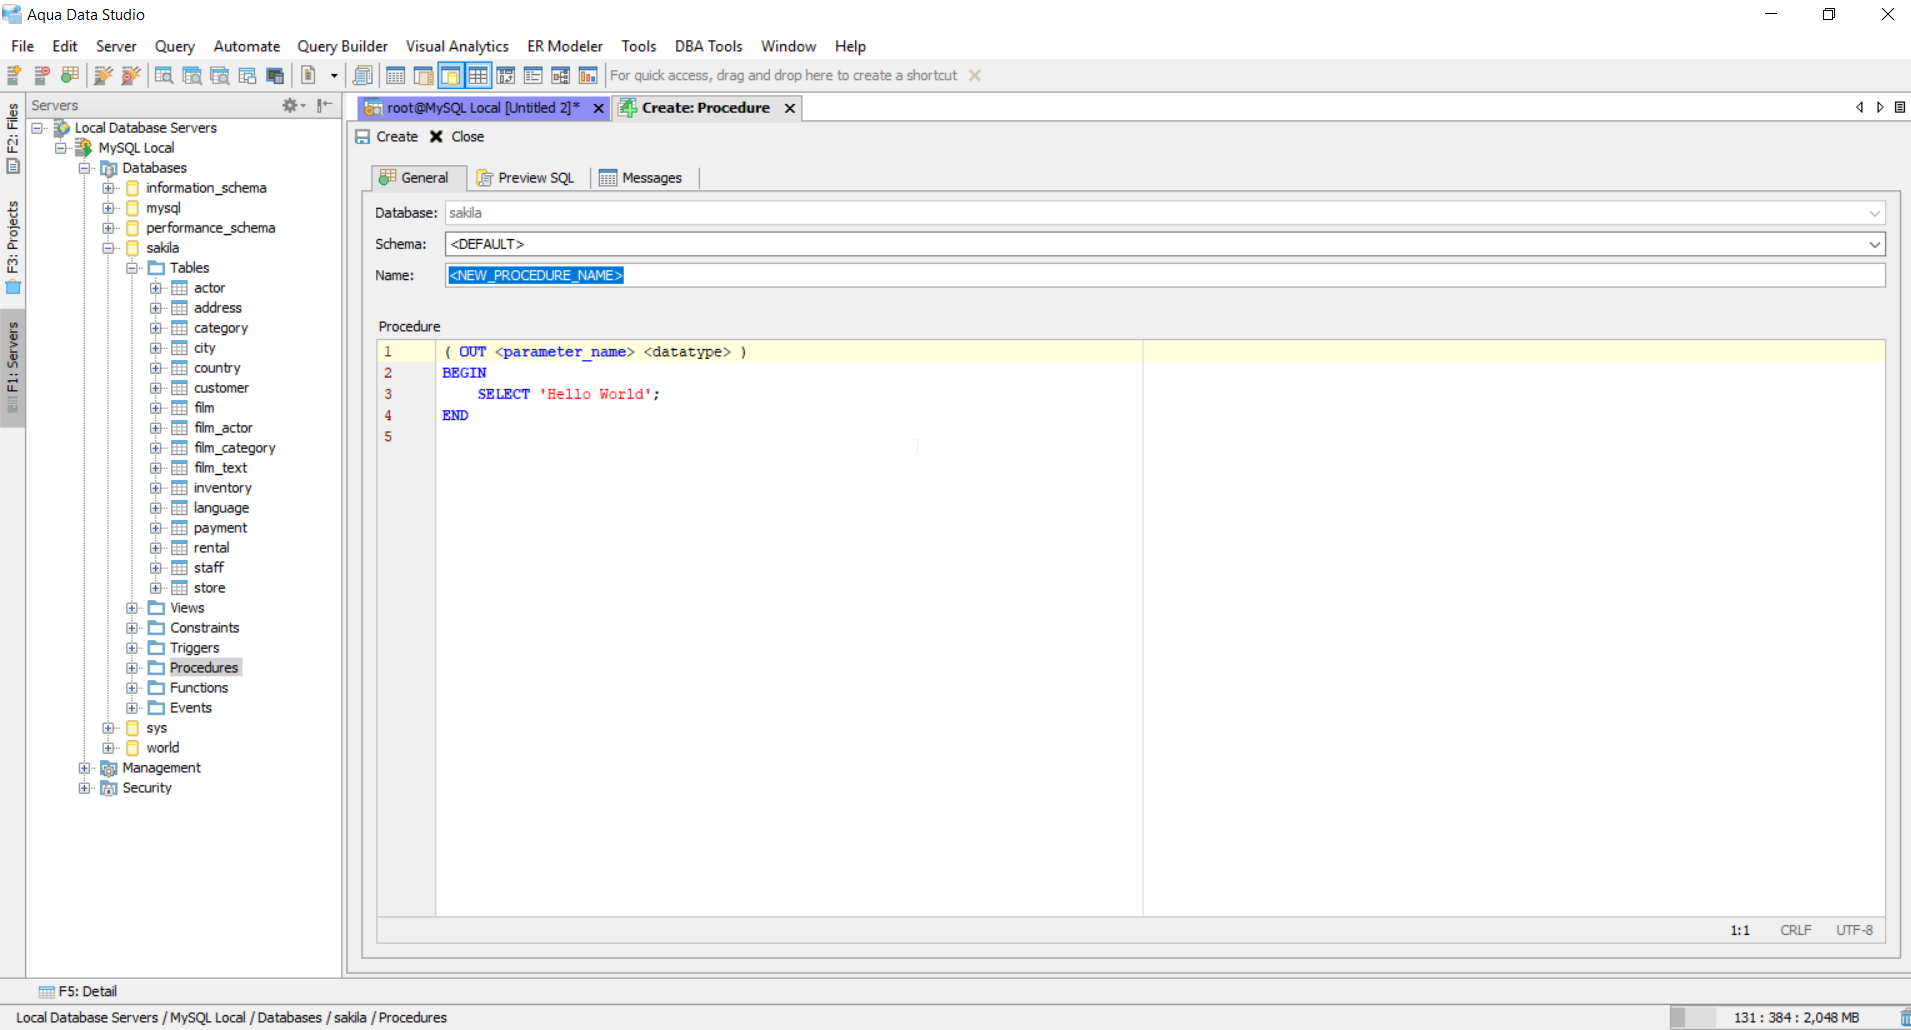
If you're creating a procedure, the tab looks like this:
In DBeaver there is a similar feature. Right-click on the Tables entry in the database browser and select Create Table. You'l be shown a new tab for creating the object.
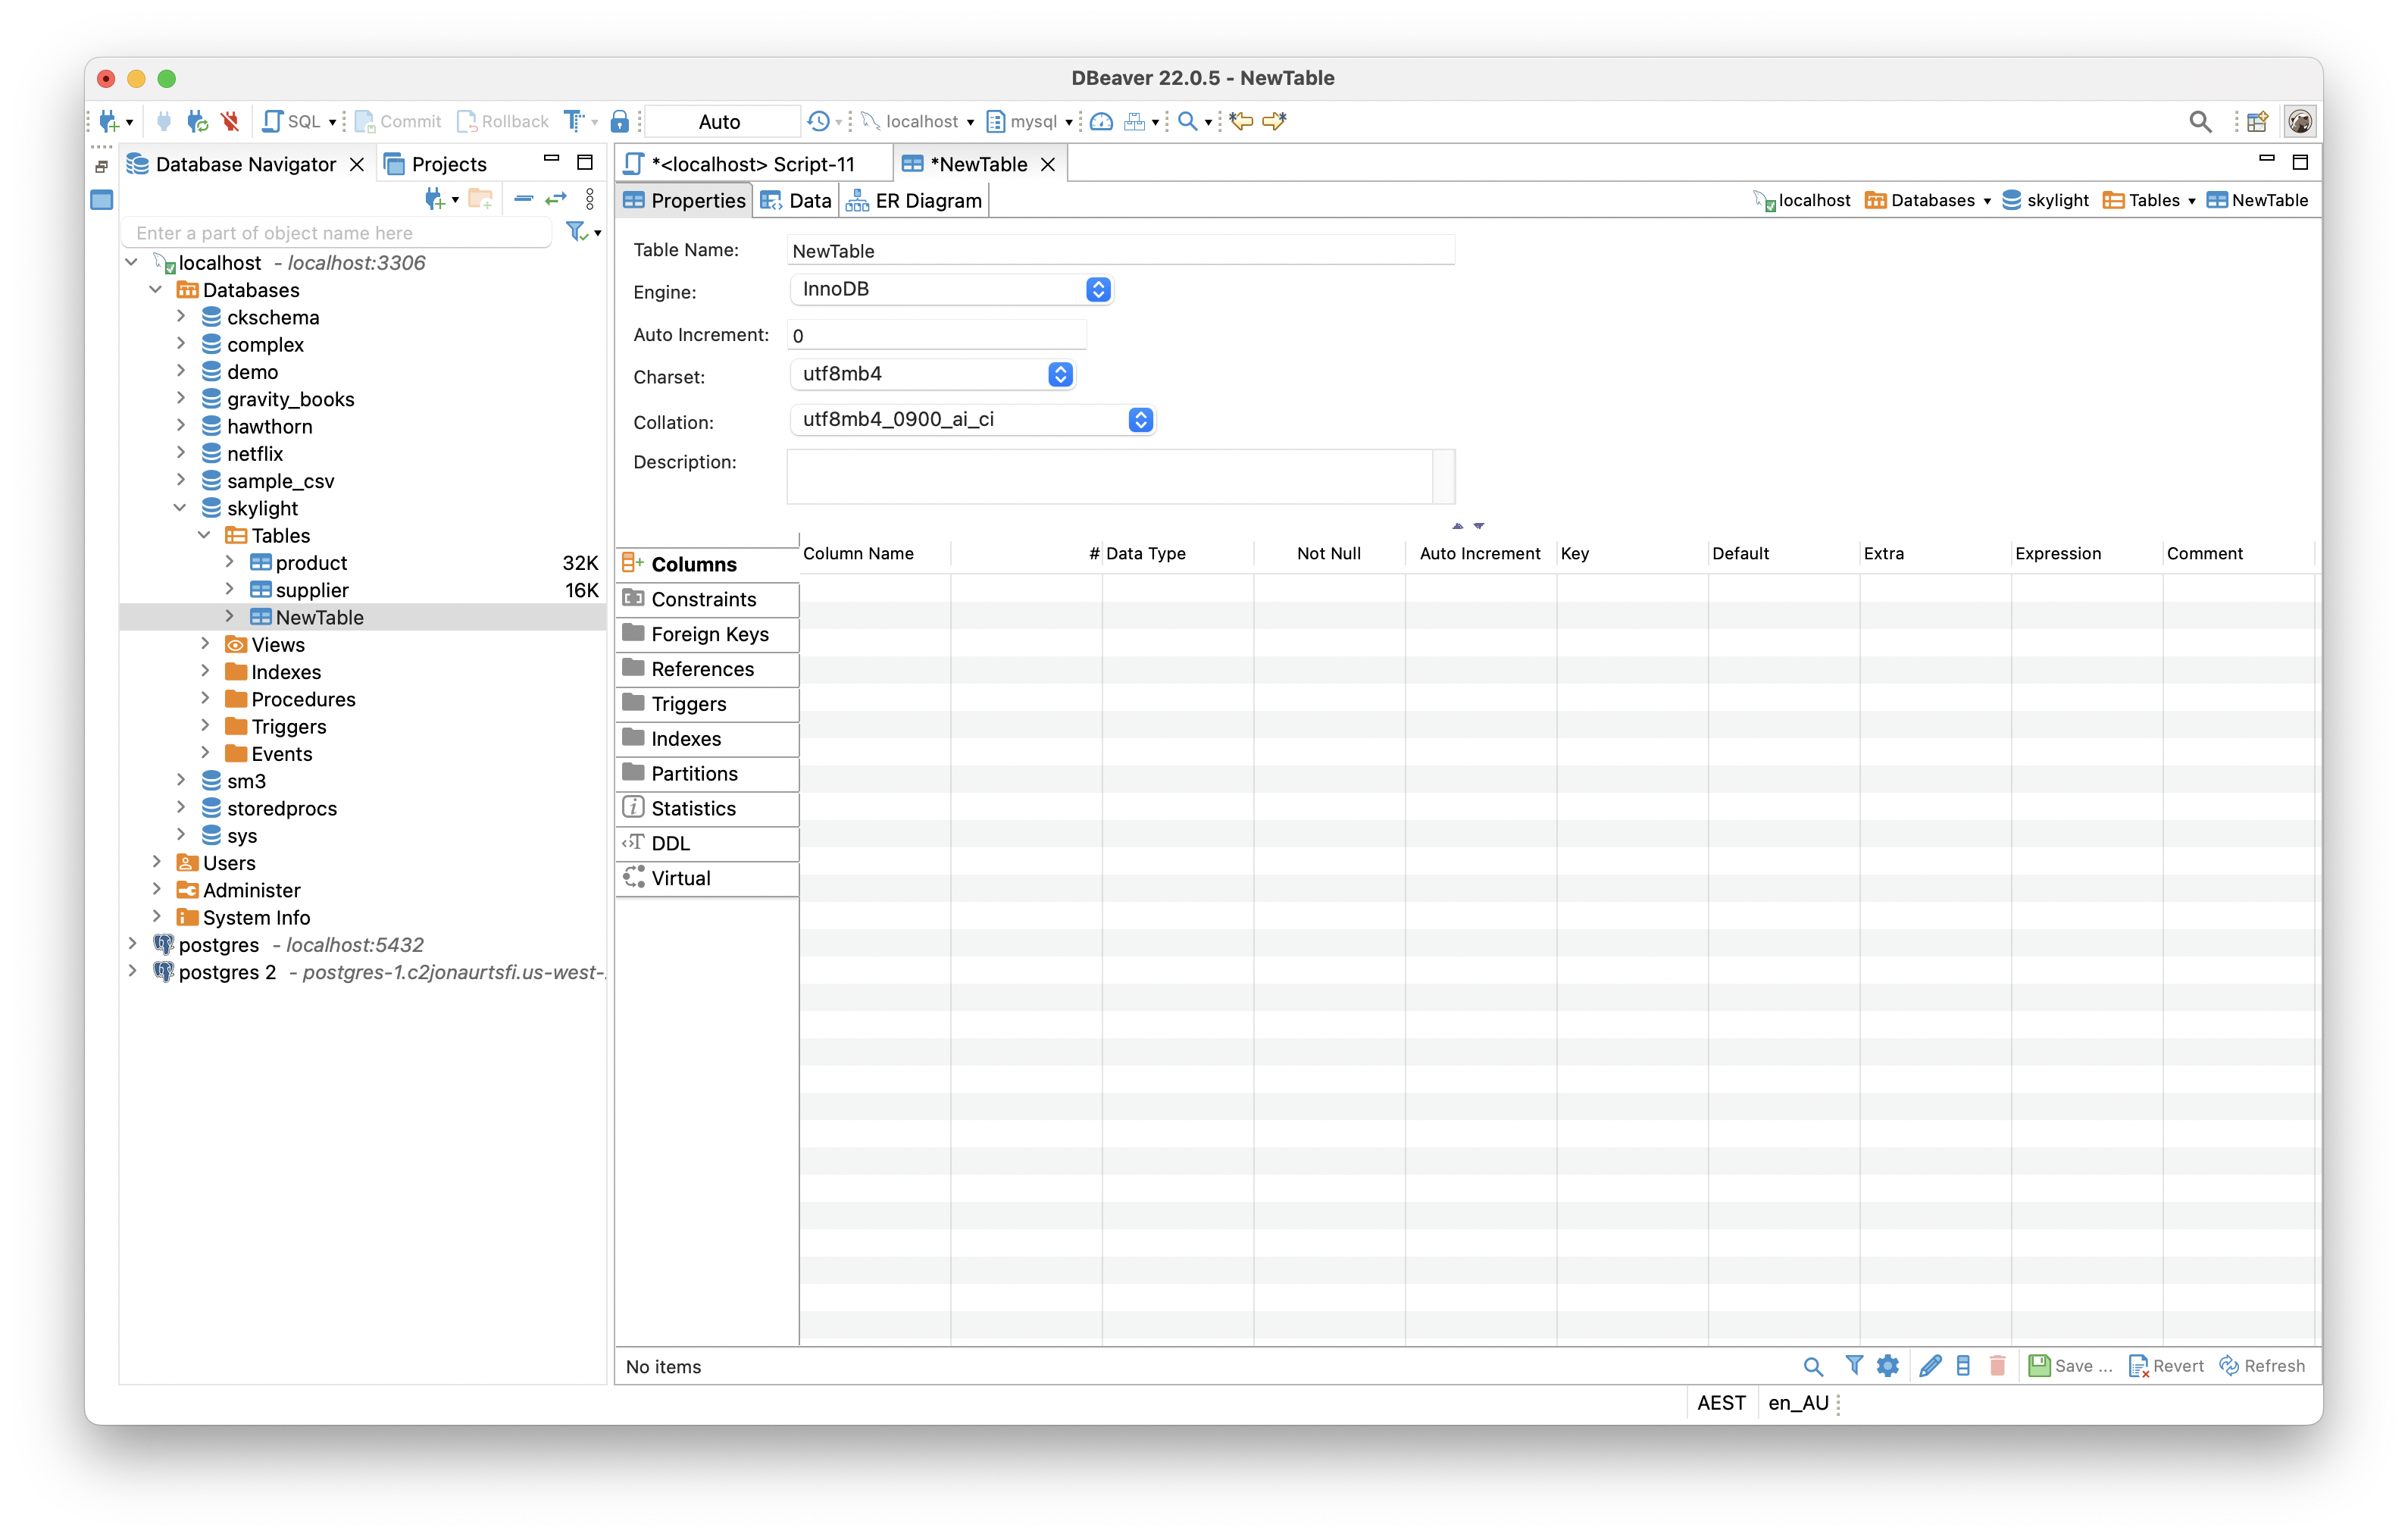
You can enter a range of information, including the object name. Also, depending on the object type, you can provide specific information such as constraints and column information.
Query Builder
Another handy feature of Aqua Data Studio is called Query Builder. This feature lets you build an SQL query in a visual way.
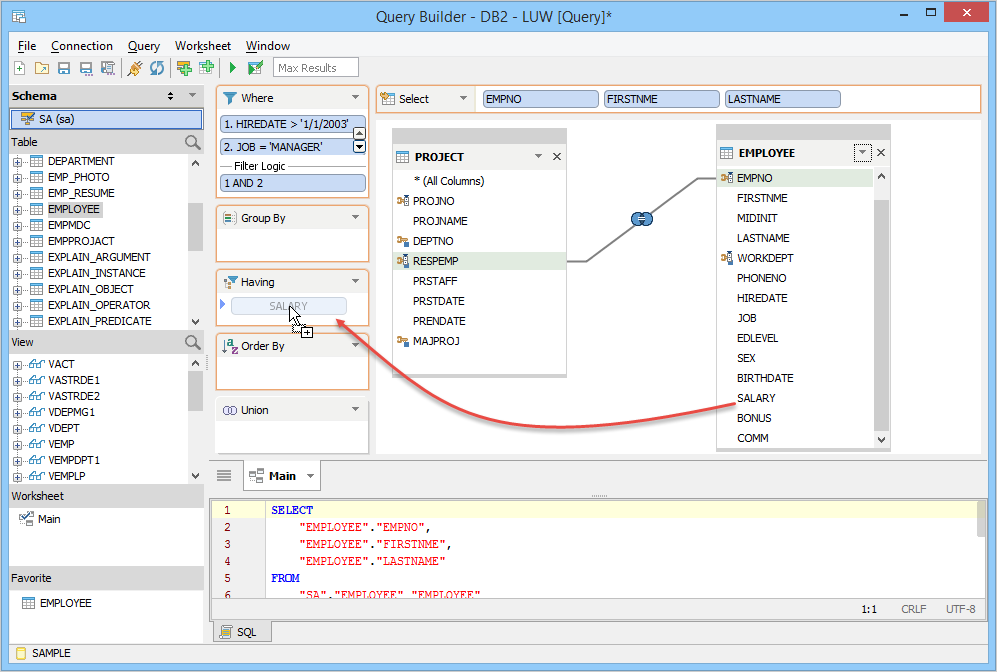
When you open the Query Builder, you'll see a new window appear called Query Builder.
This window has a section on the left for the tables and views in your database, and the main section of the window is where the query creation happens.
You can drag your tables and views into the main section of the window. Once they are added, you can drag or select fields to add to many different clauses within an SQL query. For example, you can drag some columns to your Select clause to define what to see, and some columns to the WHERE clause panel for filtering. You can specify columns for Order By, Group By, and Having as well.
The panel at the bottom of the screen displays the generated SQL.
This is a great feature that may save you time and can help with writing SQL if you're new to learning SQL, as sometimes it's easier to visualise how a query is written.
Parameterised Scripts
Aqua Data Studio has a feature that allows you to specify a parameter placeholder in your SQL script, and specify the value for the parameter when you run it.
This is helpful if you run similar queries that only differ based on the parameter.
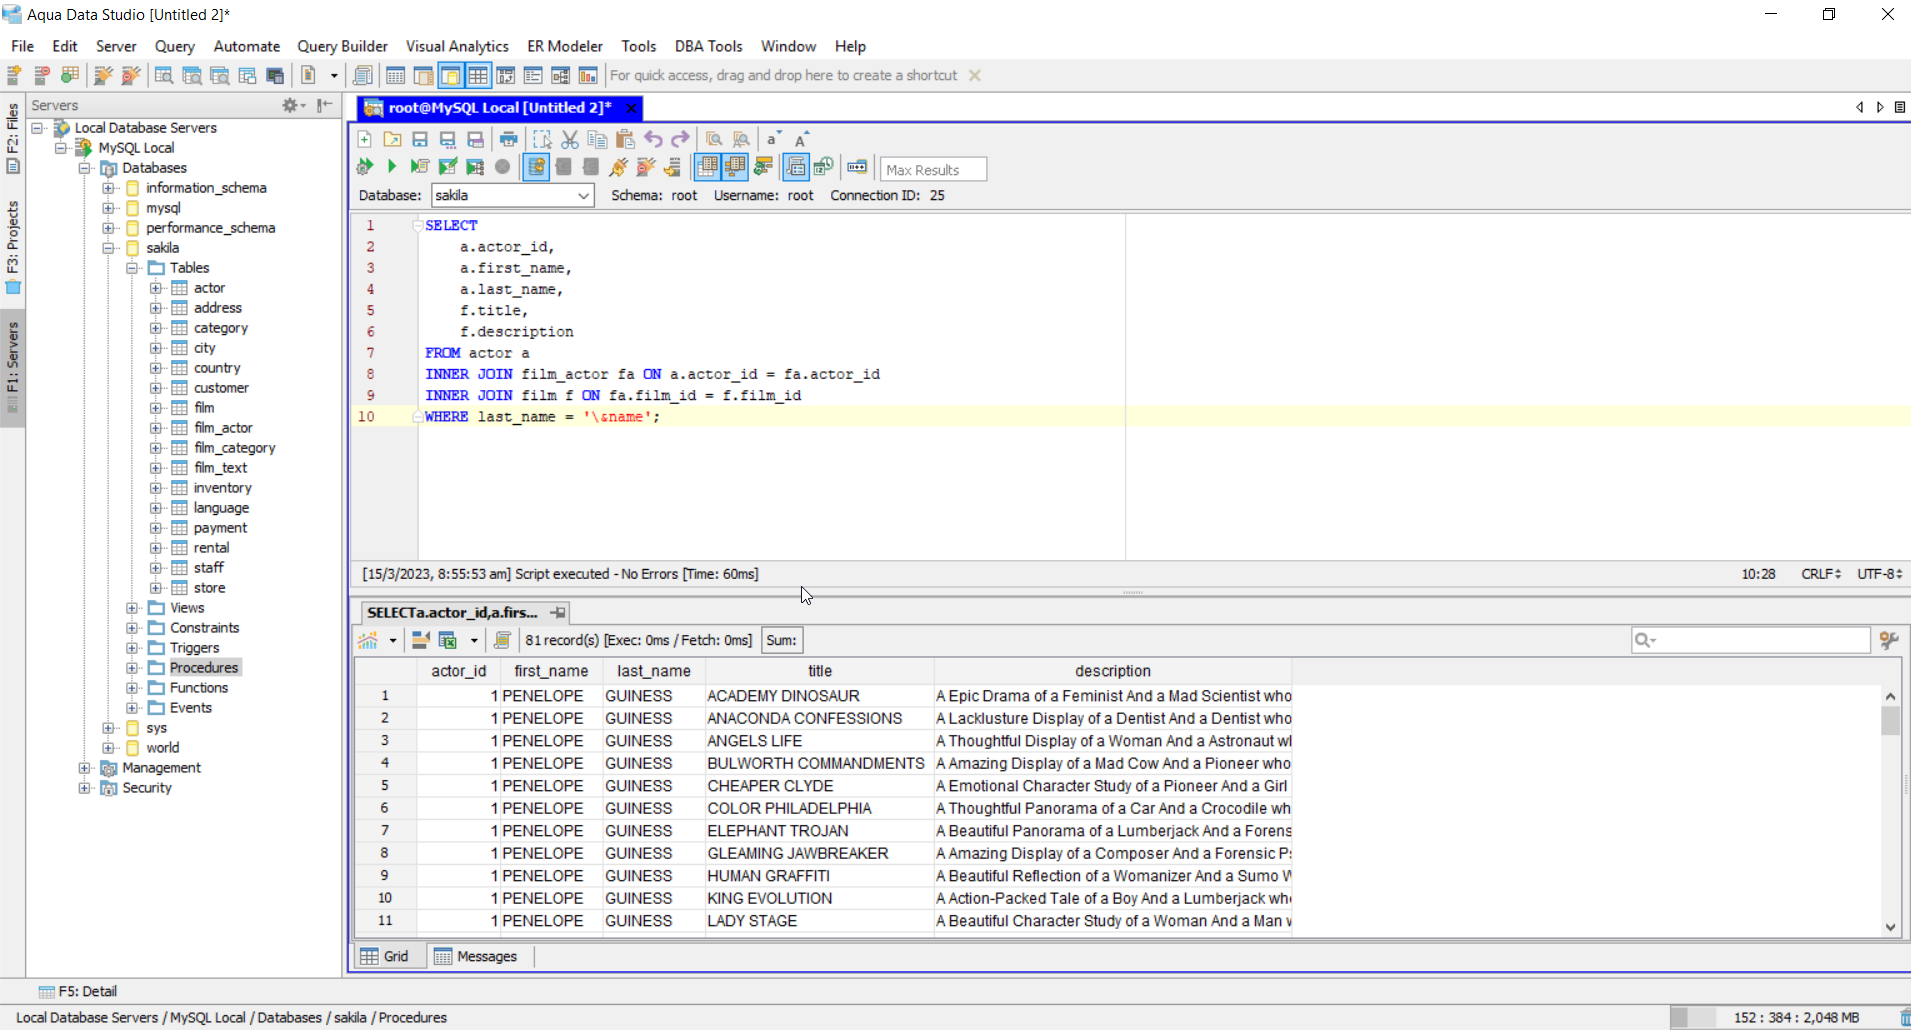
To do this in Aqua Data Studio, you can include a parameter in your script by adding an ampersand & symbol and then a name of the parameter.
If you add it within a text value (such as specifying a person's last name), you'll need to escape the ampersand value with a backslash to ensure it is handled correctly.
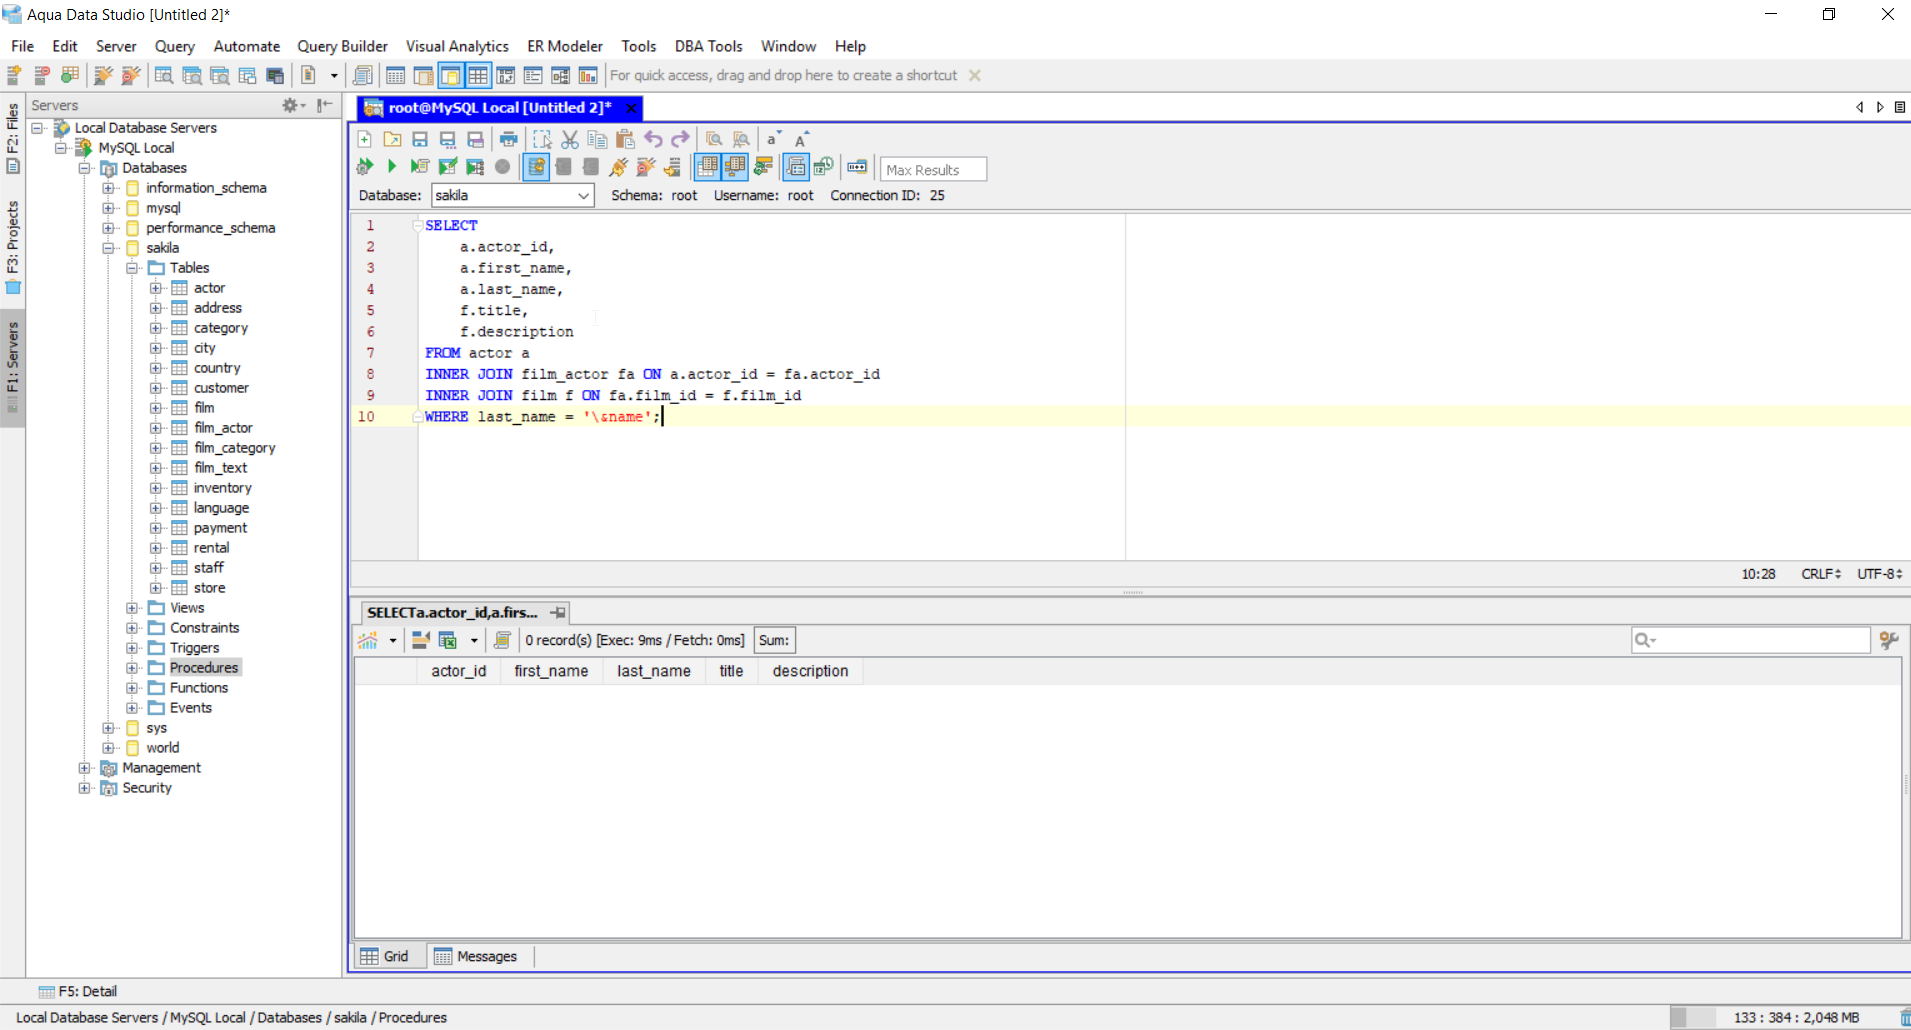
When you run the query, you'll be prompted to enter a value for the parameter.
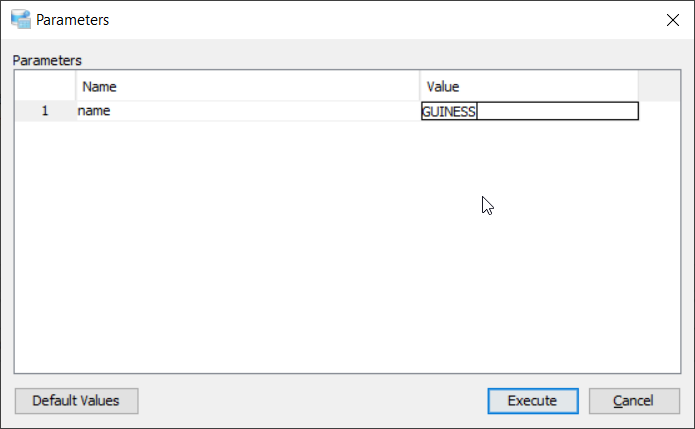
In this example, we've used the name "GUINESS". Once you click Execute, you can see the results using that parameter.
This handy feature makes it easier to work with SQL queries.
DBeaver has a similar feature called Variables but is only available in the Pro edition of DBeaver.
SQL Automation
Aqua Data Studio has a range of features around SQL Automation. This allows you to speed up how you write SQL queries.
You can access these features in the Automate menu of Aqua Data Studio.
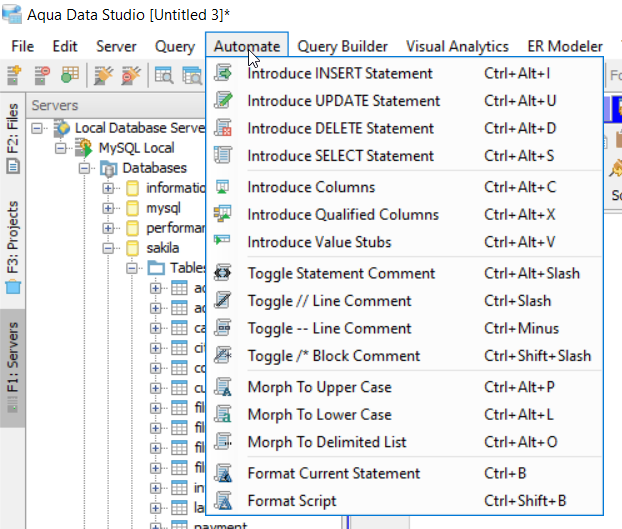
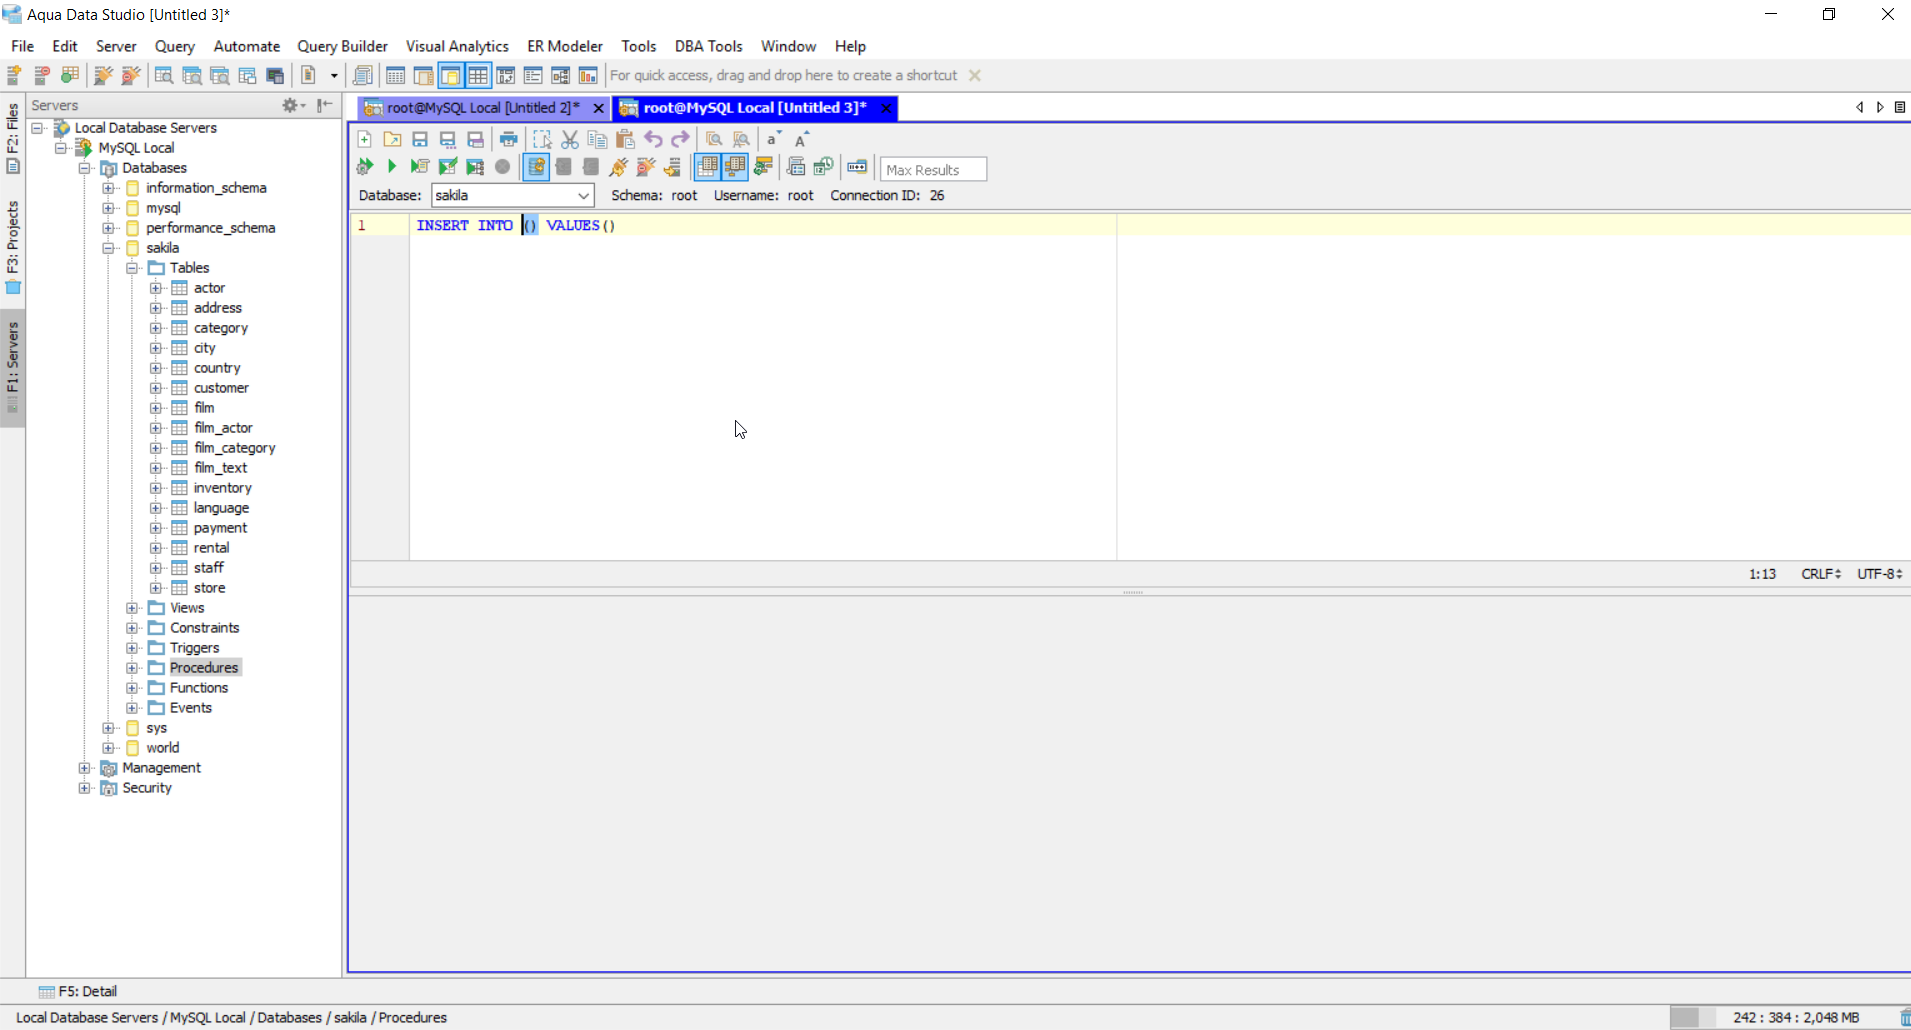
One example is the first item, "Introduce Insert Statement". If you select this, an Insert statement will be added to the Query Analyzer window.
You can also add columns for a specific table by using Introduce Columns.
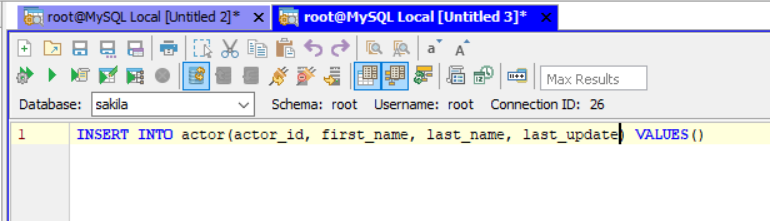
You can add in placeholders for the values clause by using Introduce Value Stubs.

Each of these can be triggered with a keyboard shortcut, as well as all of the other items in the Automate menu.
This is a great feature to help you save time with writing SQL statements. You can use a few menu options or keyboard shortcuts and have most of the SQL statement written very quickly.
File Management
Working with files is an important part of SQL editors. Each SQL editor handles it a different way, from merely opening an SQL file to a full file and project management function.
Aqua Data Studio and DBeaver both include project and file management.
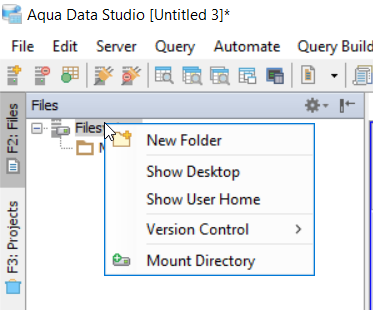
In Aqua Data Studio, you can work with files on your computer in the panel called Files on the left.
If you right-click on the Files root entry, you'll be able to add new folders, mount a directory (which is like opening an existing folder on your computer), and work with version control for the selected folder.
In this example, I've used Mount Directory and selected a folder called SQL Scripts.
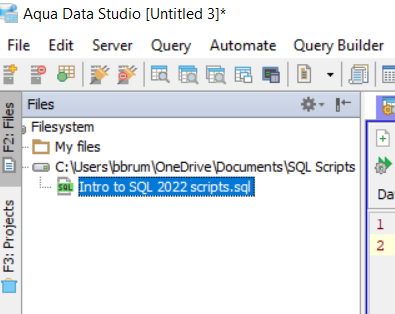
You can see the full path in the panel, as well as all files that exist in the folder. You can open the files and work on them just like any other file.
This makes it easy to manage and update files on your computer - much easier than opening individual files.
In DBeaver, there is no built-in feature for browsing or working with files. It does include a Project feature, which we'll look at in the next section.
Project Management
Aqua Data Studio has a Project feature which is available in a separate panel. A Project as described by Aqua Data Studio is "a self-contained programming unit that allows users to create a set of AquaScripts that work on a specific set of database servers with the ability to store and access configuration files".
If you right-click on the Project entry, you can create a new project, mount an existing project, or create a new folder.
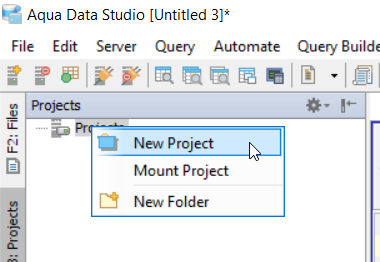
There are several templates of projects that can be used, or you can proceed without a template.
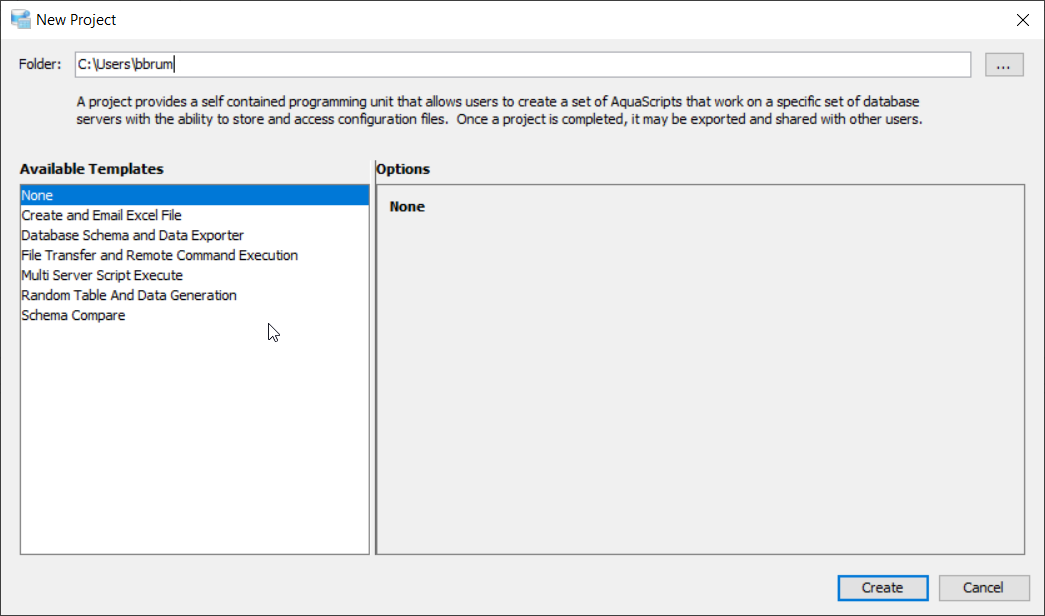
Here's an example of a new project using the Create and Email Excel File template.
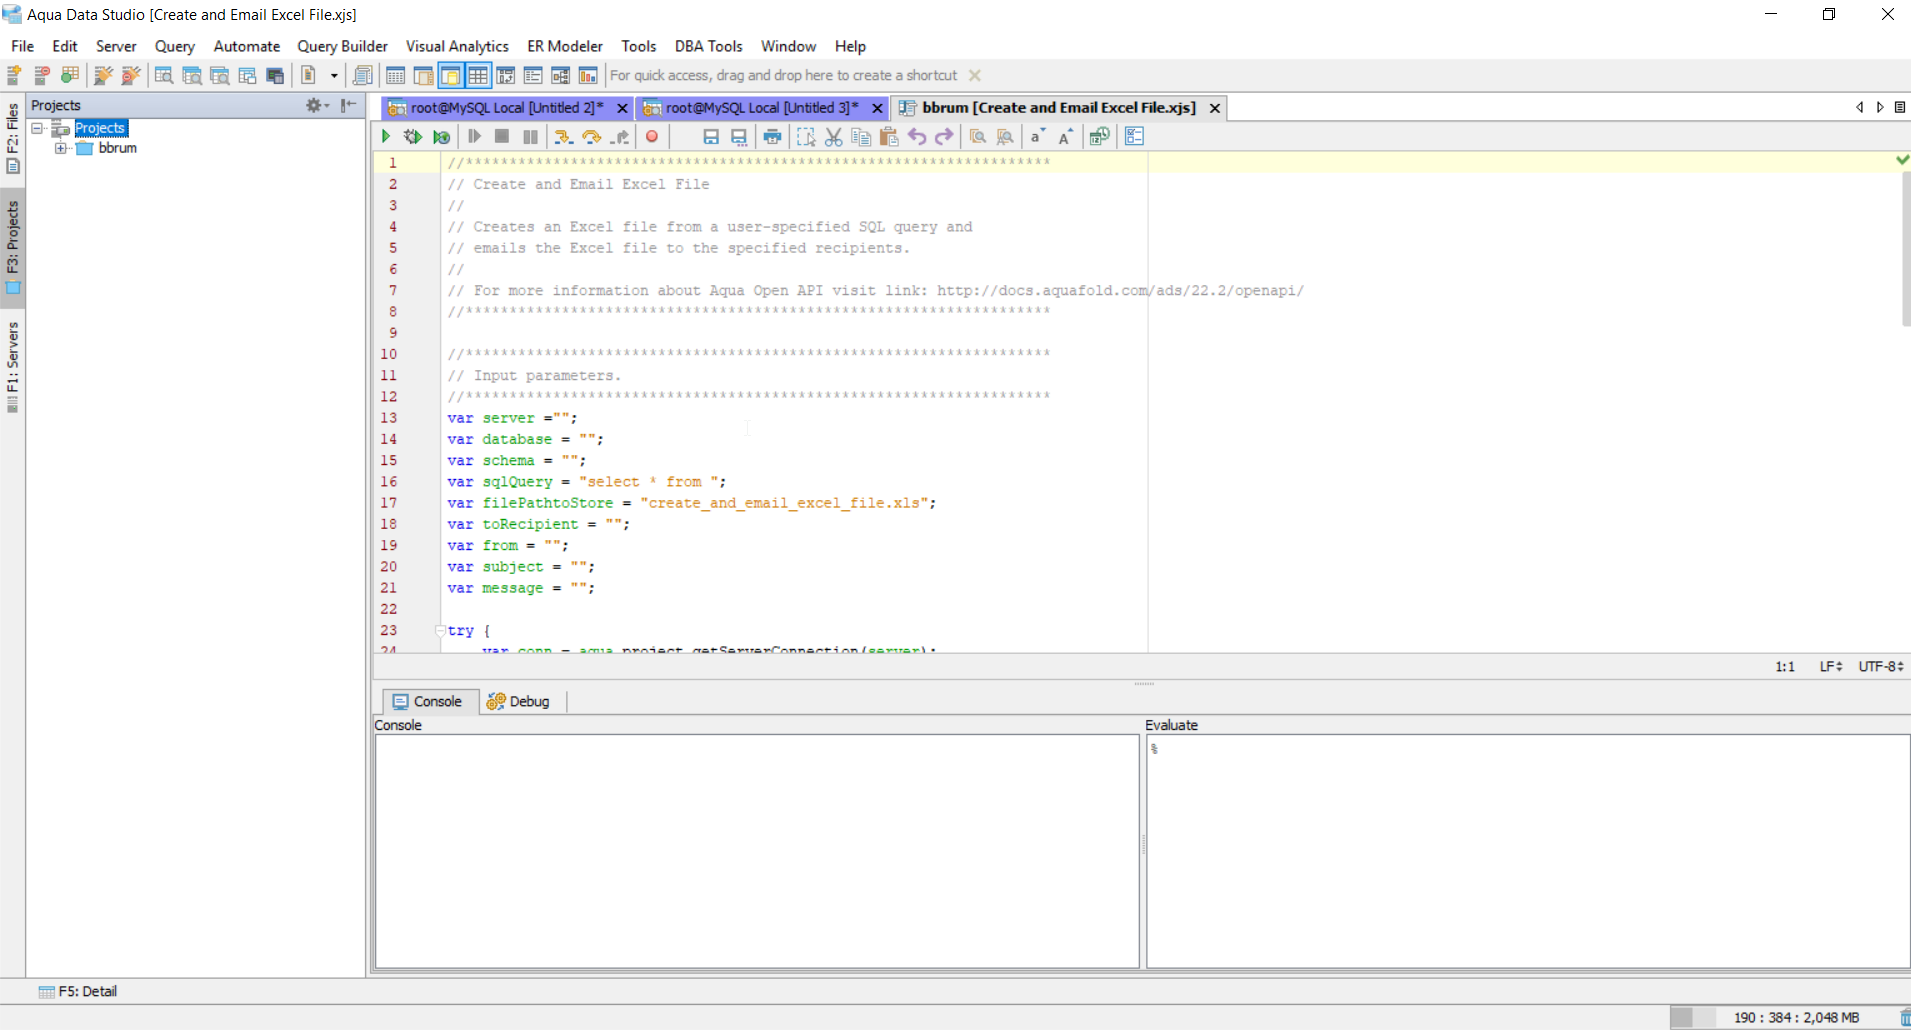
It uses an AquaScript file to perform a range of tasks and includes this file as part of the project. You can add many more files to your project, which will be saved in the project.
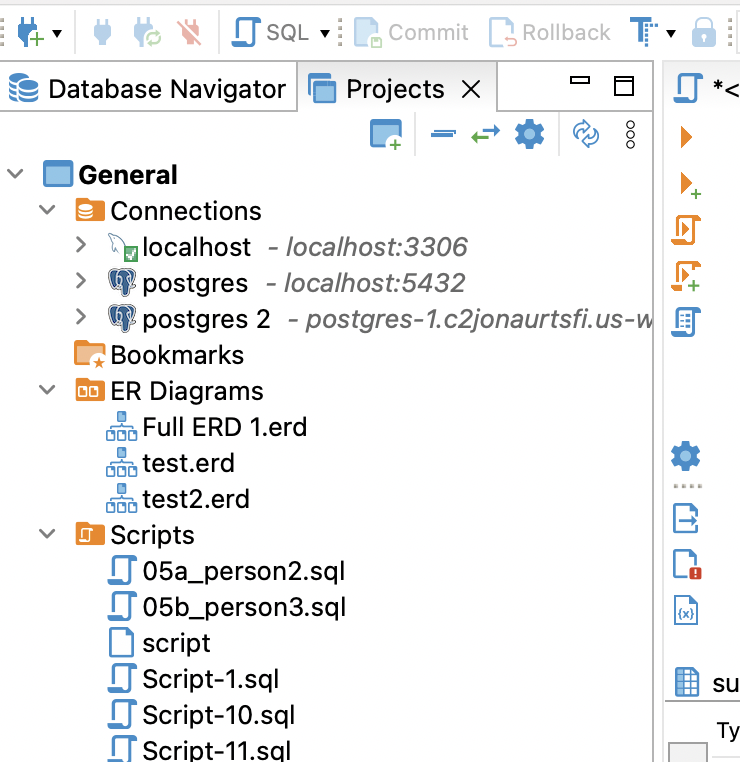
In DBeaver, a project is a collection of a few types of entities that are related.
You can create connections, bookmarks, ER diagrams, and SQL scripts and store them as part of a project.
Scripts and Code
This section is about all of the functionality in Aqua Data Studio and DBeaver that relates to working with SQL scripts and code, such as version control, unit testing, and debugging.
Version Control
Both Aqua Data Studio and DBeaver include version control features.
In Aqua Data Studio you can integrate with many different version control systems:
- Subversion (SVN)
- Concurrent Versions System (CVS)
- Perforce
- Git
This will allow you to manage the files in your repository, work with different versions, commit changes, refresh changes, and more.
In this example, I've created a new repository, which shows up in the Files tab. There's a green icon next to it to indicate it is version controlled.
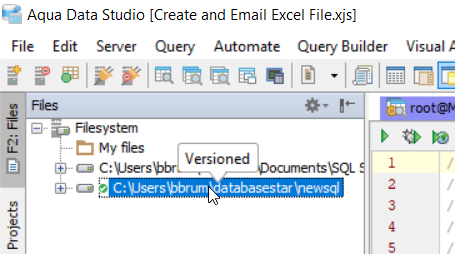
Right-click on the entry and expand Version Control, and you can see all of the functionality available for working with the repository.

You can show the history of the repository, fetch files, pull and push, commit changes, add tags, and more.
This makes it easy to work with version control for your SQL code, which is something I recommend doing. I've outlined how to set up a GitHub repository for your SQL files in this post.
In DBeaver, the version control functionality is available in Enterprise Edition by default, and you can install a plugin for Community Edition. It's only available for Git repositories.
You can open a repository and work with the files inside it in a similar way.
You can push and pull files, commit changes, perform merges, and more.
Debugger
Aqua Data Studio includes a debugging tool that lets you debug code written in:
- Oracle PL/SQL
- SQL Server
- DB2
- Sybase
The functionality works as you would expect with a debugger.
You can right-click on a stored procedure or function and select Debug in Procedure Debugger.
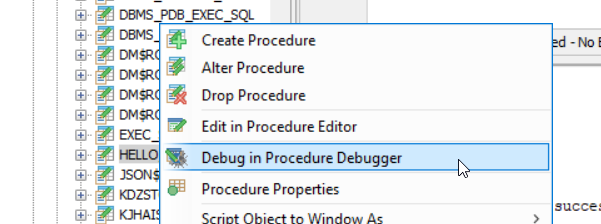
This will open the debugger window in the main part of the screen.
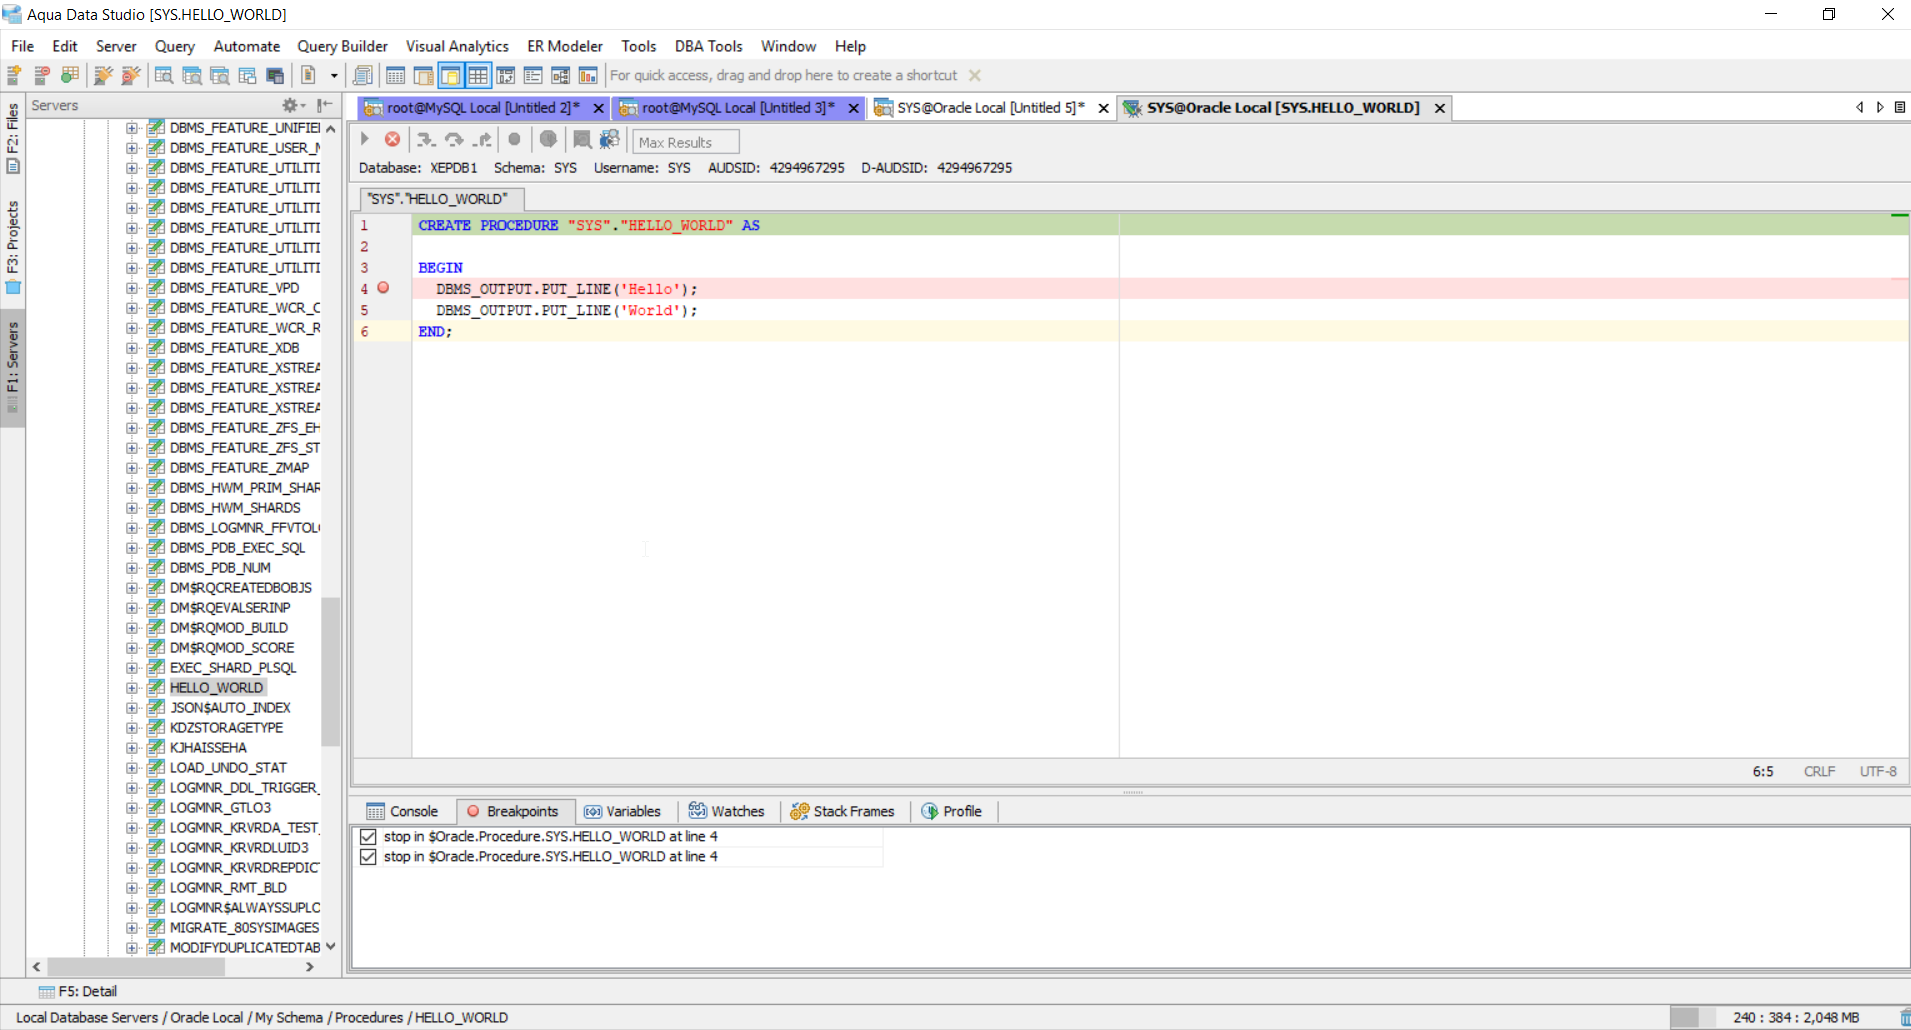
You can do a range of standard debugging tasks, such as adding breakpoints, starting the code, stepping over/into/out of code, viewing variables, and setting watches.
It's a pretty handy feature for helping you find issues with your procedural code.
In Dbeaver, there is no built-in debugger, but you can install a debugging plugin for PostgreSQL.
The plugin includes standard debugging functionality, such as breakpoints, running code, stepping over code, and examining variables.
Advanced Shell
Aqua Data Studio has an integrated shell feature called FluidShell. It combines the features of a Unix shell and an SQL command-line tool.
It includes many features from a Unix shell such as variable substitution, alias commands, pipelines, and command history.
From the database perspective, you can do a lot with FluidShell, such as running SQL commands and scripts and performing many database automation tasks.
The FluidShell page on Aqua Data Studio here has more details and examples of the power of this feature.
Secure Shell
Aqua Data Studio has another shell which is more of a traditional SSH or terminal, called Secure Shell. You can use this to perform more Unix-like commands with servers.
To access the secure shell, you will need to register a server. This is done in a similar way to a database connection.
You'll then be able to create a secure shell for that server.
The benefits of using this shell within Aqua Data Studio include all of the GUI features such as tabbed browsing, search, docking, and keyboard mapping.
Mongo Shell
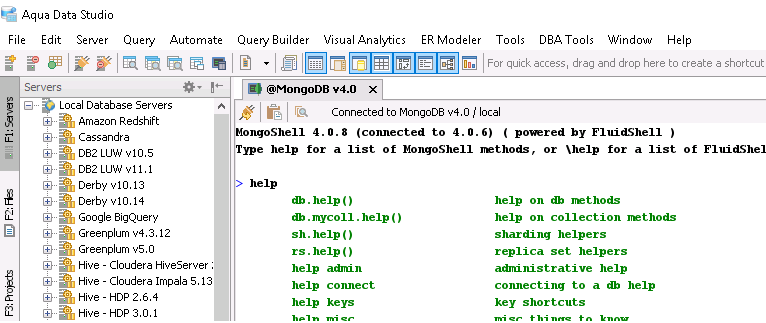
Another MongoDB-related feature of Aqua Data Studio is called Mongo Shell. This is a JavaScript shell interface that works very similarly to the native Mongo shell.
This shell has a range of Unix commands and Mongo shell commands. And just like the other shells within Aqua Data Studio, it benefits from the other user interface features such as keyboard shortcuts, tabbed windows, and docking.
If you work with MongoDB then this is yet another feature of Aqua Data Studio that I'm sure you'll find useful.
Mongo SQL Mapping
There's a feature in Aqua Data Studio called SQL Mapping. This lets you see how the MongoDB syntax maps to the Aqua Data Studio MongoSQL syntax.
This can help you with writing SQL on a MongoDB database when using Aqua Data Studio. It's another way of interacting with the database and can help you if you want to write your queries in MongoSQL format.
The documentation has a range of examples of how this mapping would be displayed, which is great for understanding the feature.
Unit Testing
Aqua Data Studio has the ability to work with these testing frameworks:
- PostgreSQL pgTAP
- PostgreSQL pgUnit
- SQL Server tSQLt
These frameworks will let you write and run tests and see the results of these tests.
The installation process for each of these frameworks is pretty similar.
Once you've chosen a framework to use, you can install it, and follow the supplier's documentation to get your tests up and running.
DBeaver doesn't include any built-in functionality for working with unit testing frameworks.
Data Management
This section is about all of the features in both Aqua Data Studio and DBeaver related to generating, editing, and analysing data.
Mock Data
Mock data is the concept of generating or working with "fake" data in your database. This is handy for populating tables for demonstrations or working with a variety of tests.
Both Aqua Data Studio and DBeaver include functionality for mock data.
In Aqua Data Studio, you can create random tables with no data, random tables with random data, or populate random data into existing tables.
You can access this by going to Tools > Random Table and Data Generator.
You'll then be able to specify a range of parameters depending on the approach you want to take, such as the minimum and maximum number of tables and columns, the table and column prefixes, and the number of rows.
In DBeaver, a Mock Data Generation feature is available in the Enterprise edition.
This will let you generate mock data or random data in your database. You can specify a range of different parameters, such as generating using constants, random values, sequences, names, and more. You can use many different data types, and some of these have preset generators (such as an email address as a string).
This feature in both SQL editors will make it much easier than generating data using a spreadsheet or some other process, saving you time with testing.
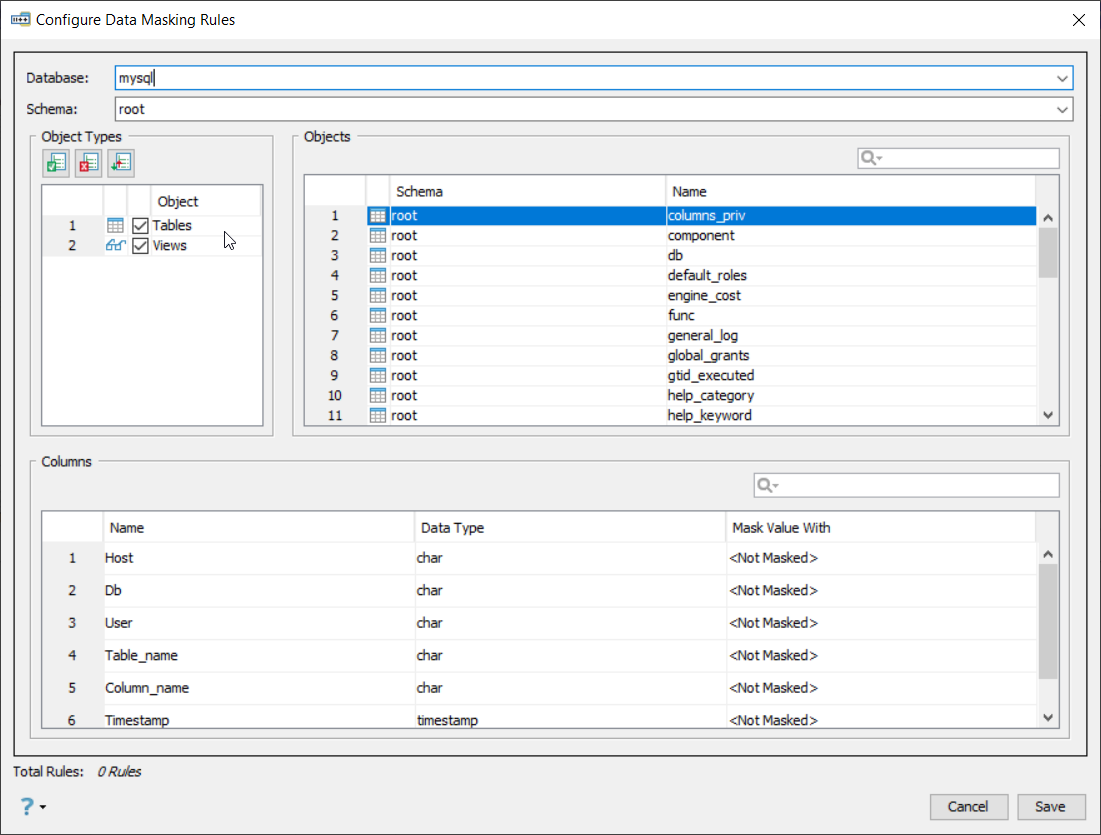
Data Masking
Data Masking is a feature that lets you mask the data in columns, for data that may be sensitive and should be hidden from other users.
In Aqua Data Studio, you can do this by either substituting a value of the same type or showing a NULL value instead.
You can select specific columns to mask in Aqua Data Studio before you share them with others. This means you and other users can still work with the tables and the data.
To access this, go to Tools > Data Masking. You can specify the tables, columns, and values to use for masking.
DBeaver doesn't have the functionality for data masking.
Analytics
Both Aqua Data Studio and DBeaver include visualisation and analytics features.
Aqua Data Studio has a pretty comprehensive set of analytics tools.
When you open it, a separate window is opened. This window shows a range of features.
You can specify a source of data to use for your visualisation.
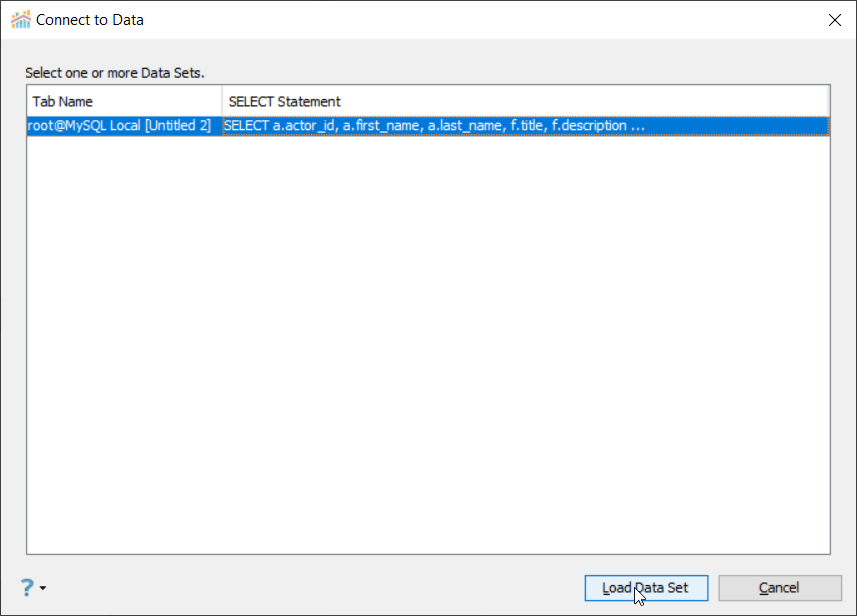
Next, you'll be able to choose fields to use for rows and columns for your chart, the type of chart, and apply a range of filters to your data. If you've worked with any BI tools then this concept would be familiar to you.
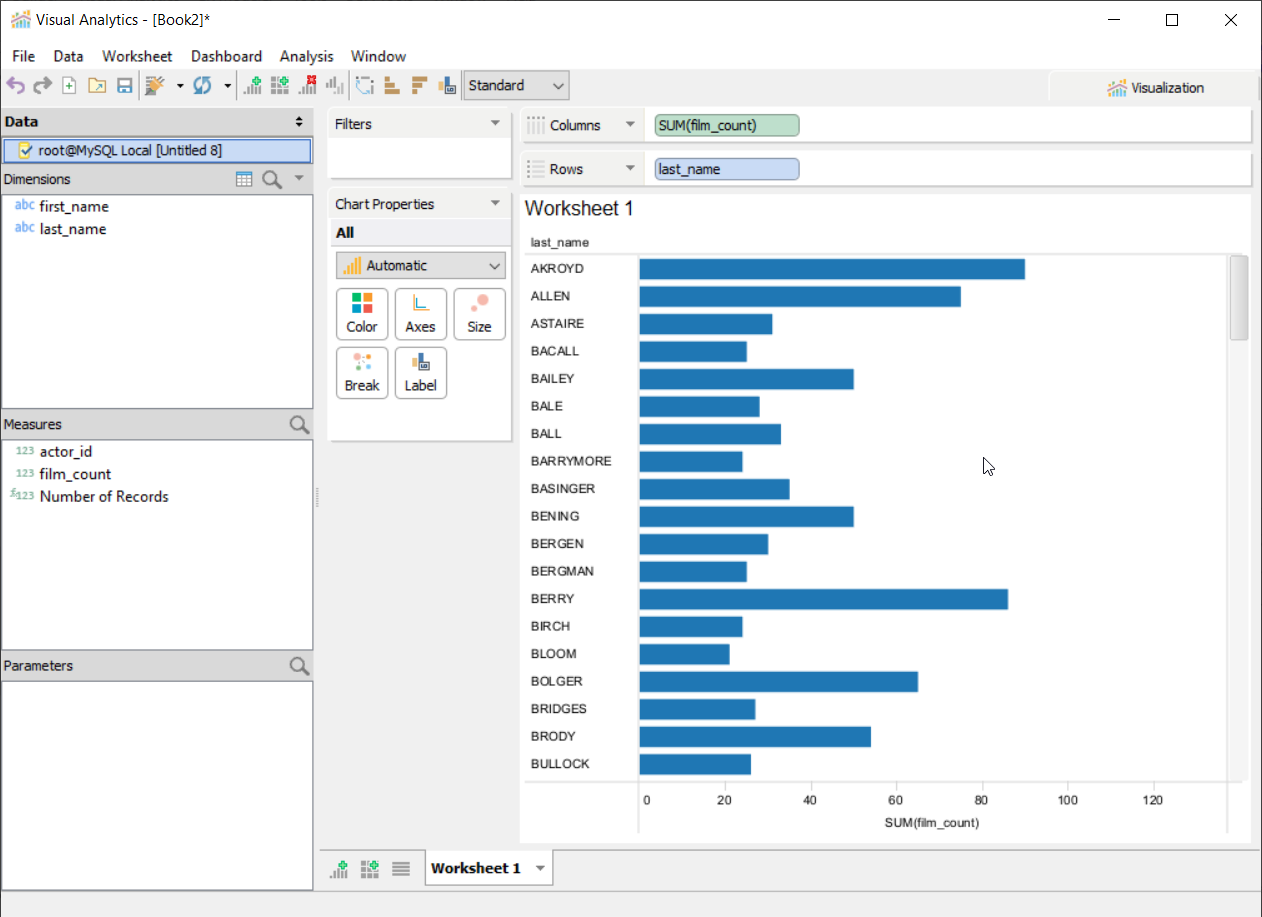
The Visual Analytics within Aqua Data Studio is almost like a separate application, it's that comprehensive.
Also, as part of the Visual Analytics feature, you can write code in the R language for advanced statistical analysis. You'll need to install a couple of things (R and Rserve), and once you do, you'll be able to use it within your Visual Analytics work.
In Dbeaver, you can create a chart from a result set by clicking on the Chart button in the SQL editor. The Chart functionality is available in Enterprise and Ultimate editions, not Community edition.
You can specify which fields to use for the rows and columns, and then the chart will be generated.
Once you view the chart, you can save the chart as an image, filter the data, or refresh the chart based on the underlying query.
Being able to visualise your data is a helpful way of understanding it, and it's good to see that both Aqua Data Studio and DBeaver include functionality for this.
Tools and Features
This section lists a range of tools and other features that are included in each editor.
Entity-Relationship Modelling
Entity Relationship Modelling will let you create diagrams to represent tables, columns, and the relationships between them. It's a good way to design a database or to understand an existing database.
In Aqua Data Studio, you can use the built-in ER Modeler tool to create new diagrams.

You can also perform both reverse engineering and forward engineering. Reverse engineering allows you to generate a diagram from an existing database. Forward engineering allows you to generate SQL statements from a diagram. Both of these are handy features when working with diagrams and can save you a lot of time.
With the diagram that is created, you can save it as a diagram file independent of your SQL files, so it can be stored and shared with others. You can print the diagram or save it as an image file.
DBeaver also includes an Entity Relationship Modeling feature.
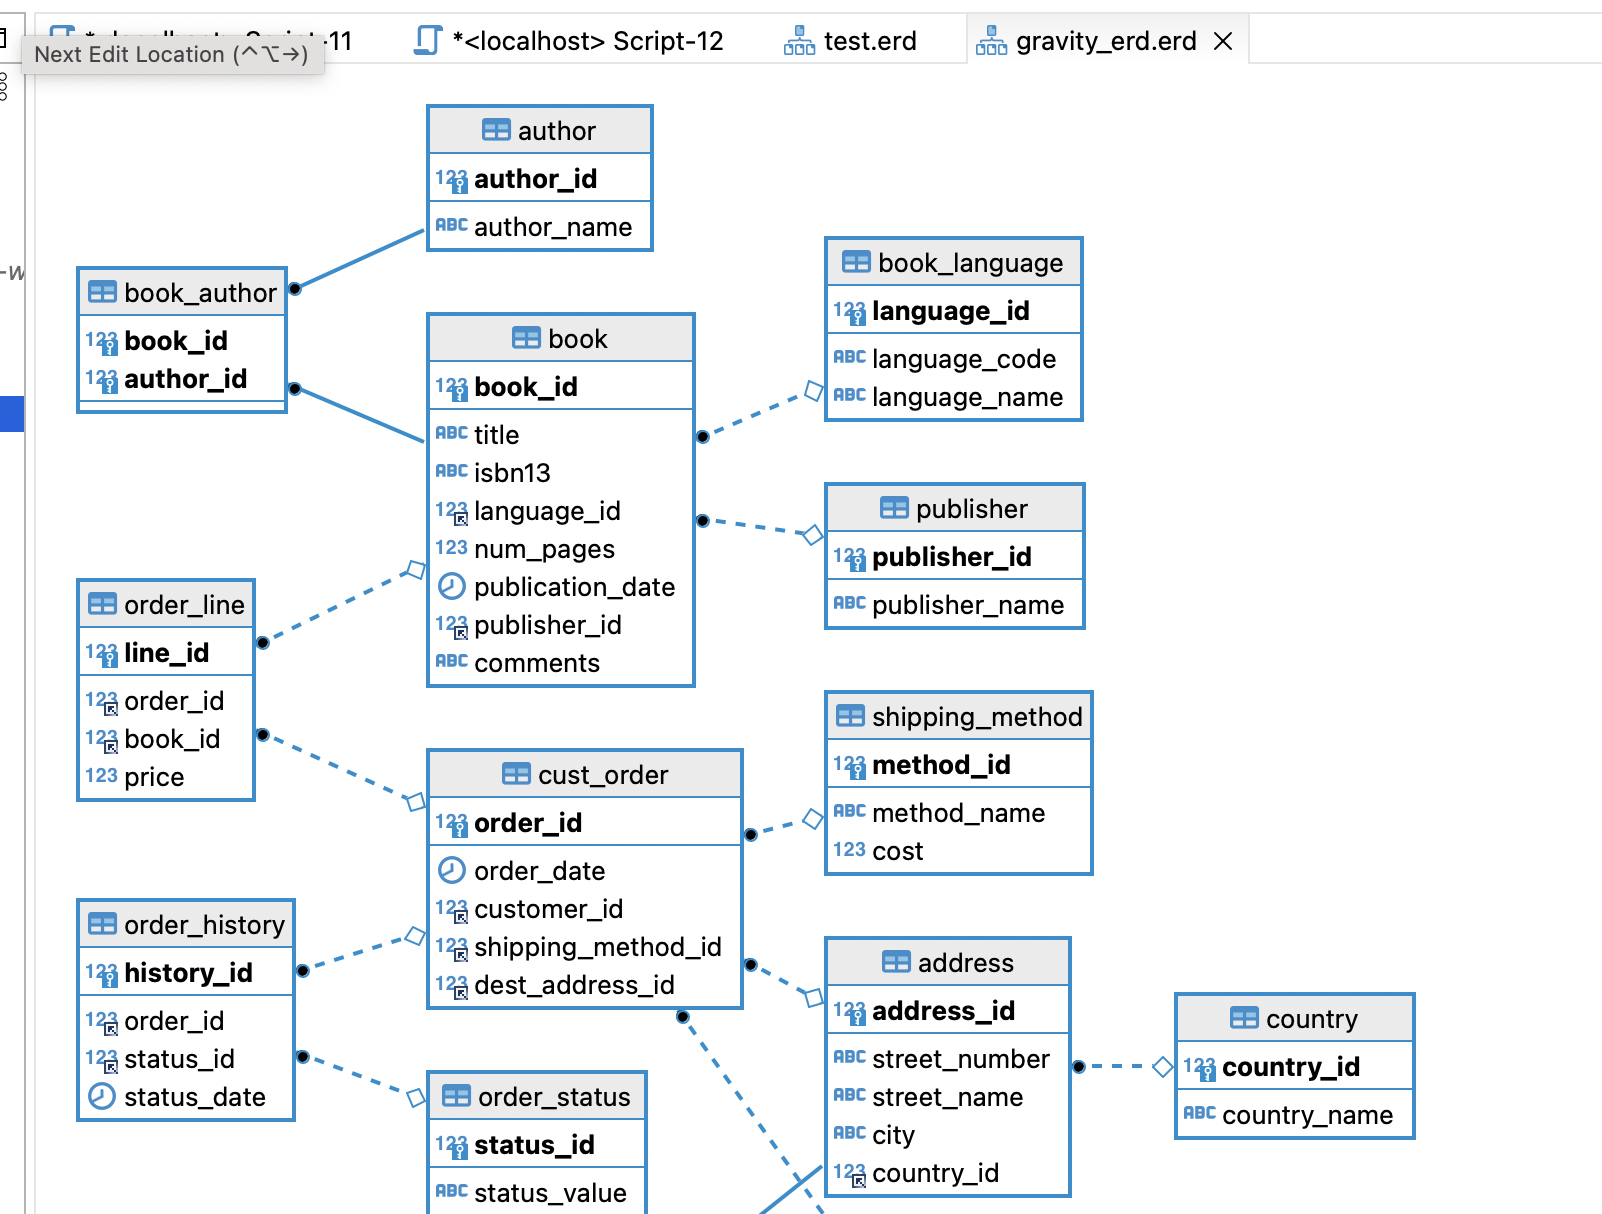
You can generate database diagrams based on an existing database, otherwise known as reverse engineering.
You can also create a diagram from a blank page. Both of these types of diagrams can be printed or saved to an image file.
There are separate data modelling tools available, but having the functionality within your SQL editor can make it easy to work with, which we can see in both DBeaver and Aqua Data Studio.
Compare Files and Objects
The ability to compare different files, objects, and even databases can be helpful during the development and deployment process.
Aqua Data Studio includes several comparison tools, available in the Tools > Compare Tools menu.
These tools are:
- Schema compare: compare differences in DDL between objects in two different schemas.
- Schema synchronisation: compares differences in database objects, and also prepares the DDL to synchronise a target database to match.
- Tab compare: compares the contents of two tabs within Aqua Data Studio.
- Directory compare: compare the contents of two directories.
- File compare: compare the contents of two text files.
- Copy compare: compare the contents of the clipboard history.
- Results compare: compare two different result sets.
The general process for each of these comparison tools is that you select two items to compare, and the tool will show the differences.
This is a great feature for working with databases. File comparisons are quite common, but Aqua Data Studio includes a lot of other comparison tools that can make it easier for you to work with database objects.
In DBeaver you can perform:
- Schema compare
- Data compare
With Schema Compare, you can compare two database schemas and see the output as a DDL SQL script, a diagram, or a Liquibase changelog or report.
With Data Compare, you can compare the data within two tables and see the differences. The output will show both tables side-by-side with colour-coded differences.
Both editors include helpful features for comparison, and Aqua Data Studio's are more comprehensive.
Data Import
A common task when working in SQL editors is importing data from an external file into your database.
Fortunately, both Aqua Data Studio and DBeaver offer this functionality.
In Aqua Data Studio, you can access the Data Import tool by going to Tools > Import Data.
A new tab will open with a range of parameters to set for the import.
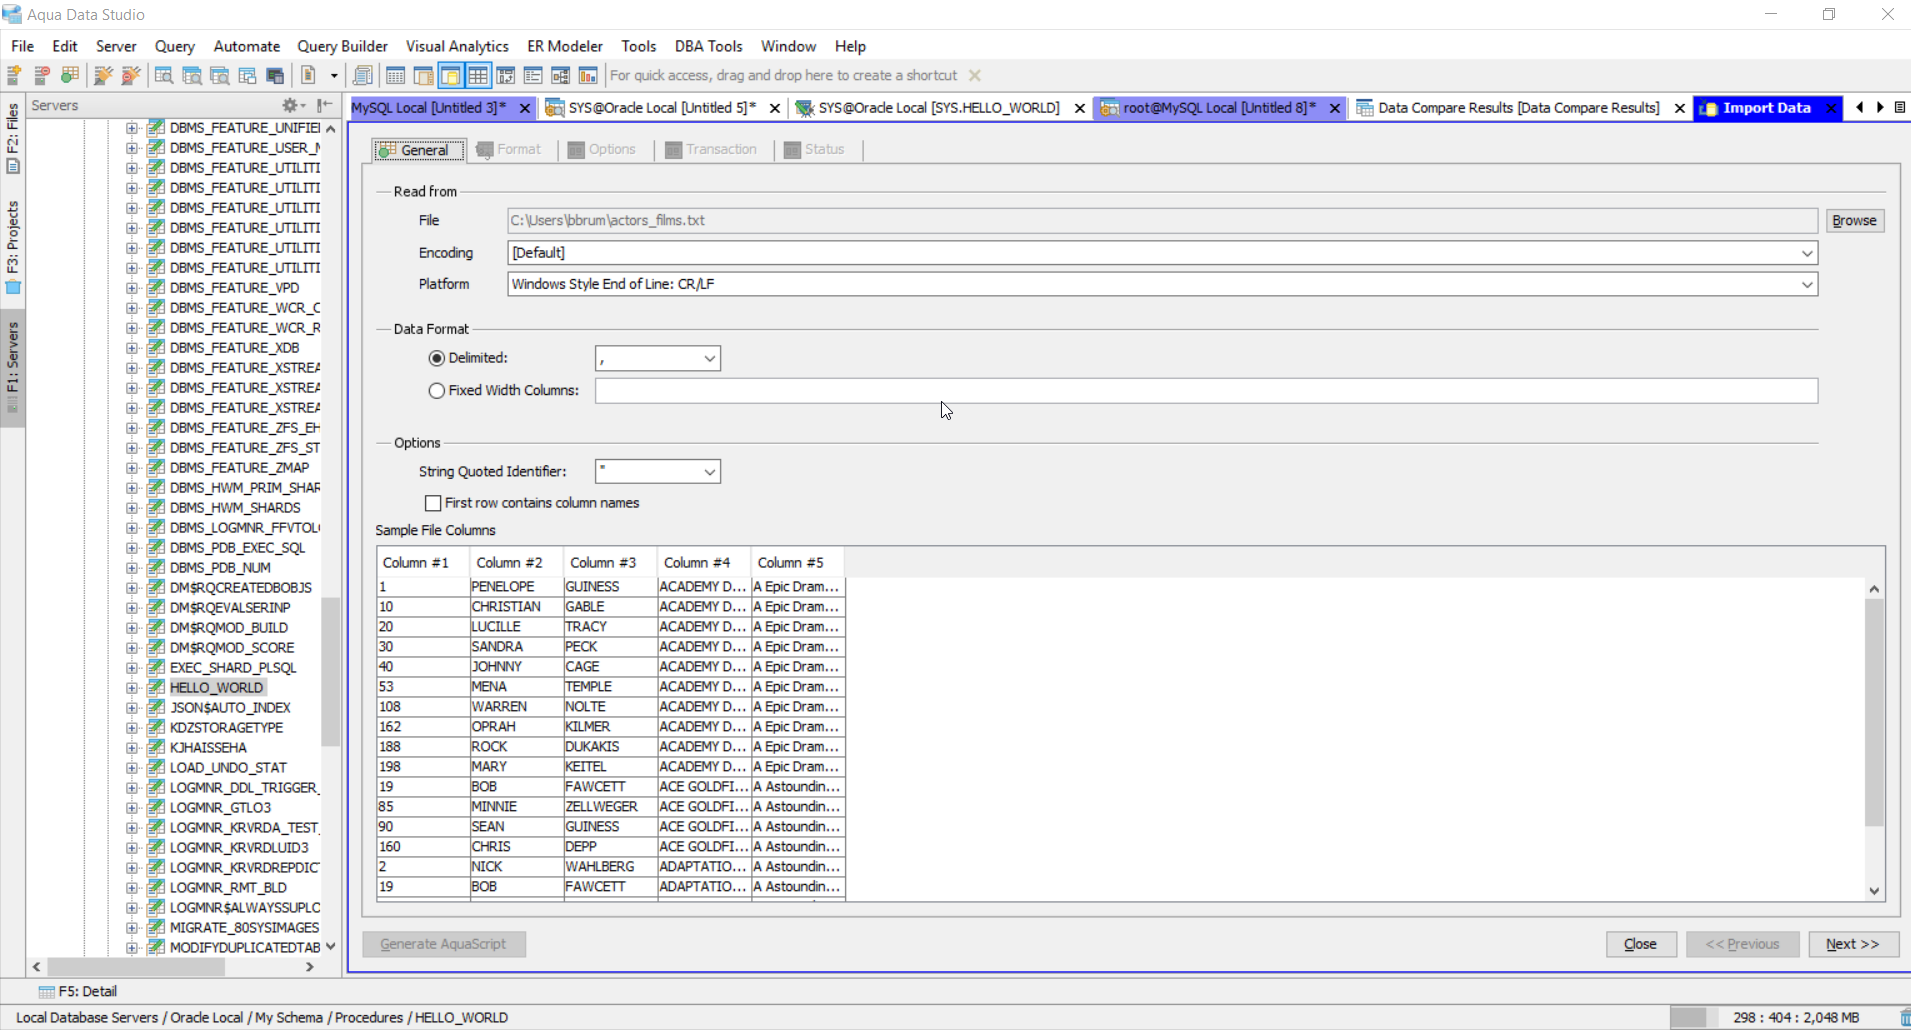
You can specify the file to import, which can be a text file or CSV file, for example.
You can specify other options such as the delimiter and the string quote identifier. You'll also be able to see a preview of the data being imported.
Follow the steps in the Import Data screen and the data will be imported.
In DBeaver, the process starts by right-clicking on a table and selecting Import Data.
You'll see a window to start the import process.
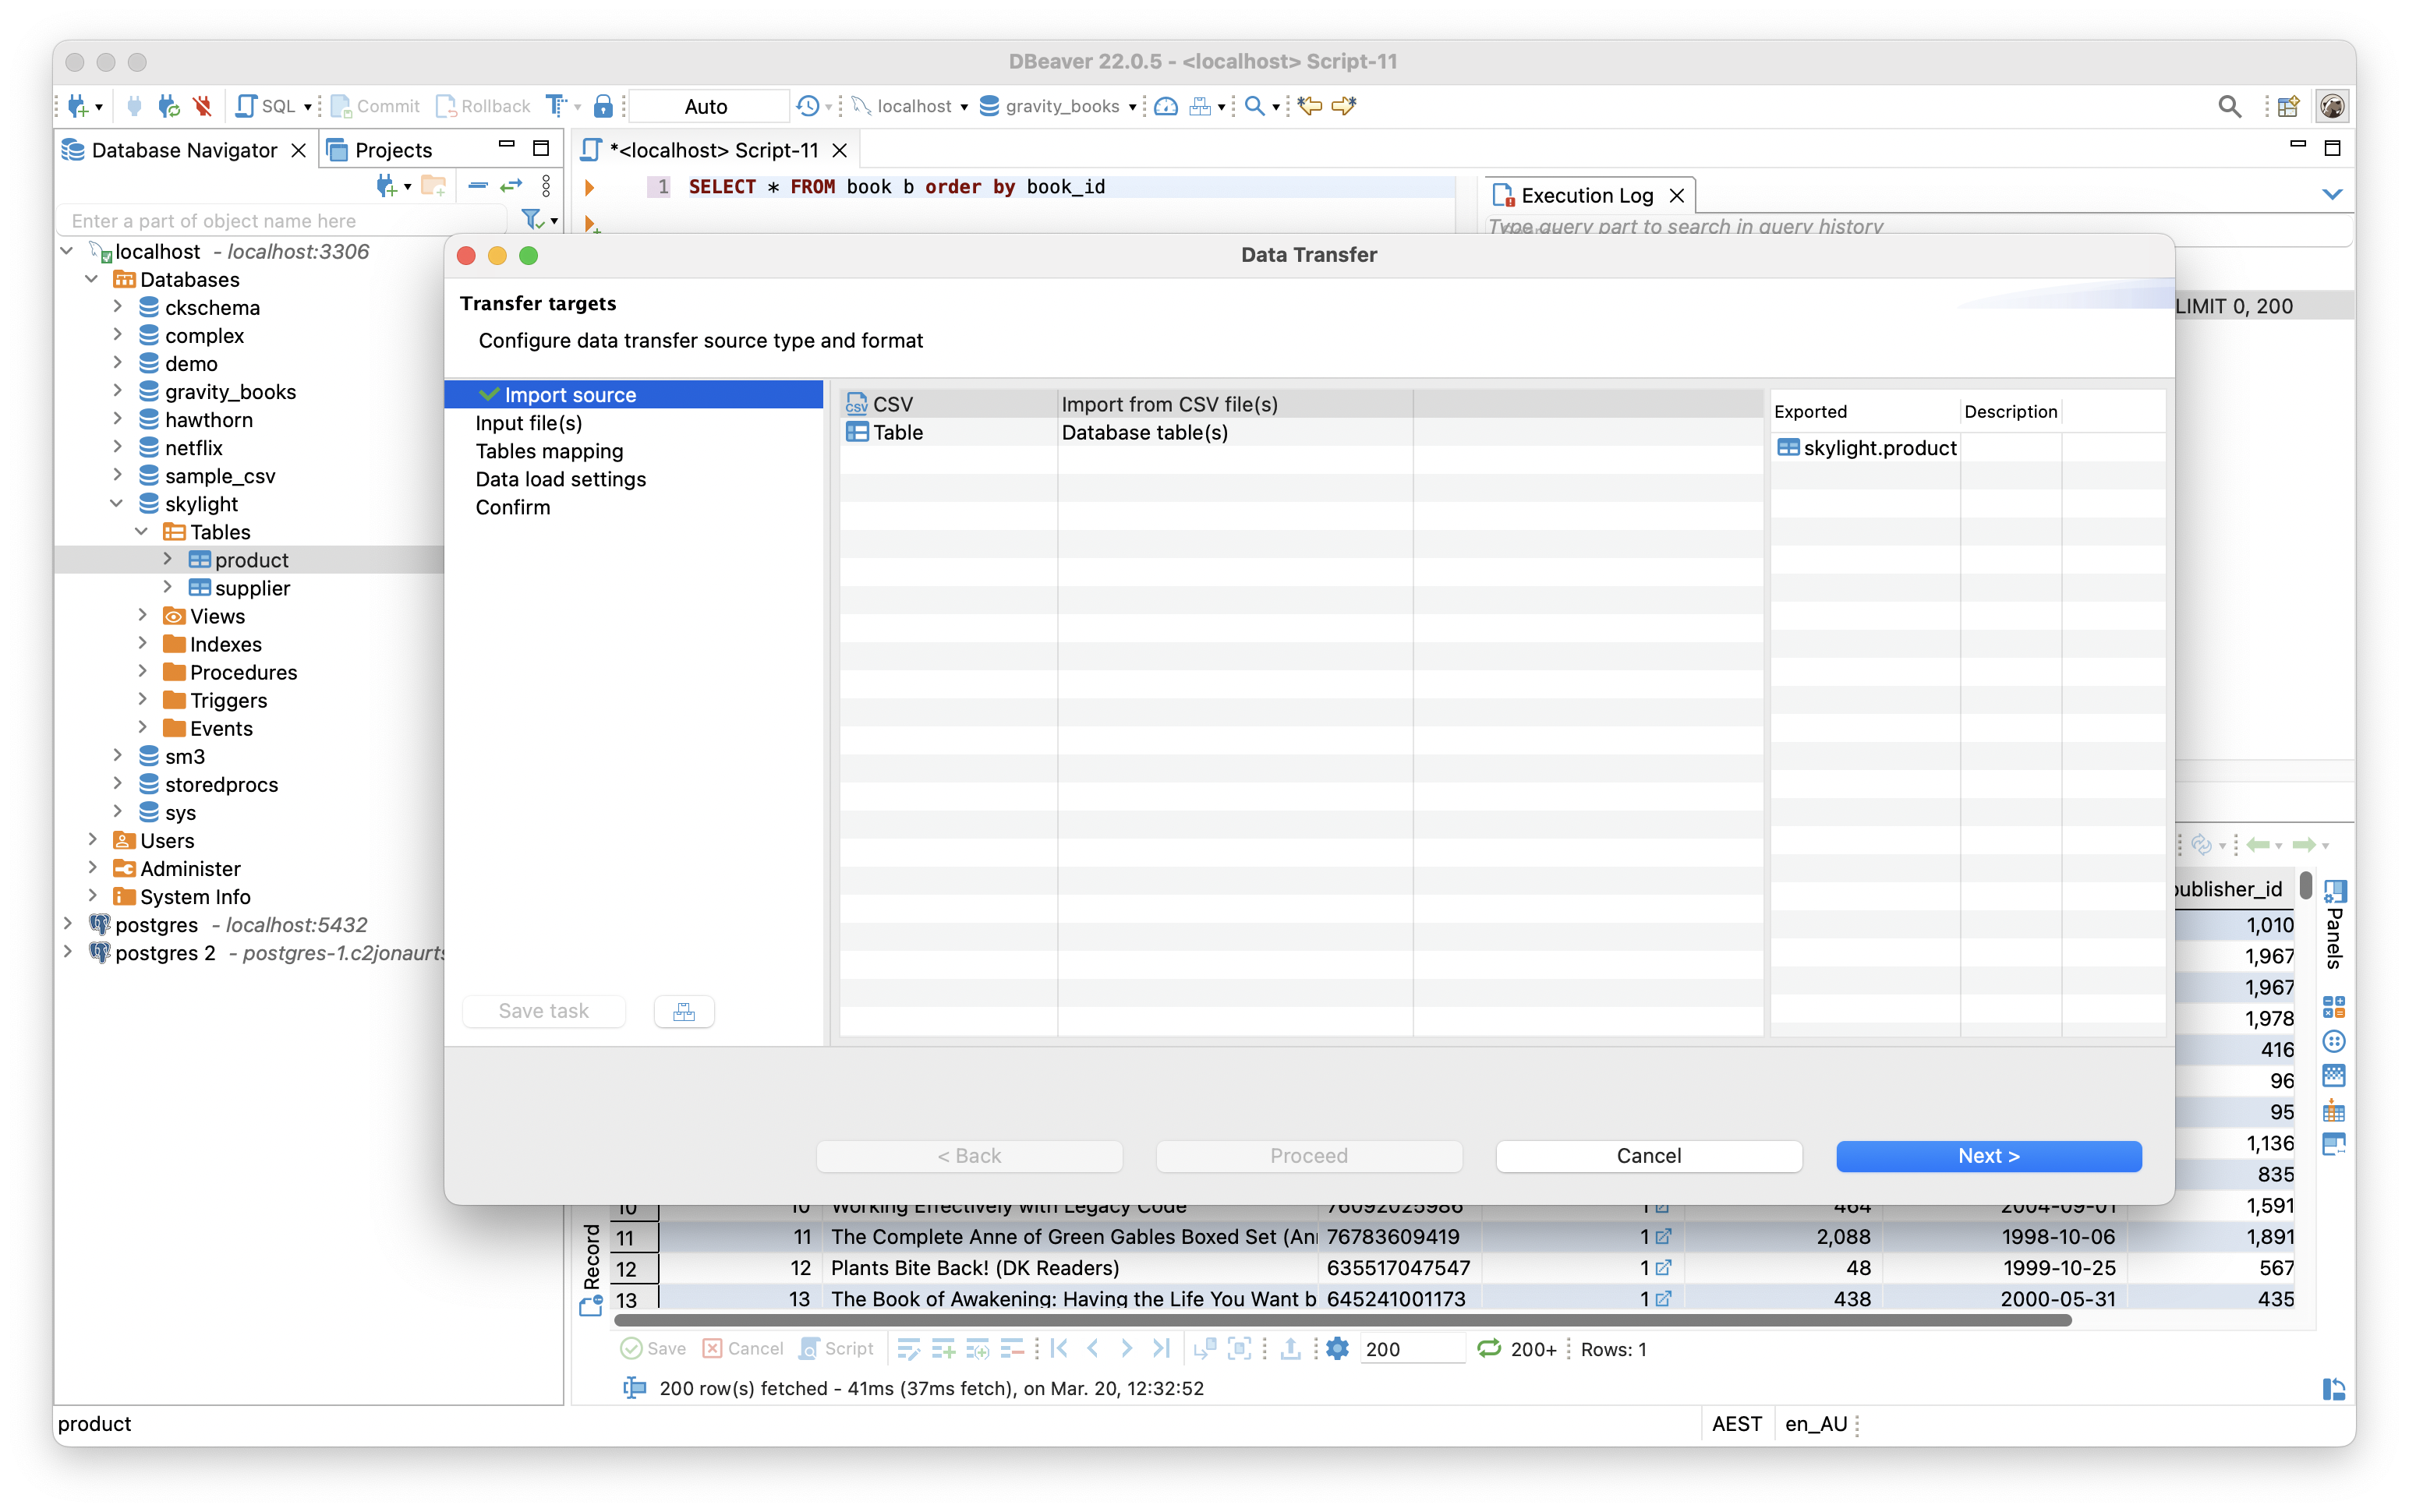
You can select the source file to be imported, the parameters to use (such as the delimiter, the target table, and proceed with the remaining steps to get your data imported.
Both editors have similar functionality for importing data and both are easy to use.
Data Export
Similar to Data Import, the Data Export feature is a helpful tool to get data out of the database, if you want to further analyse it in Excel or share it with others.
Both Aqua Data Studio and DBeaver have this functionality.
In Aqua Data Studio, you can do this by going to Tools > Export Data.
A new tab is opened that allows you to specify whether you want to export from a table or a Select statement, the database and schema, and the table(s) you want to export.
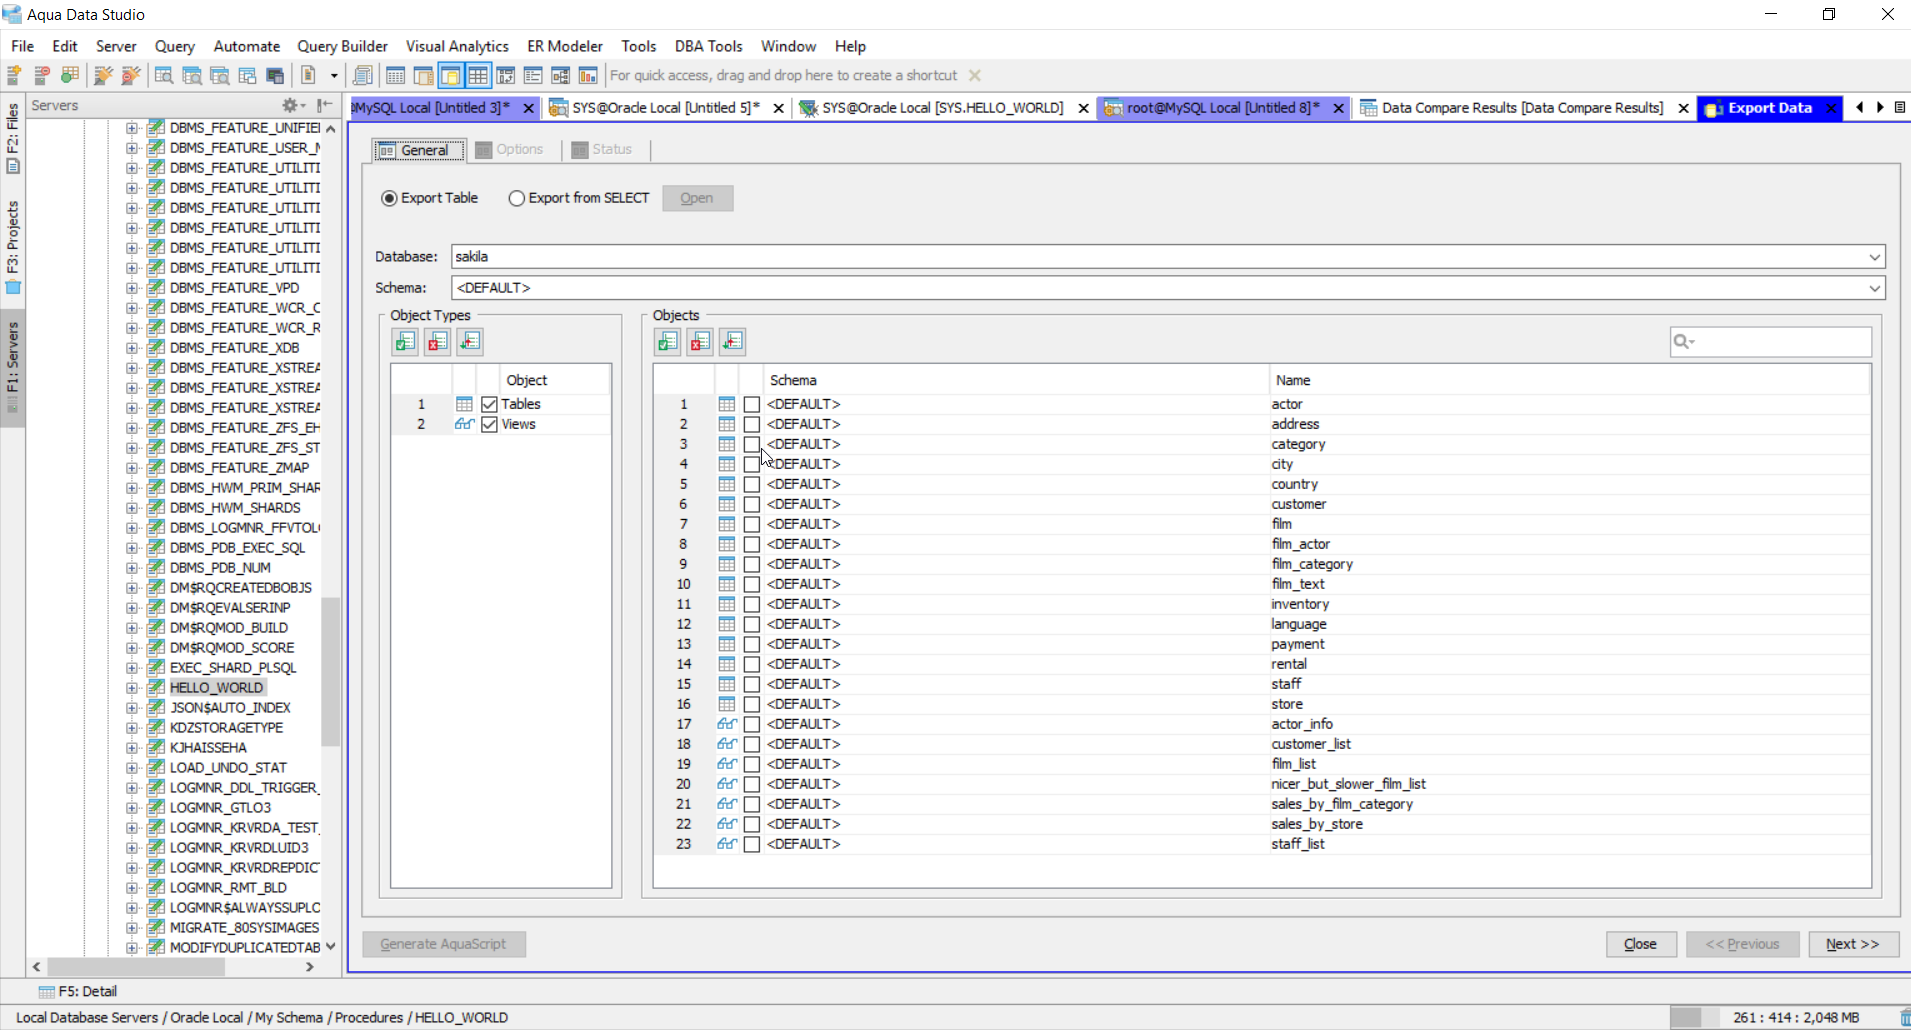
You can then specify the options for the file to be saved, such as the type and the encoding. You can save it as either a delimited file (such as CSV) or a series of Insert statements.
In DBeaver, you can export data by right-clicking on a table and selecting Export Data.
You can export to a range of data formats, such as CSV, HTML, JSON, SQL, and more.
Once you select a file format, you can specify the table mapping details, the settings for extraction, and the file to save.
Proceed until the end of the wizard and your data will be exported.
Both editors have helpful and easy-to-use data export features.
Generate SQL Scripts
Aqua Data Studio has a feature called "Schema Script Generator", which lets you generate a DDL script for database objects.
This is helpful if you need to check the code into version control, make changes to an existing object using SQL, or create it on another database.
To do this, go to Tools > Script Generator. A new window will open.
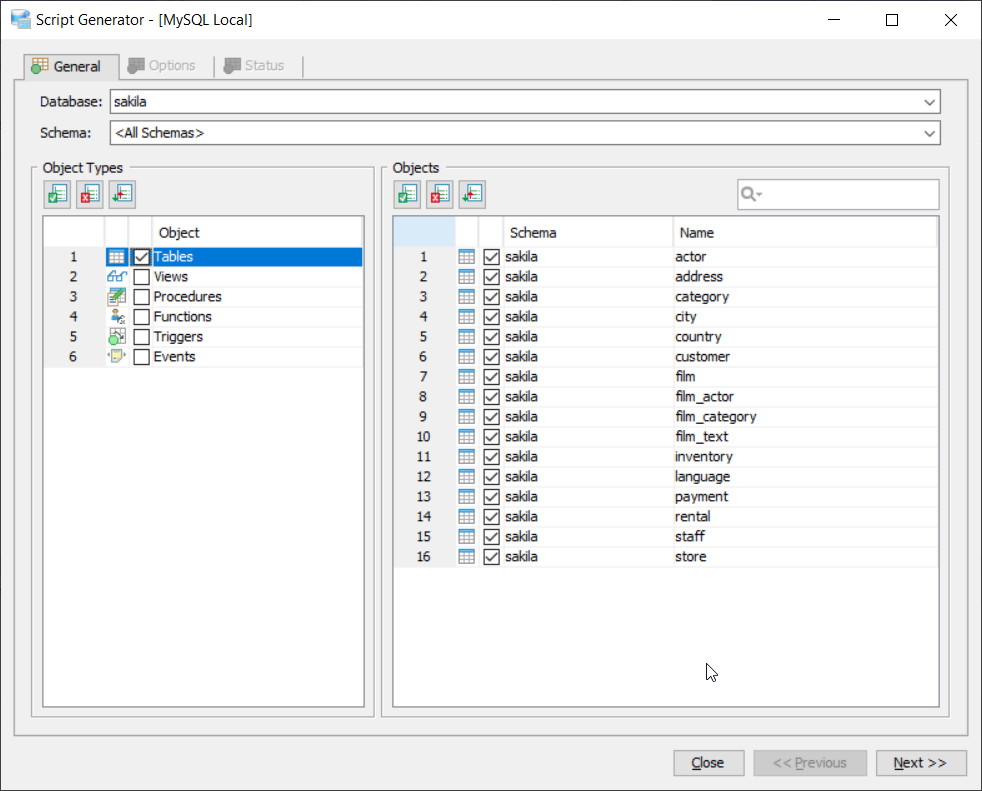
You can select the object type, such as tables, views, or procedures. You can then select the specific objects to generate a script for.
You can specify many options for this generation process to customise it just the way you want.
At the end of the process, an SQL script is generated that can be used to create the object you specified.
In DBeaver, you can do a similar thing but it's not as customisable.
You can right-click on an object, and select Generate SQL > DDL.
A new window will open with the SQL to be used to create the object.
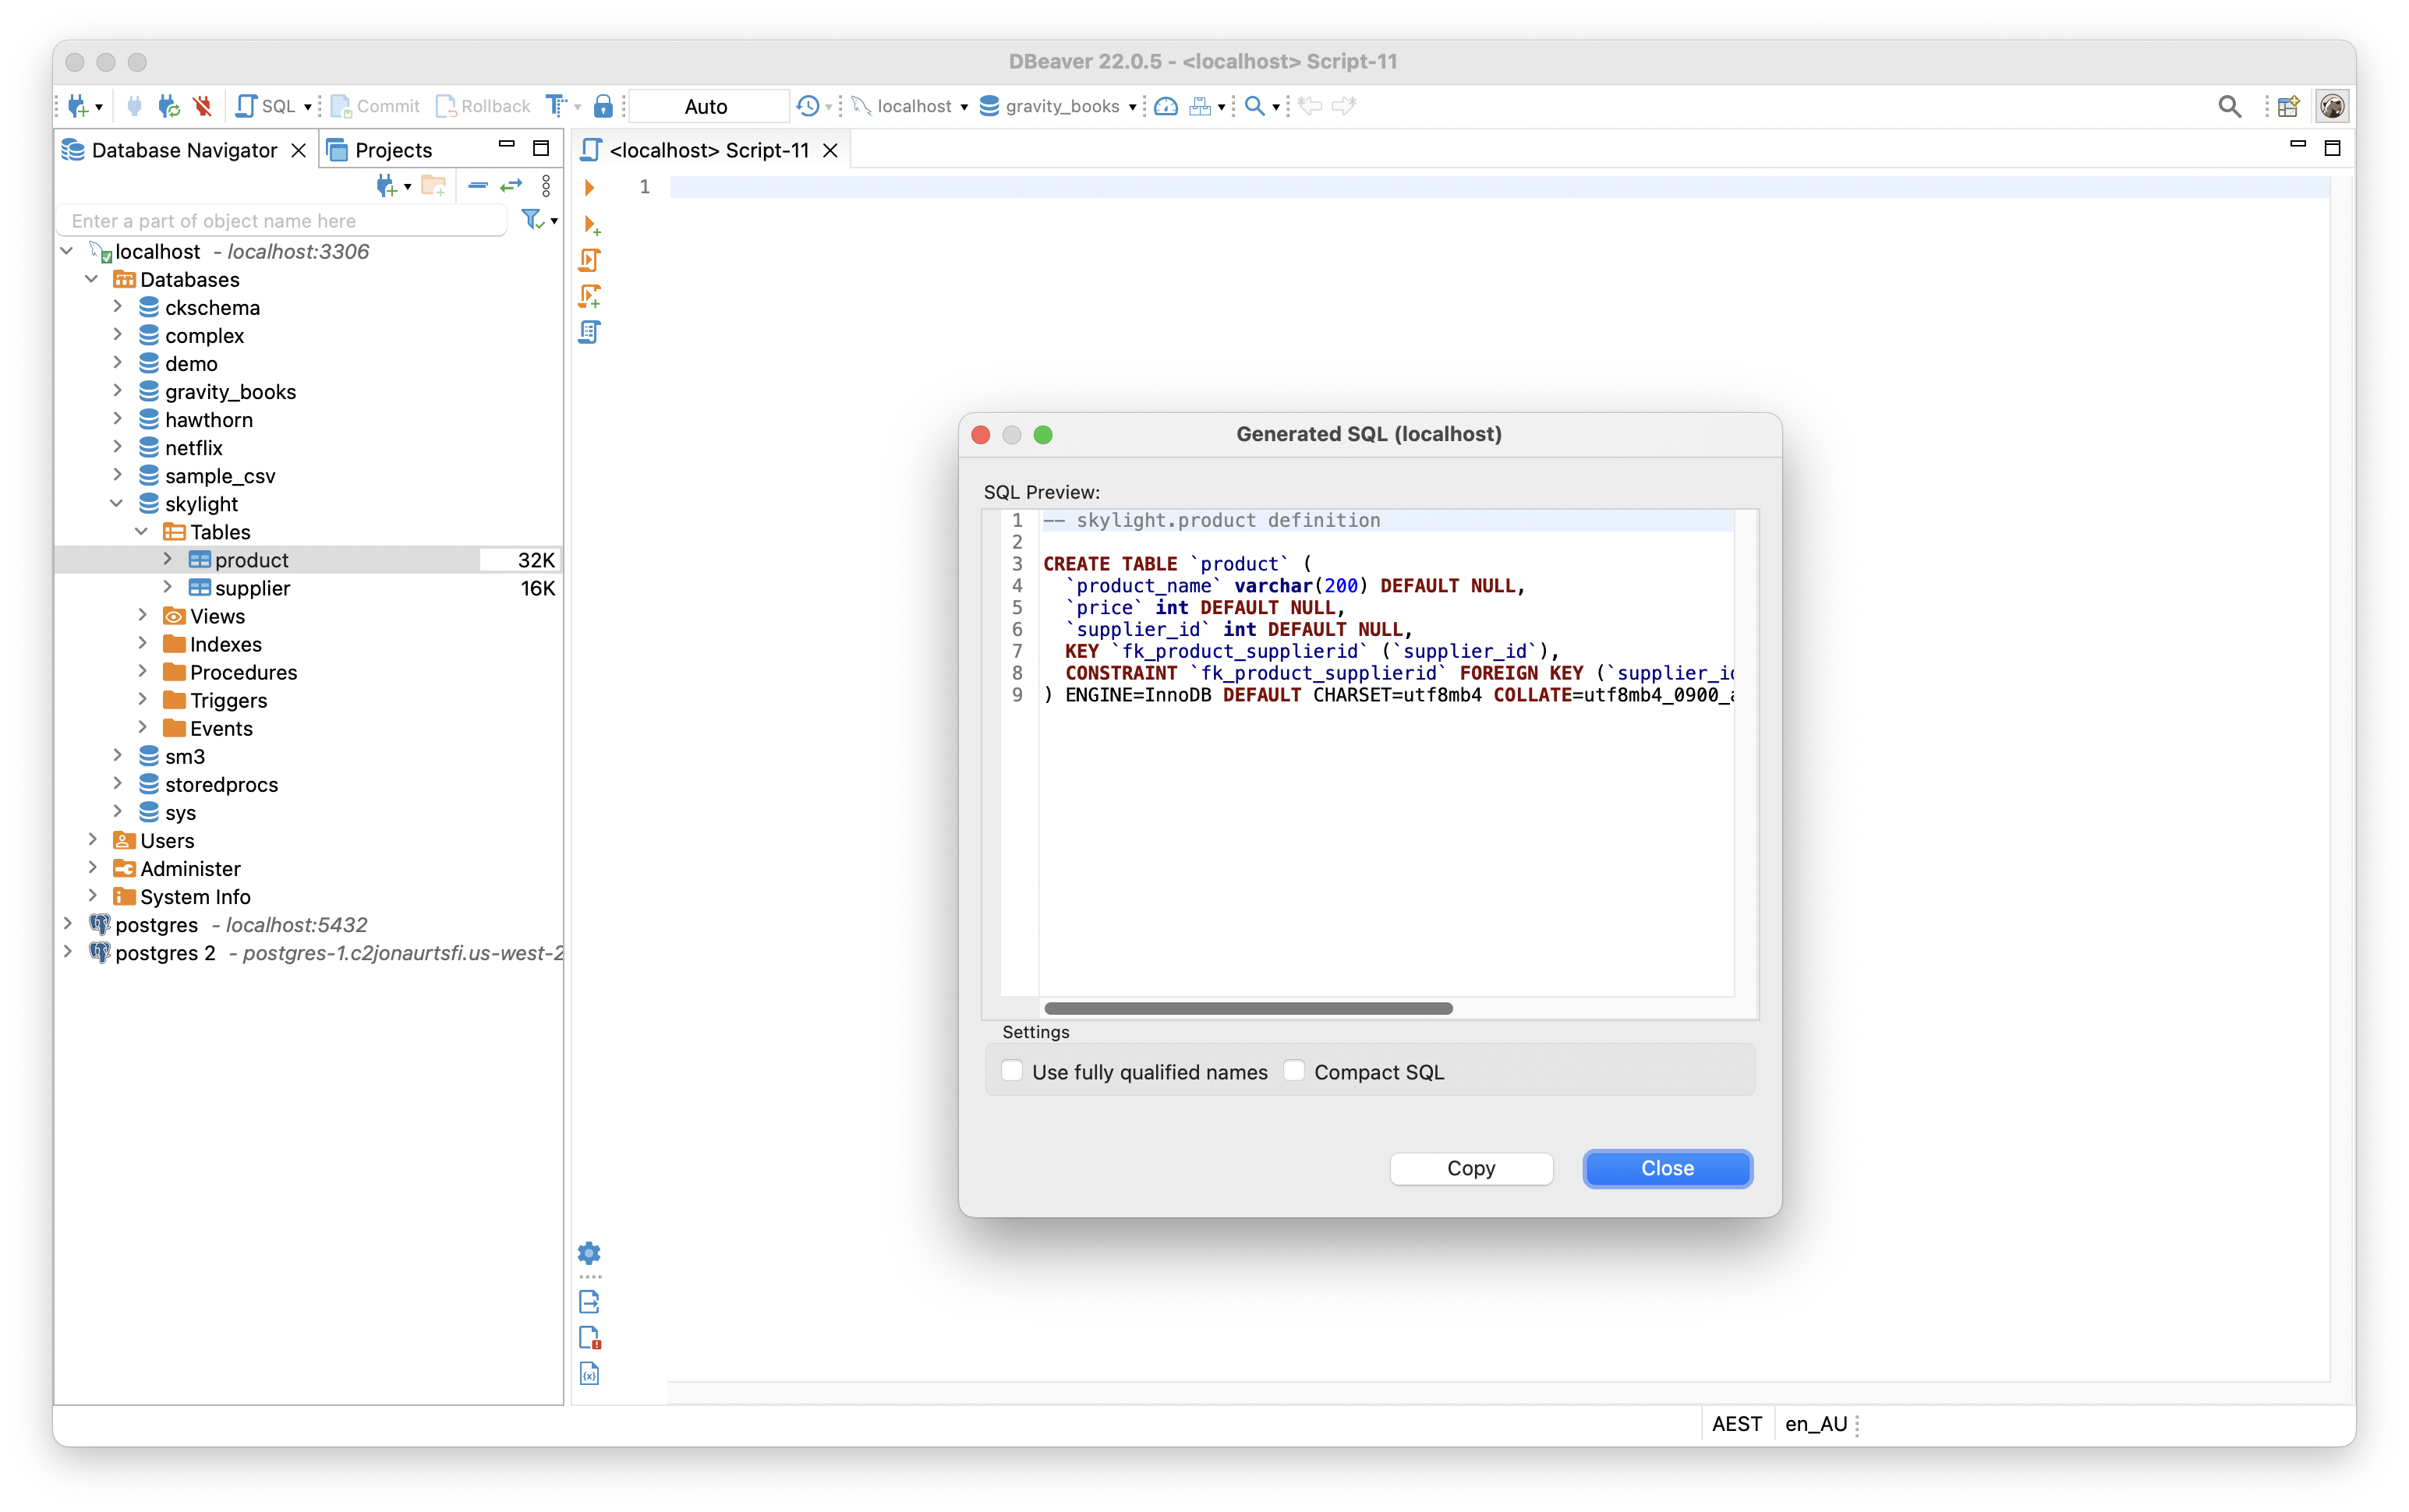
You can specify whether you want to use the fully qualified name and use compact SQL.
You can copy the script that is shown, and save it to an SQL editor tab. You'll then have to save it to a file if you want to keep it.
So, both editors offer the ability to generate SQL scripts from objects, but Aqua Data Studio's functionality is more comprehensive.
Table Data Editor
In Aqua Data Studio, you can edit the data in a table from within the results of a Select statement. This makes it easy to see the data and make the changes you want, rather than writing an Update statement to do the same thing.
You can do this in one of two ways:
- Right-click on the table in the explorer and select Edit Table Data
- Write a Select query and click Execute Edit.
You will then be able to edit the data in the results panel and save your changes to the table.
DBeaver has a similar feature. You can run a Select query and see the results in the results panel.
You can then edit the data from the table in this results panel. Only certain types of queries can have their data edited, such as tables that have a foreign key and those that are not aggregated.
If it is a query where the results can be edited, it can be easier to do this in the results panel compared to writing an Update statement.
Object Search
In Aqua Data Studio there's a feature called Object Search. This will let you search for objects in the entire database.
To launch this feature, go to Tools > Object Search,
You'll see a new window where you can:
- filter by database and schema
- filter by object type (e.g. tables, views, procedures)
- specify the text to search for and where in the name to search
You'll see the results of your search which shows you the name and type of the object as well as its owner.
This is helpful if you're looking for an object and you know part of its name.
In DBeaver, there is no equivalent feature for Object Search.
However, the Object Explorer in the left panel allows you to filter the objects that are shown. You can type in a text value, and the objects in the panel are filtered to only show those that match.
This is a similar feature and can help you easily find a table or other object based on the name. However, it only works for the object types shown in the list, which is less than the types in Aqua Data Studio.
Server Script Generation for Database Management
Aqua Data Studio has a feature called Server Script Generation, which lets you easily generate scripts for database objects for assisting with database administration tasks such as backups.
You can find this by going to Tools > Server Script Generator.
In the window that appears, you can define the types of objects, which are more DBA-focused than the Generate SQL Scripts feature. This list includes types such as logins, jobs, alerts, and remote servers.
You can select the actual objects to include, then specify to save the script as one or separate files.
At the end of the process, you'll have the script (or scripts) generated, which can be used for migrating to another database or as a backup.
DBeaver doesn't include this feature. The closest you can get is right-clicking on an object and selecting to generate the SQL to create it, which we covered above in the Generate SQL Scripts section.
Execution Monitor
In Aqua Data Studio, you can use a feature called Execution Monitor to see information about runnings queries.
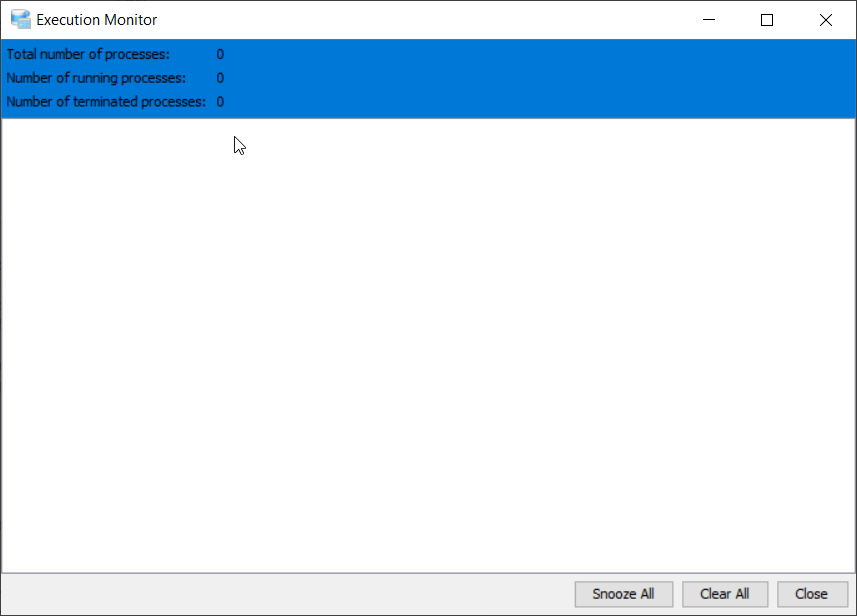
You can open the Execution Monitor which will show the number of queries being run. For each query, you can view the execution status, ID, execution time, and more. It's helpful if there are a lot of queries running on your computer, or you're connecting to another server and want to see what is running.
DBeaver has a similar feature called Query Manager, available in their Pro edition. It lets you view the history of queries that have been run, including the time it was run, duration, and the number of rows.
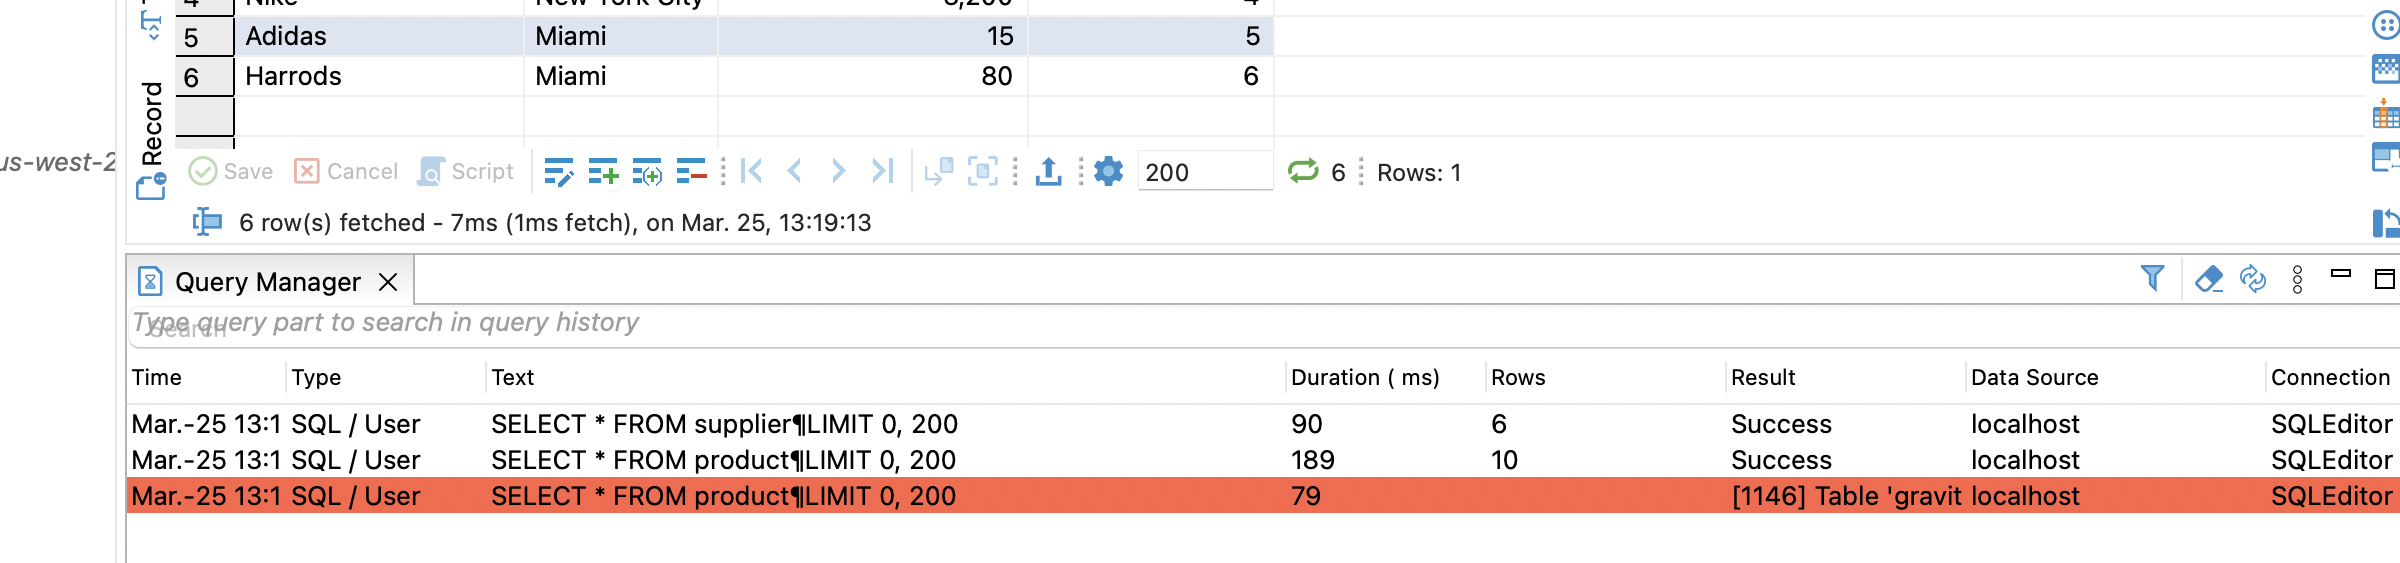
It doesn't show the currently running queries, but it shows the queries after they have finished executing, like the SQL History feature.
Connection Monitor
Aqua Data Studio includes a feature called Connection Monitor. This will let you see the connections that you currently have open, along with a range of details for each connection.
You can open this by right-clicking on the server you want to monitor, then Server Properties, and then Open Connection Monitor. Or you can open it from the Tools menu.
You'll see a list of the active connections, including details such as :
- Status (e.g. "running")
- The name of the tab for this connection, so you can relate it back to what you're working on
- The server name
- The module name of Aqua Data Studio that's using the connection
- Any vendor-specific identifiers, such as spid in SQL Server
- Results of monitoring features such as pinging, executing a query, and auto-commit.
Here's what it looks like:
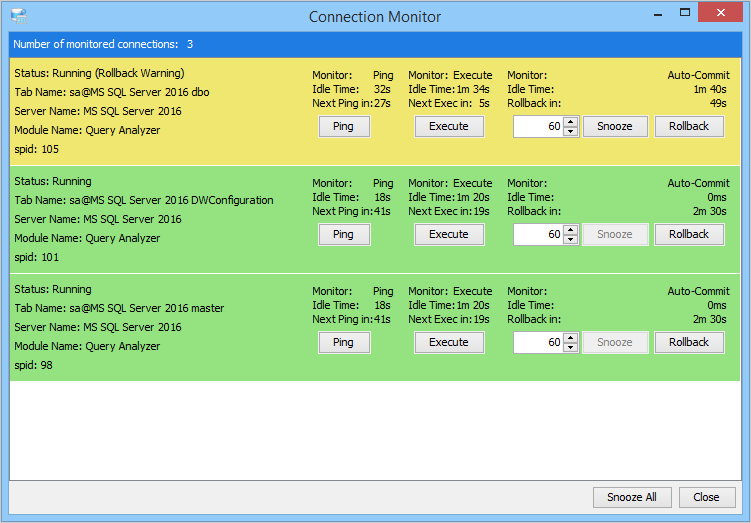
This is a helpful feature if you have multiple connections happening or want to investigate any potential issues with your server.
Database Administration
If you're a database administrator, you'll find a range of features available in Aqua Data Studio to help you with your job.
You can find the features split by database vendor and available in the DBA Tools menu.
For example, in Oracle, you have the following features:
- Instance Manager
- Storage Manager
- Rollback Manager
- Log Manager
- Security Manager
- Session Manager
- SGA Manager
- Server Statistics
For SQL Server, you have:
- Instance Manager
- Storage Manager
- Security Manager
- Session Manager
- SQL Server Agent Manager
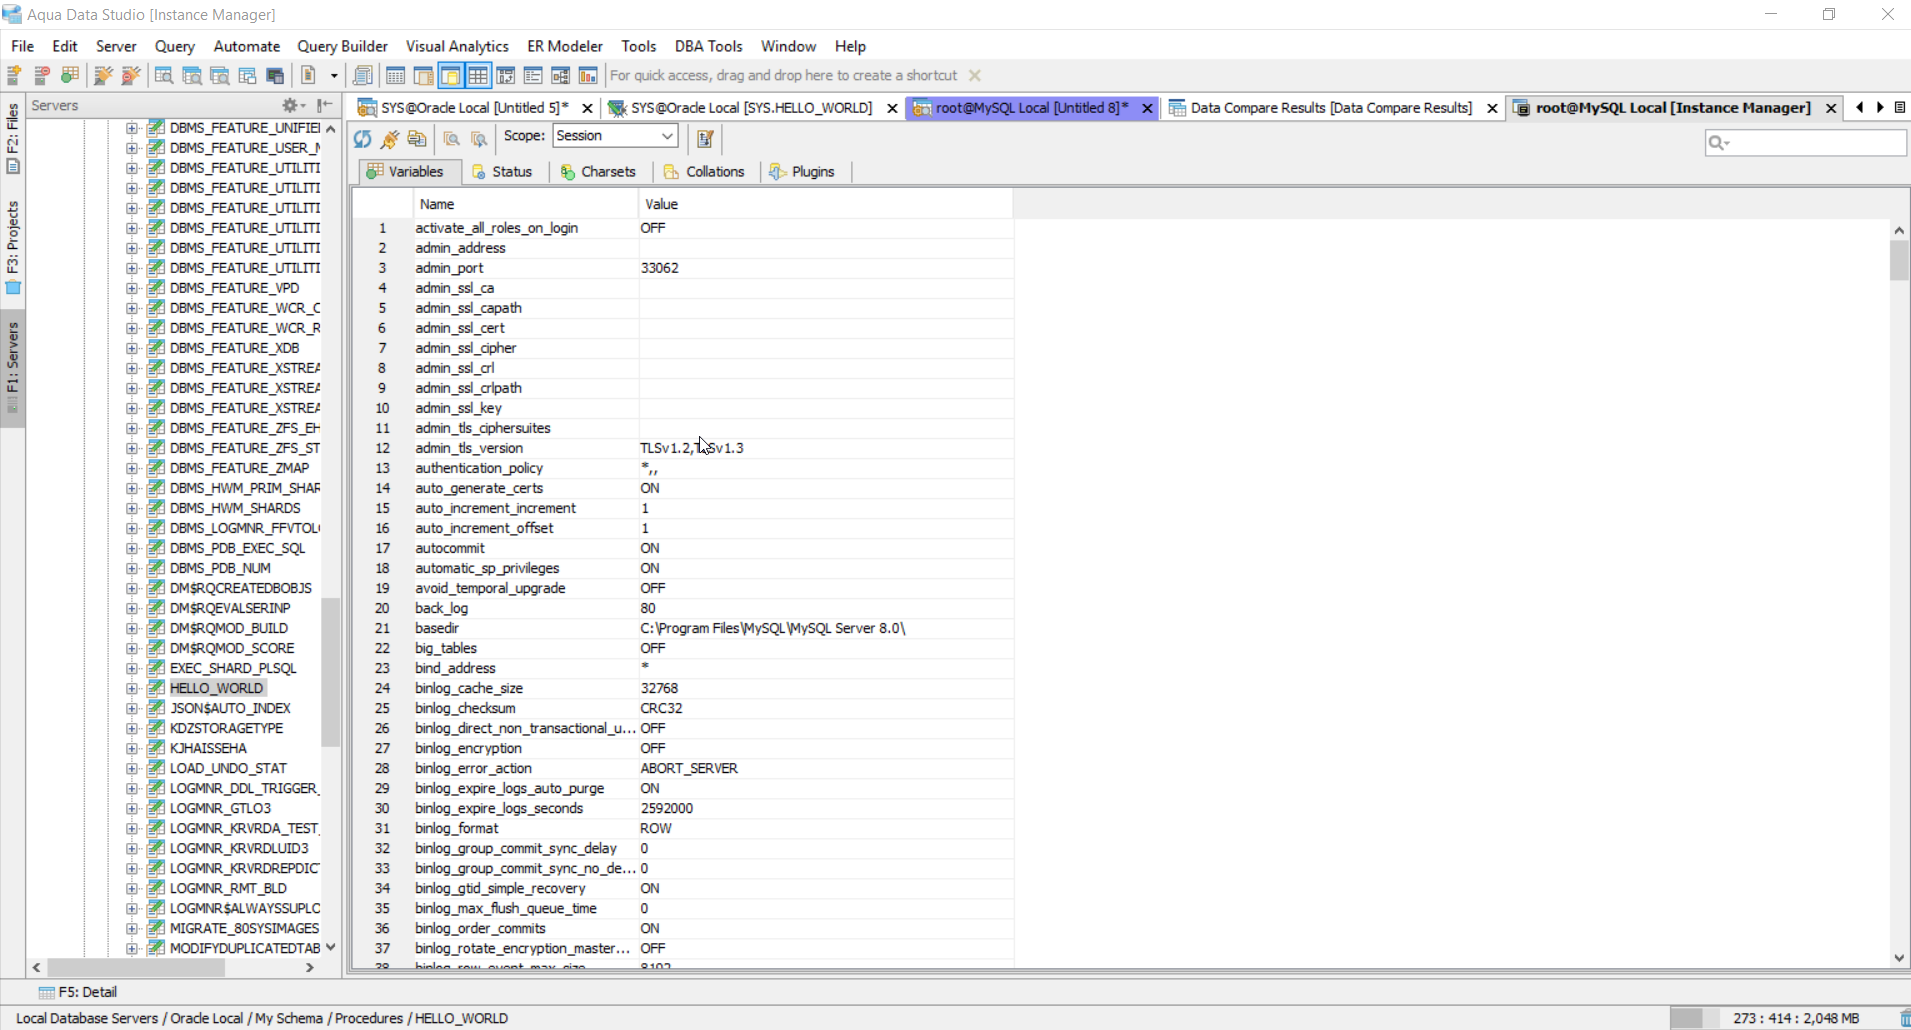
Here's what the Instance Manager looks like:
There are DBA tools for many of the other database vendors supported by Aqua Data Studio.
If you're a DBA you'll find these tools pretty helpful.
DBeaver doesn't have the same level of database administration tools as Aqua Data Studio. Perhaps this is because DBeaver is focused on the development and not on administration.
This means if you want to see how things are running in the database, you'll have to run queries on the system tables (for example, to see generated logs).
Settings Configuration
A helpful feature of many SQL editors is the ability to customise how the tool works. Both Aqua Data Studio and DBeaver do not disappoint - they both have very good customisation options.
In Aqua Data Studio, you can open the Options window to change a lot of settings for the application.
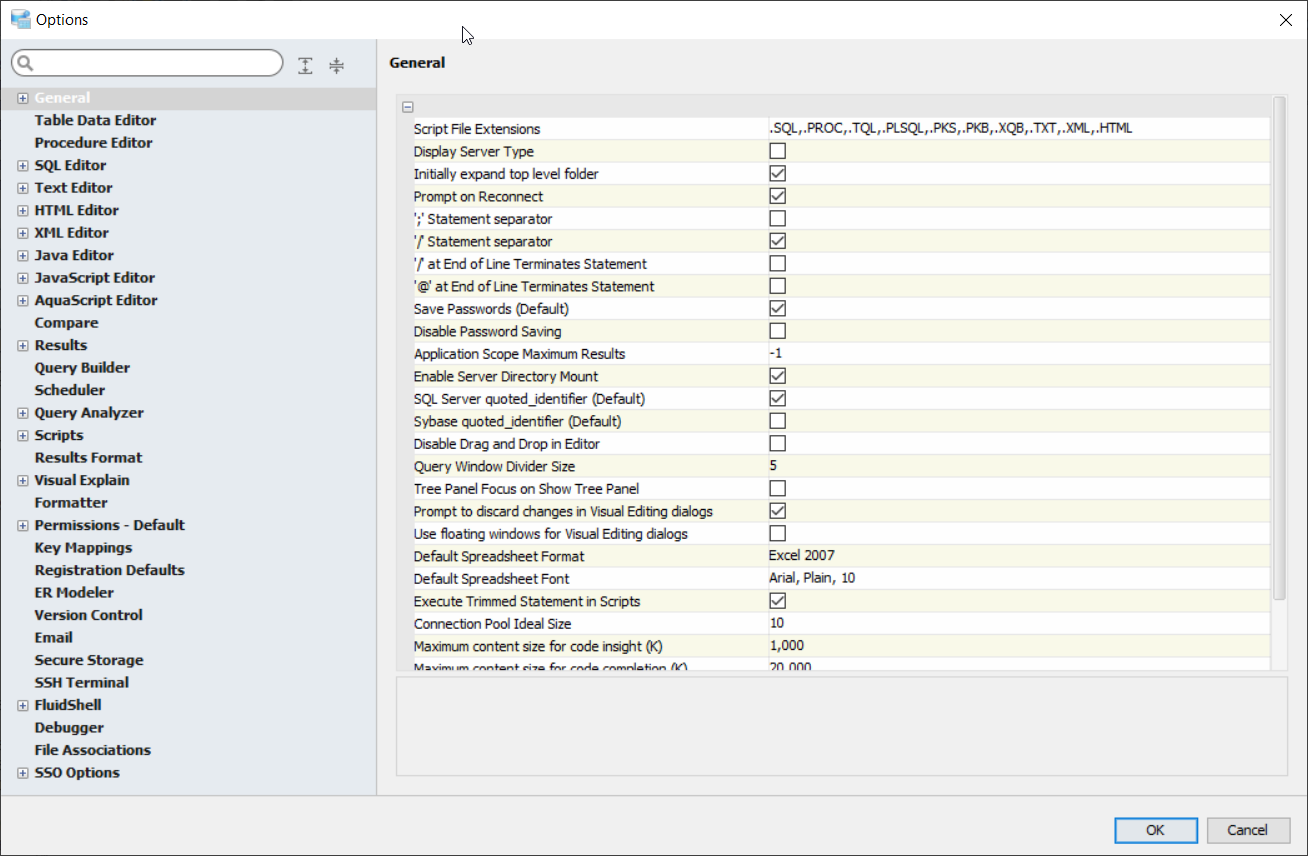
The settings are grouped into pages, which are grouped into categories and shown on the left panel. You can expand and collapse categories to drill down into the kind of settings you want to alter.
You can also use the search textbox at the top of the window to find a specific setting if you know what it's called, such as line numbers or formatting.
I won't explain all of the settings that can be changed here, but there are a lot, and they are explained in the documentation here.
DBeaver's settings can be changed in the Preferences window.
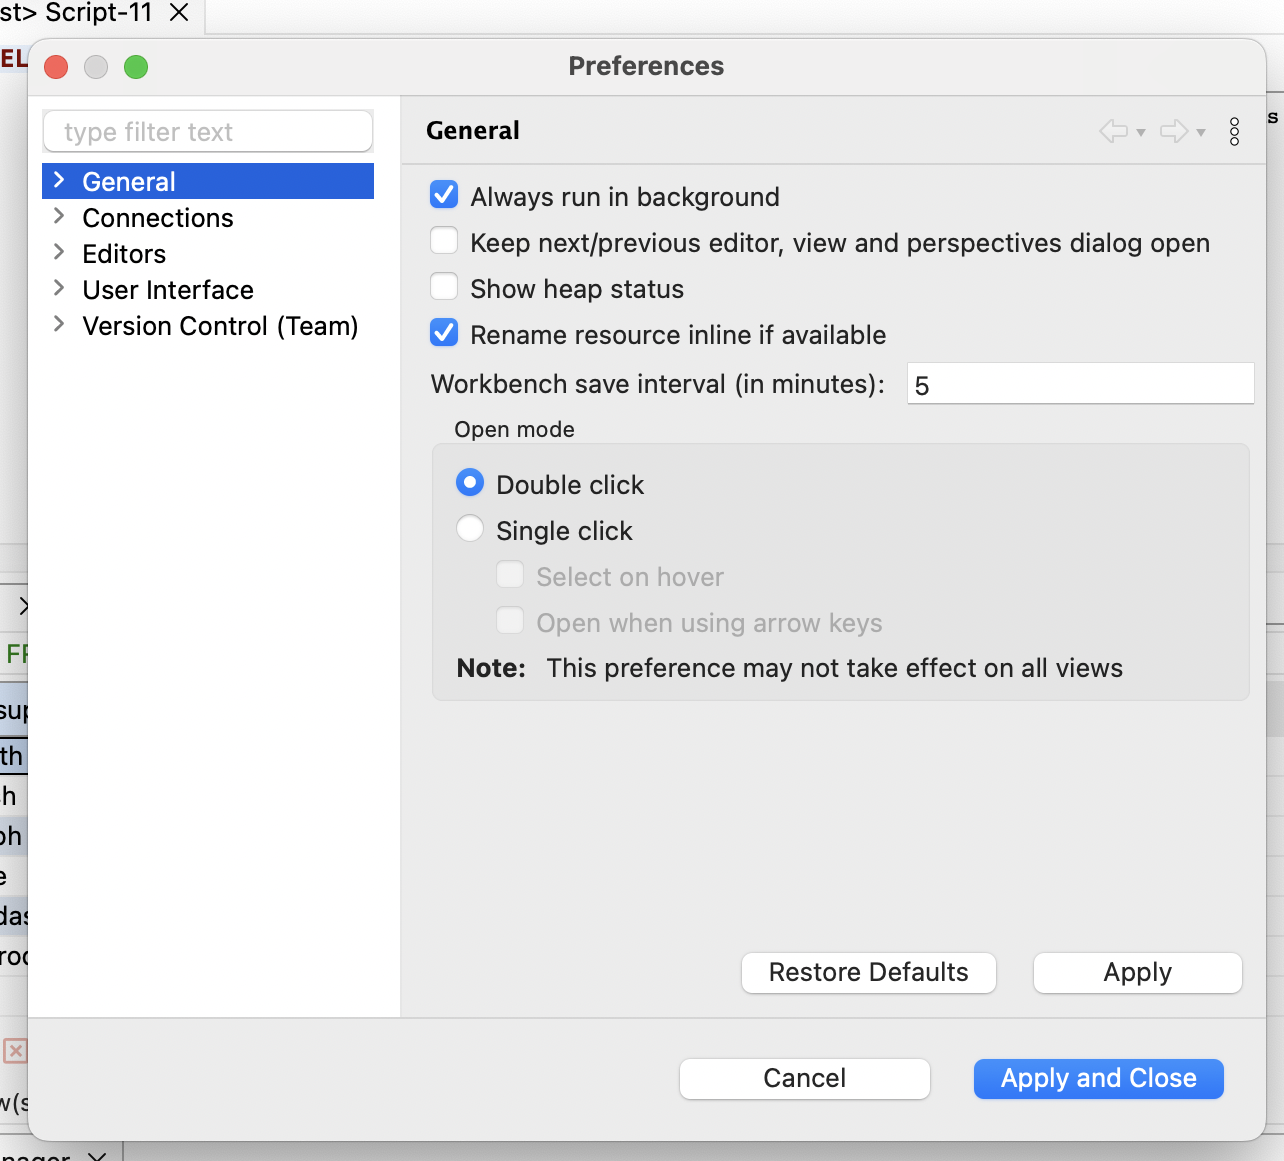
The layout looks similar, where the settings are on pages that are grouped into categories.
At first glance, it looks like there are fewer settings, but this could be because there are fewer features, or the groups are different. The settings that can be changed are pretty comprehensive, which is great to see.
There's also a search or filter textbox on the top of the window if you know the setting you are looking for, which can save you time.
Conclusion
Both Aqua Data Studio and DBeaver are great SQL editors and can serve you well when you're working with databases.
In my opinion, Aqua Data Studio seems to be a more comprehensive tool and has a range of extra features to make your life easier as a database developer, administrator, or software developer.
DBeaver is a good alternative if you're not able to get the budget for a paid tool like Aqua Data Studio.
If you're interested in checking out Aqua Data Studio to find out more, they have a trial version available, which you can find out more about here:
I hope you enjoyed this comparison post. If you have any questions or comments, put them in the comments section below.