GitHub Tutorial for SQL Files
Do you want to, or need to, learn how to use GitHub for your SQL files?
GitHub is a commonly-used service for application development. But it can also be used for your SQL scripts and other files used in development.
In this guide, you'll learn:
- how to sign up to GitHub
- how to create a repository to store your files
- how to add and update files to this repository
- how to access your repository using the new "personal access token" method
- and more!
Let's get into it.

Step 1: Sign Up for GitHub
The first step is to sign up for GitHub.
Visit the website at GitHub.com. The page should look something like this:

Click on the Signup bottom on the top right.
Creating an account and using GitHub is free. There are paid components, but you can do everything you need to do with a free account.
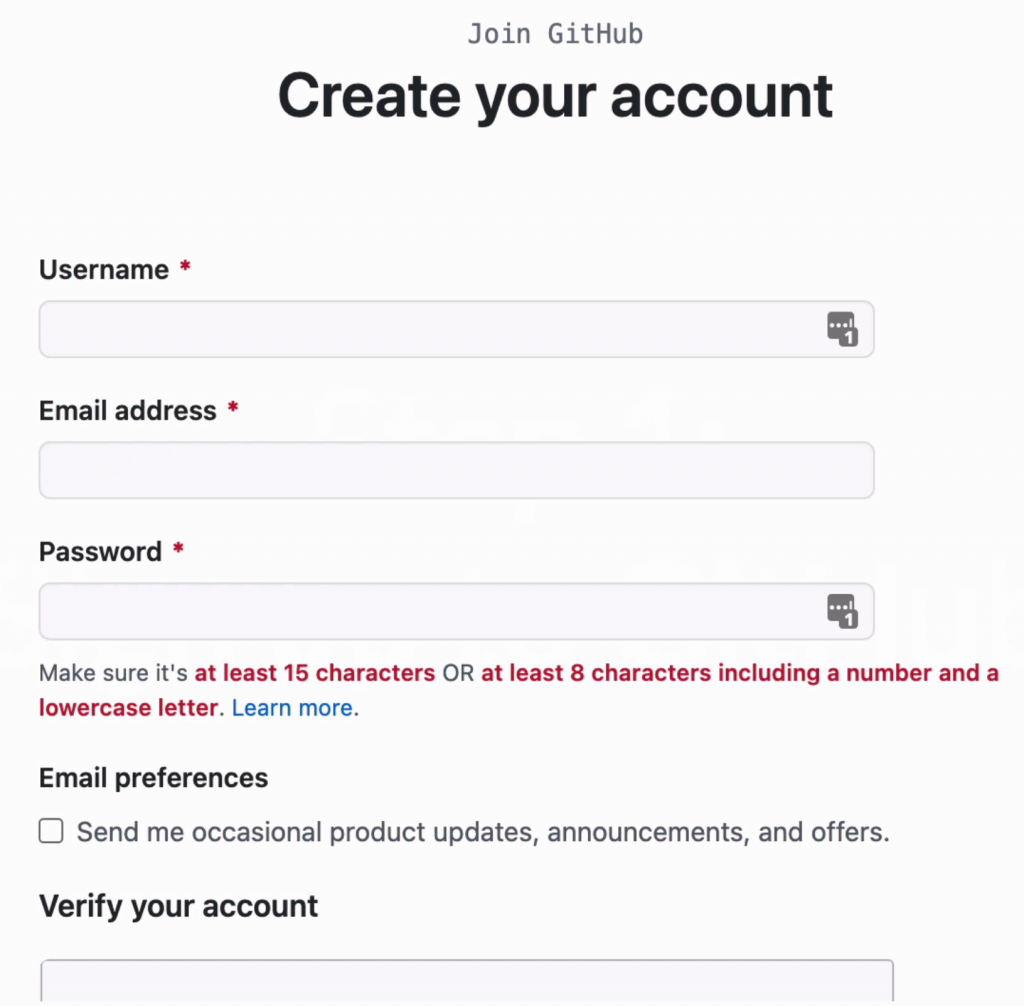
On the Signup page, enter a username, email, and password you want to use. Click Create Account.
You'll then be asked to verify your email.
You'll receive an email from GitHub shortly to confirm your email address, so click on the link in that email.
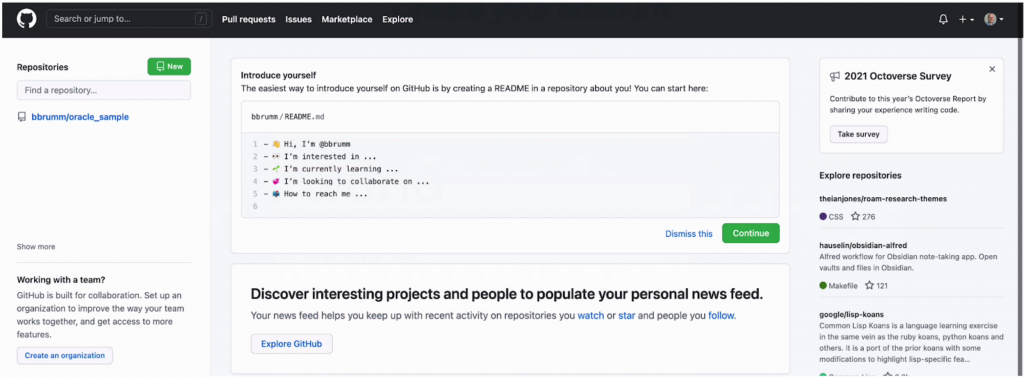
Once you've verified your email, you'll arrive at the GitHub homepage.
If you don't see this page after confirming your email, you can login to GitHub using the details you provided when you signed up.
Step 2: Create a Personal Access Token
Now your account is set up, the next step is to create something called a "personal access token".
Why? We'll need to access our GitHub account from outside the website, using a command line or an IDE. In order to do this, we need to be able to provide our username and password.
However, in 2021, GitHub is encouraging and now forcing users to use a new access method.
This new access method is called a Personal Access Token.
Without going into too much detail, it's something we can set up inside our account on the website, and provide it when we log in to other tools.
It's pretty easy to set up, so let's do that now.
After you've logged in to GitHub, click on your profile icon on the top right.
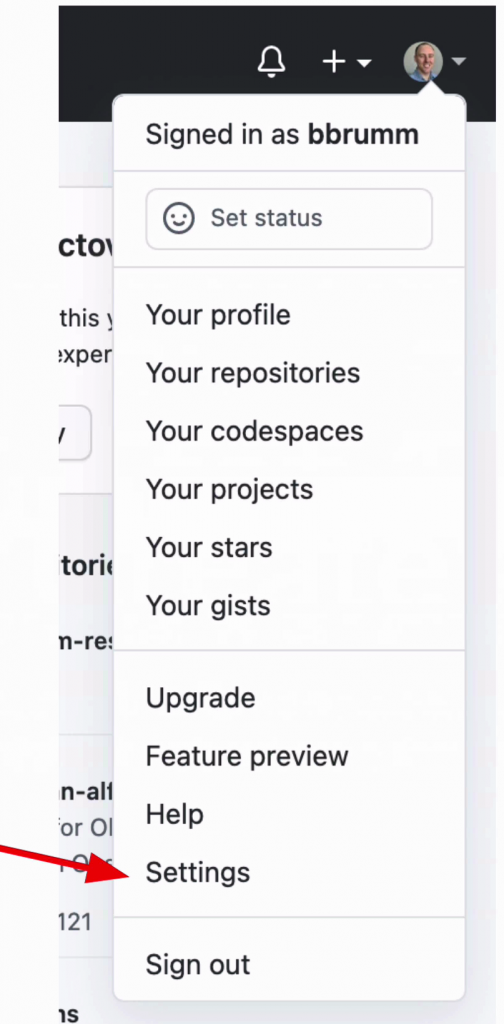
Then, click Settings.
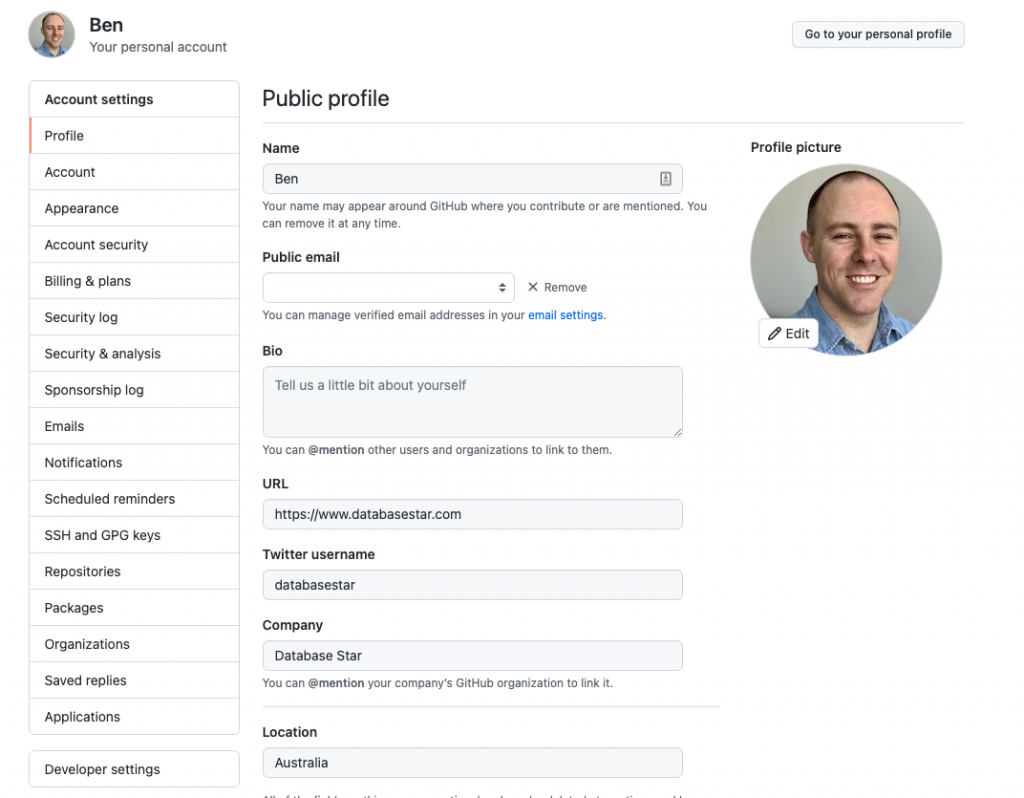
On the left, click Developer Settings.
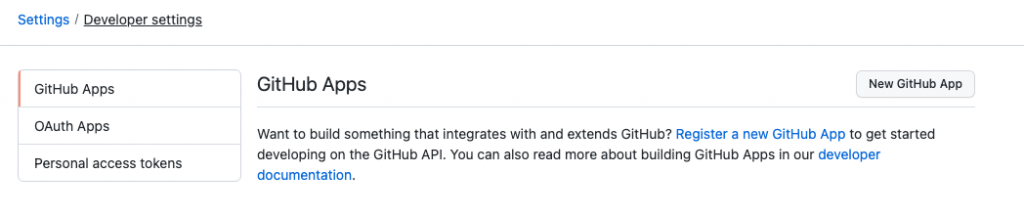
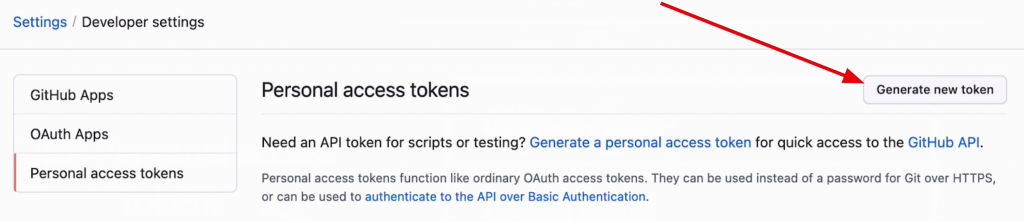
Now, click on Personal Access Tokens.
Click Generate New Token.
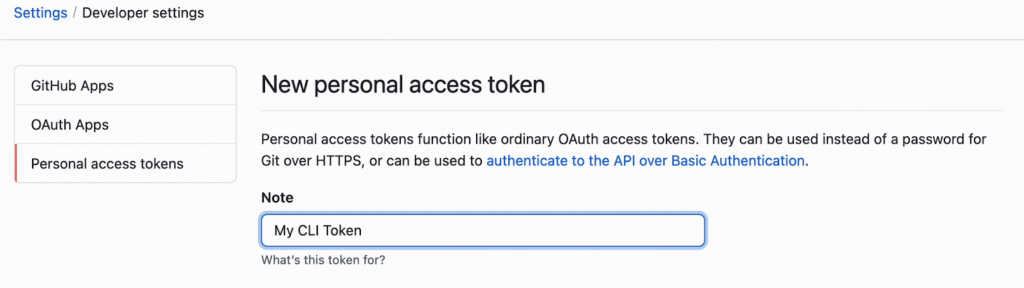
Enter a name for your new token.
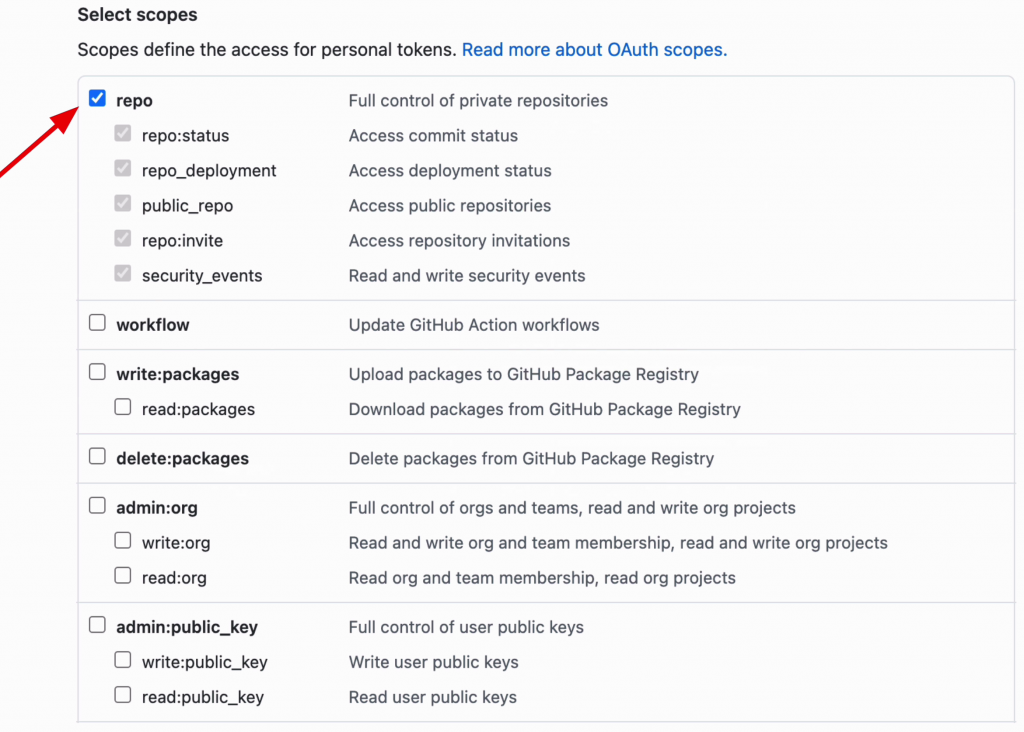
Then, select the scopes you'd like to be able to use for this token.
Scopes are like permissions, and the scopes you select here will be activated wherever you use this token.
In this example, we'll select the "repo" checkbox at the top.
Click Generate Token.
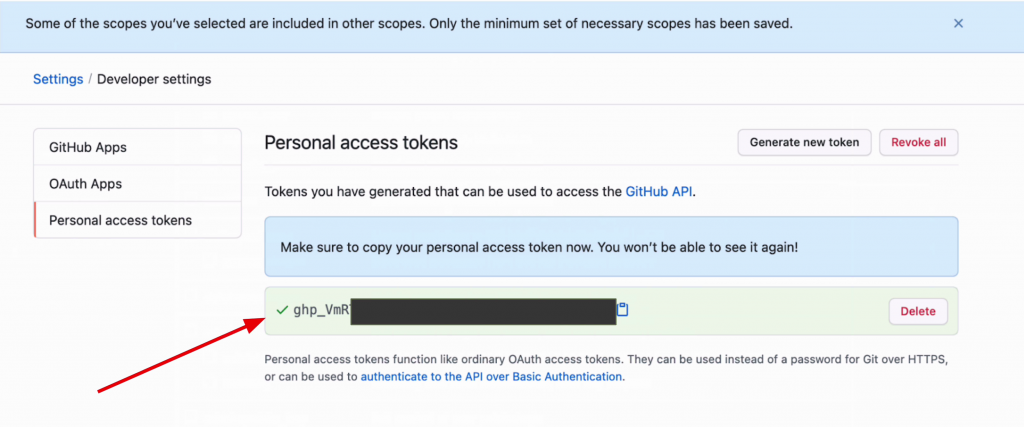
A screen will appear with your token, which is a long series of letters and numbers.
Copy and paste this somewhere that you'll remember, as once you close this window, you can't get the token again.
Now you have your token! We'll use this in our login process shortly.
Step 3: Create a New Repository
We're going to create a place in your GitHub account to store your files. This is called a "repository". You can have many repositories in your account, and a repository is created for each project you work on.
A repository is often called a "repo" for short.
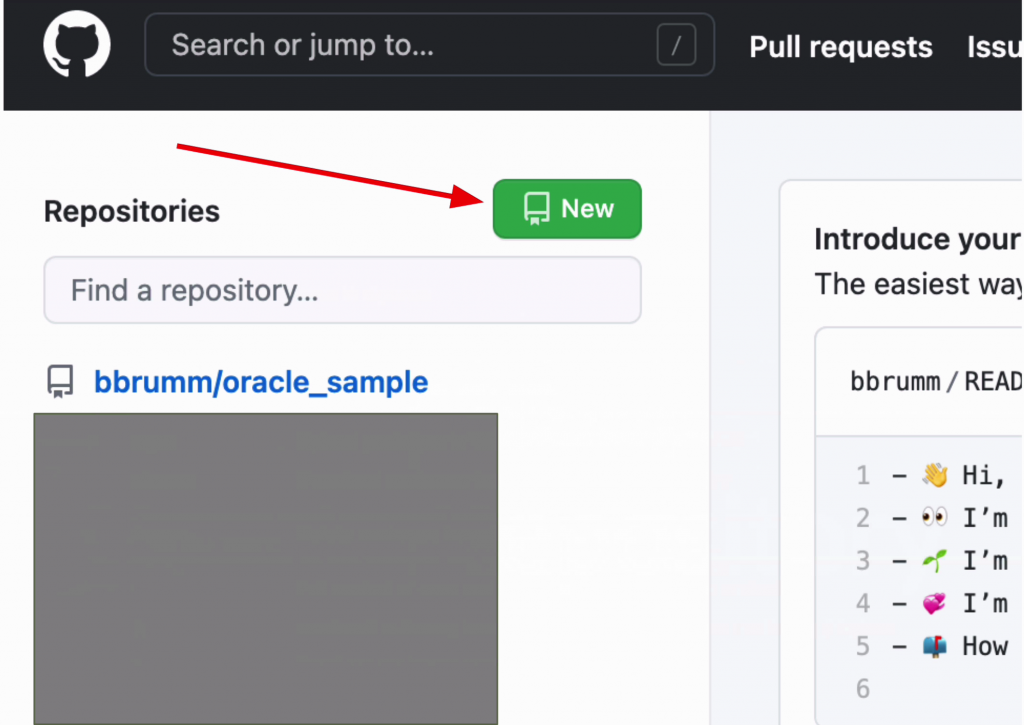
Return to the main page in GitHub by clicking in the top left corner.

To create a repository, click on the green New button on the left of the screen, next to Repositories.
You'll be taken to the new Create a New Repository page.
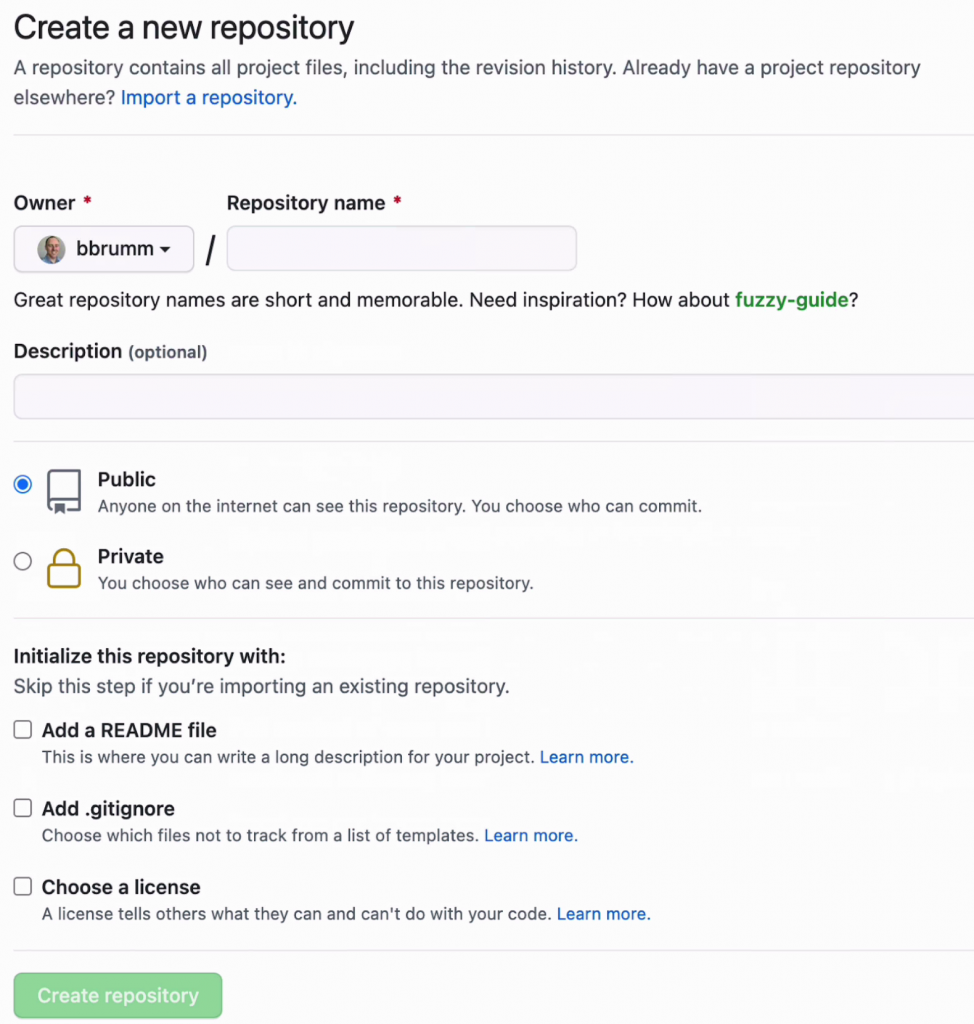
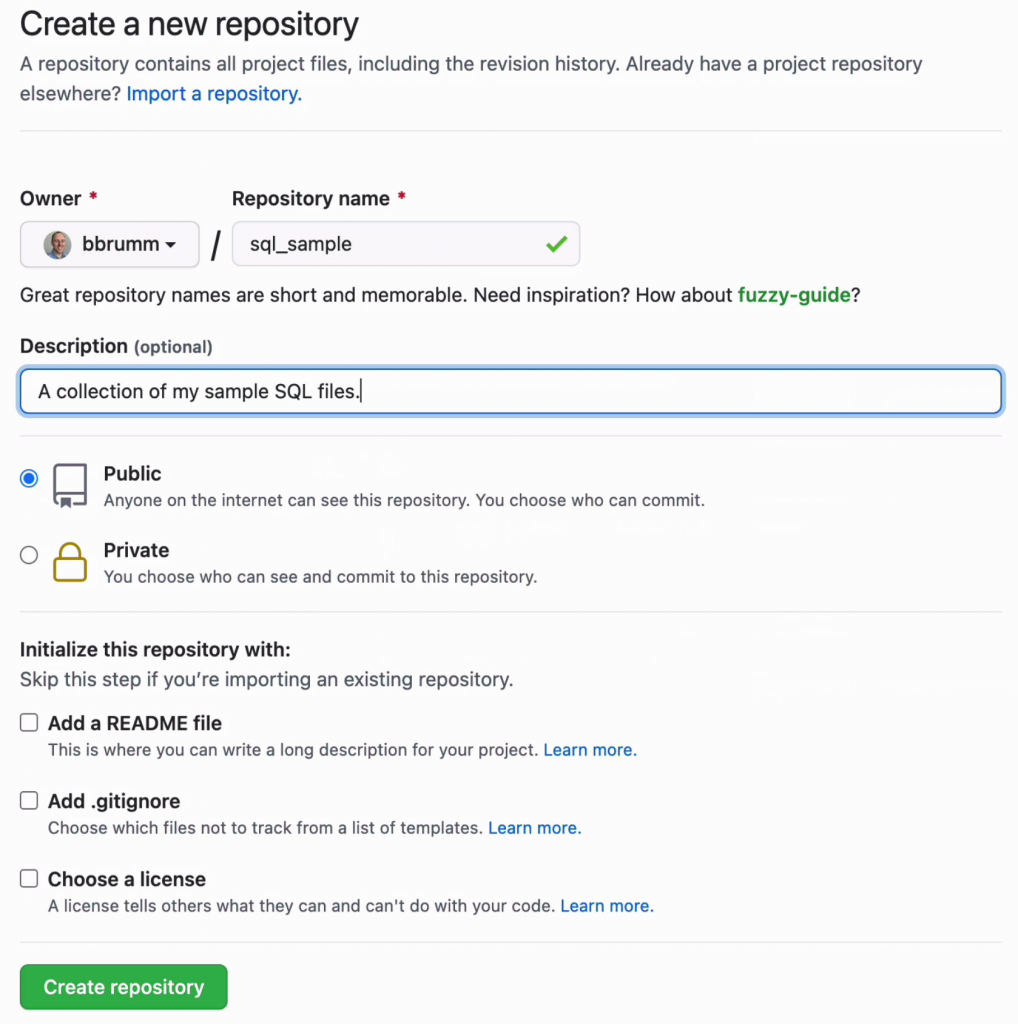
Enter a name for your repository. You can also enter a description if you like.
You can leave the visibility section as public for this demo, but if you want to restrict access, change this to Private.
The last few options at the bottom are optional. You can have a readme file automatically generated, which is handy, so we'll select that.
A gitignore file is also helpful, but we won't need one for our demo. Same with license. So we'll leave those unchecked for now.
Click Create Repository at the bottom.
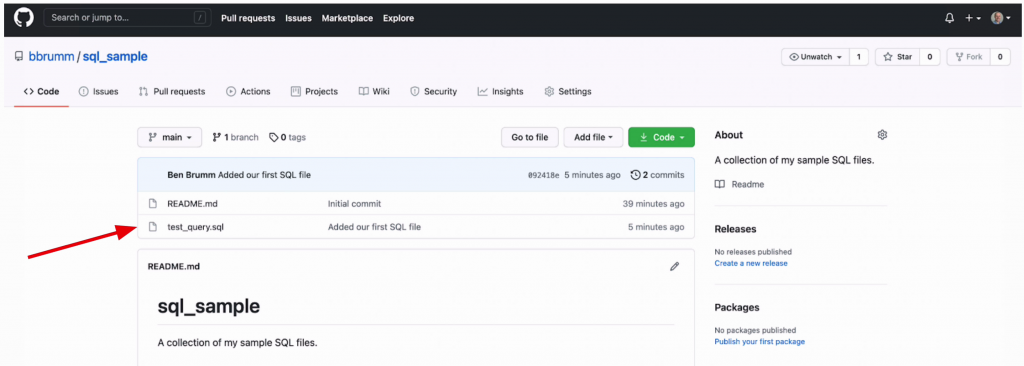
Your repository is now created! Your page should look something like this.
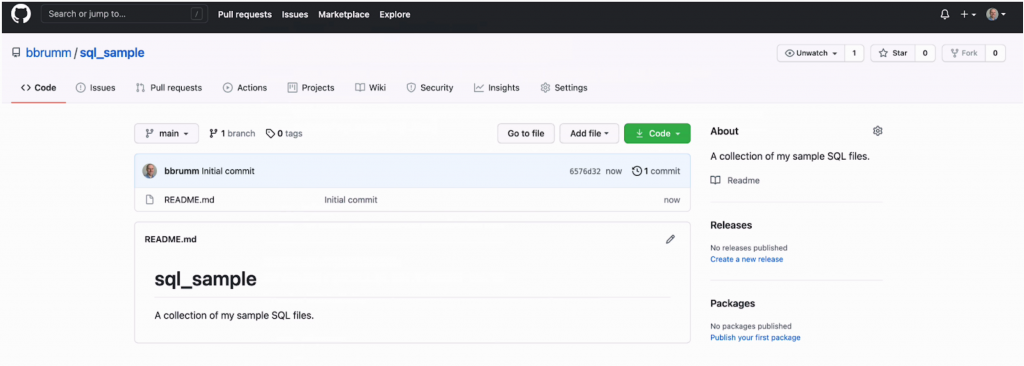
Your account name and repository name are shown at the top left here. In this example, my account name is bbrumm and the repository name is sql_sample.
On the right, under the About section, is the description of the repository if you entered one on the previous page.
In the middle of the page is a list of files in the repository. If you selected to create a readme file, you'll see a readme.md file here. The MD extension stands for markdown.
Below the list of files is the readme file. We see the name of the repository, which is sql_sample, and the description. The readme file here can be edited to add more information.
Now our repository is created, let's move on to the next step.
Step 4: Add the Repository to Your Computer
The next step is to get the files from this new repository onto your computer. We do this using the command line.
There are other tools that can be used, such as Git Desktop, or features in your IDE. I'll go over those in other posts, but for now, we'll use the command line.
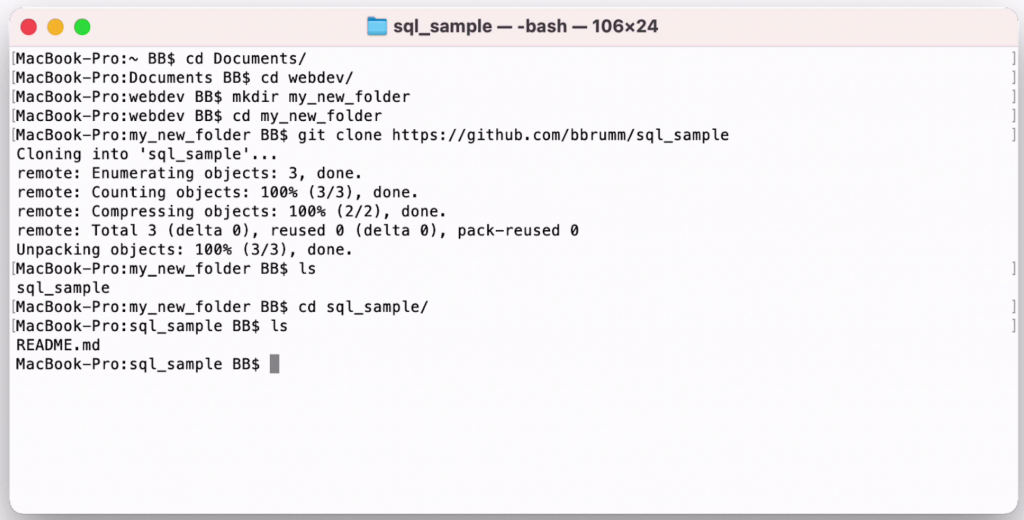
Open the command line on your computer. On a Mac, this will be Terminal. On Windows, this will be the Command Prompt.
We're going to use the terminal to download and link the repository we created on GitHub to a location on your computer.
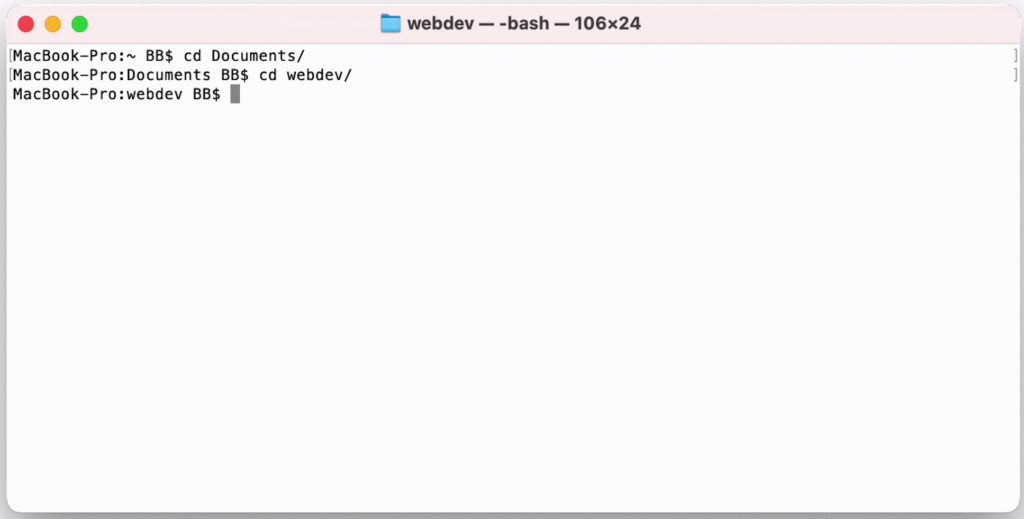
The first step is to browse to a folder where we want this to be created.
My default folder here is BB. I can use the "cd" command, which is short for "change directory".
So, I'll change to the Documents directory inside BB, then the webdev directory inside Documents.
1cd Documents
2
3cd webdev
Here's what it looks like in the Terminal:
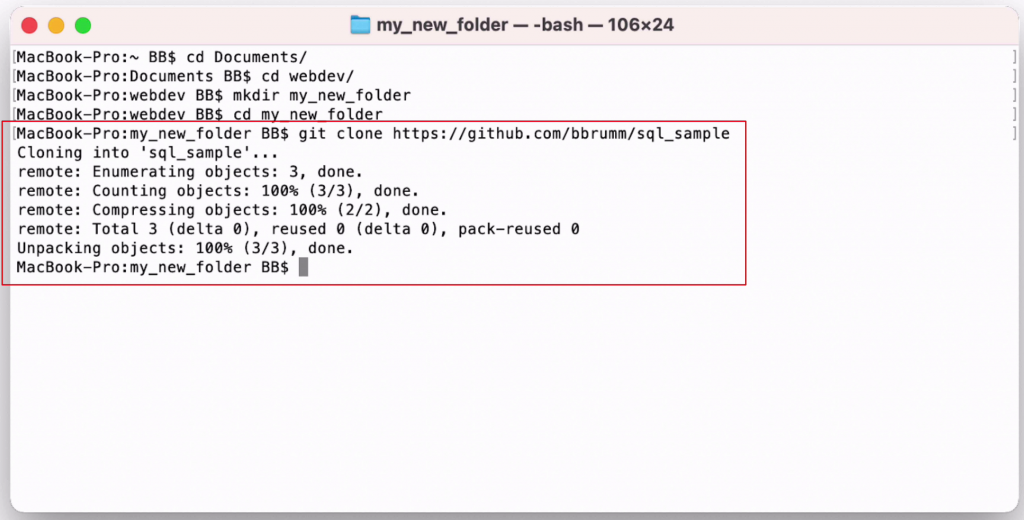
These directories already exist. You can create a new directory using the mkdir command, for example:
1mkdir my_new_folder
So, how do we get the repository we created on GitHub onto our computer?
We use a command called "git clone". This will download the repository and link the current folder to the repository for future commands.
To do this, we enter "git clone", then the URL for our repository. In this example, it is https://github.com/bbrumm/sql_sample
1git clone https://github.com/bbrumm/sql_sample
Then press Enter to run the command.
You'll be prompted for your username and password for GitHub.
If you get an error saying the git command is not recognised, you'll need to install "git". This comes with MacOS and may already be on Windows, but if not and you need to install it, you can follow the instructions here.
Enter your username from when you signed up on GitHub.com
For the password, don't enter the password for GitHub.com.
Instead, enter the token: that long text string you created on the Personal Access Token section of the website.
This login should only need to be done once. Once you do this, the files will be downloaded to that folder.
You can check that the files have appeared by using the ls command (or dir on Windows).
1ls
1MacBook-Pro:my_new_folder BB$ ls
2sql_sample
You can see the sql_sample folder which was created by the git clone command.
Use the cd command to go into this folder.
1cd sql_sample
Then run the ls command again
1ls
You should see one file here, called readme.
This was the file you created when you created the repository.
So, we've got the repository on your computer. What's next?
Step 5: Create a New File
The next step is to create a file in our new repository. It can be anything you like, but because we're focusing on using this for SQL files, we'll create an SQL file.
There are several ways you can create a new file here:
- a text editor
- a command line
- and IDE
We'll use a simple text editor for this example.
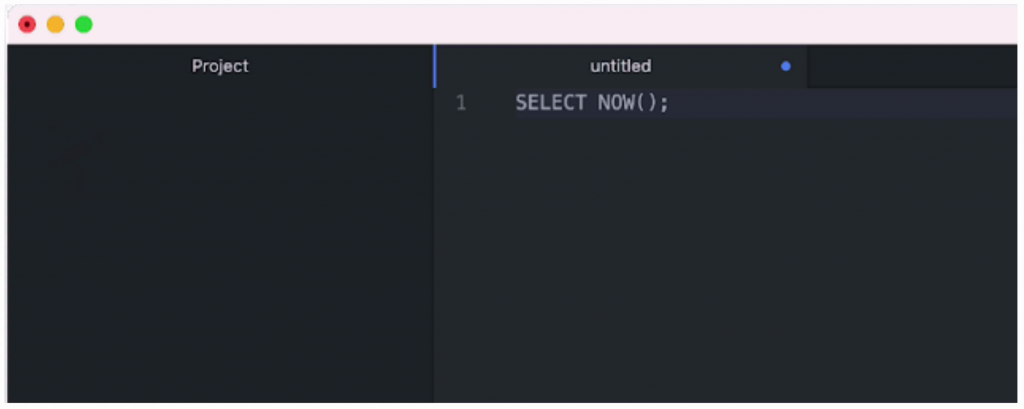
Open up your favourite text editor. I'll be using Atom here, but you can use any other tool. You can also use an IDE such as SQL Developer or SSMS or MySQL Workbench if you prefer.
Create a new file and enter a simple SQL query. It doesn't matter what the query is, as we're not going to run it. It's just to demonstrate the purpose of source control and GitHub.
We'll use a query to get the current date:
1SELECT NOW();
Here's the query in Atom:
Now, save the file in the folder where the repository was set up. This was the sql_sample folder:
BB > Documents > webdev > sql_sample
Save the file with a .sql extension, such as test_query.sql.

Now the file is saved, let's add this to our repository.
Step 6: Add the File to the Repository
The next step is to add this new file to your repository.
We'll run a few commands to do this.
Back in our Terminal (or Command Prompt) application, run the ls command again.
1ls
We should be able to see this new SQL file.
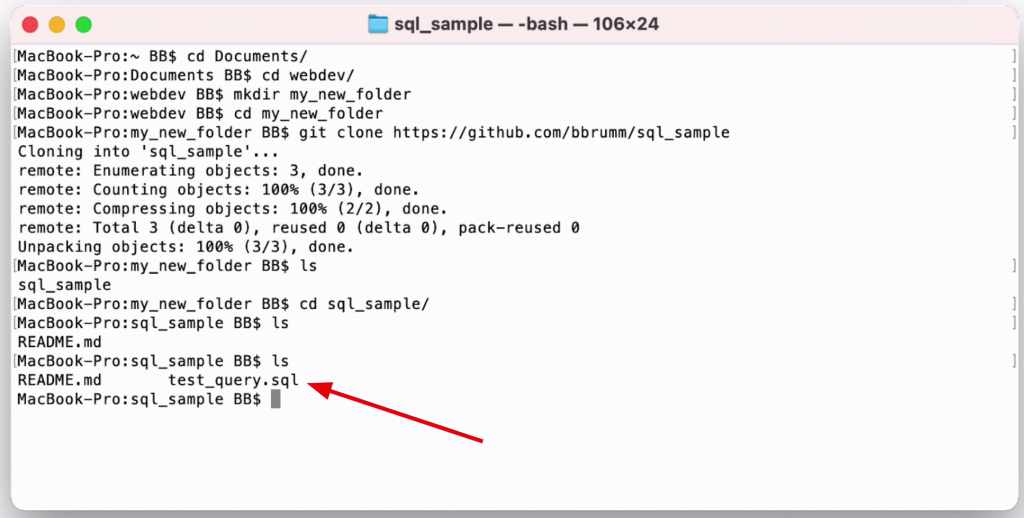
We can see two files here: the original readme file, and our new SQL file.
This folder is linked to the GitHub repository (from when we ran "git clone" earlier), and there are some built-in commands that let us work with it.
Git Status
One of those commands is called "git status". This will let us see the status of the files in the folder.
Run this command.
1git status
Here's the output of the command:
 1MacBook-Pro:sql_sample BB$ git status
 2On branch main
 3Your branch is up to date with 'origin/main'.
 4
 5Untracked files:
 6  (use "git add <file>..." to include in what will be committed)
 7
 8  test_query.sql
 9
10nothing added to commit but untracked files present (use "git add" to track)
Here's what it looks like in Terminal:
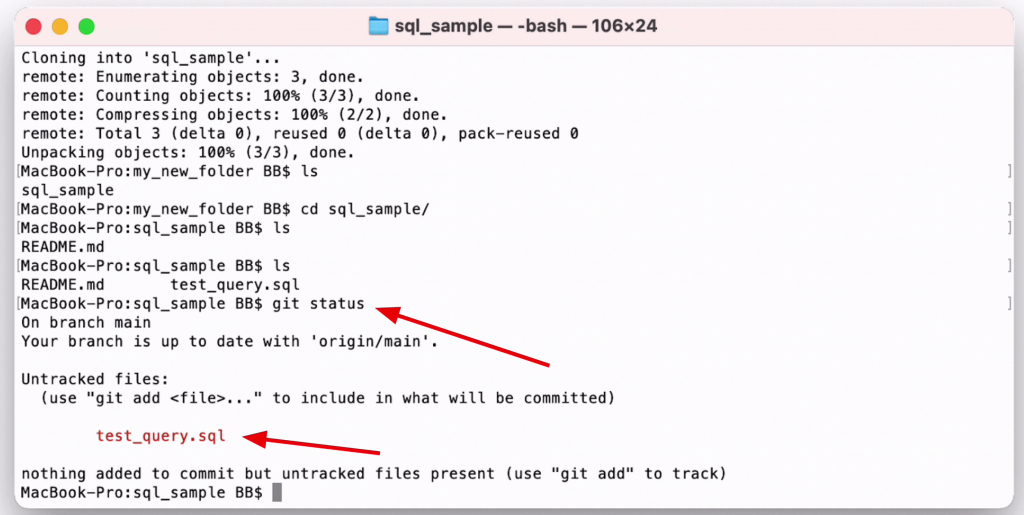
You'll see a few things here. It says "branch main" which just means you're working on the main set of your code. We'll look at branches in another article.
Under the Untracked Files section, it shows that there is one file that is created in this folder, but not part of the repository. This is the SQL file we just created, shown in red here.
Files added to the folder, like the SQL file, are not automatically added to the repository. But we can add them pretty easily.
Git Add
To add a file to the repository, use the "git add" command. After the add keyword, we specify which files to add.
We can either enter the full filename, such as:
1git add test_query.sql
Or we can select all files by using a . character:
1git add .
Let's specify our file individually. Run the git add test_query.sql command, and you'll just get taken back to the command line.
It seems like nothing had happened. But if you run git status again, you'll see a different output.
1git status
Here's the output:
1MacBook-Pro:sql_sample BB$ git status
2On branch main
3Your branch is up to date with 'origin/main'.
4
5Changes to be committed:
6  (use "git reset HEAD <file>..." to unstage)
7
8       new file:  test_query.sql
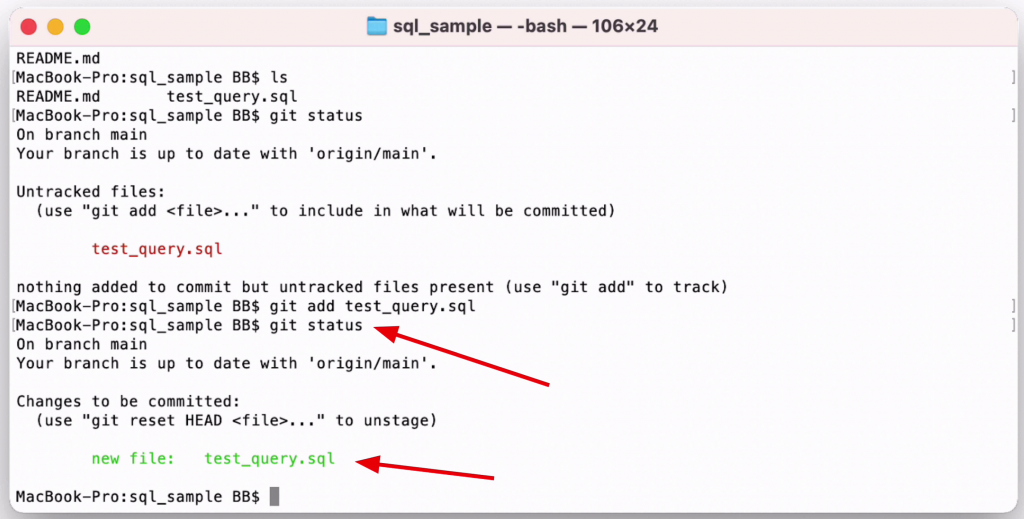
Instead of Untracked Files, we can see there are changes to be committed. We see our filename in green. This means it is added to the repository as a file we want to keep track of in our source control.
Git Commit
The next step is to commit our changes. This is separate to the add command.
The "git add" command will indicate that a file needs to be tracked, and is only run once for each file. The command to commit changes is called "git commit", and is run each time you make a change you want to save.
So, we run git commit. Before we press enter, it's helpful to add a message to this commit. The commit will get all files that are changed, which is just the green SQL file in the git status output, and save these changes to the repository.
We can add a message by typing -m after git commit then add our message in quotes:
1git commit -m "Added our first SQL file"
Then, press enter
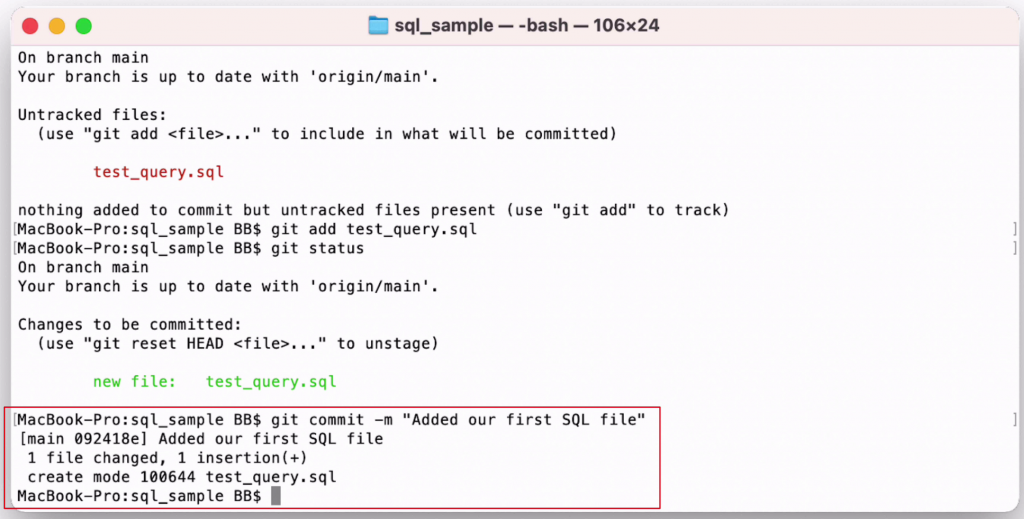
Now we have run the commit command, the changes to that file are stored in the repository's records on our computer.
The last step is to get these changes onto our GitHub account. All the work we've done so far is on our own computer.
There's one more command to run to get these files and changes onto our GitHub account.
That command is called "git push".
Git Push
The git push command will take the commit we just created, which is the new SQL file, and send it to our repository on the GitHub website.
We simply write git push and press enter. We don't need any parameters.
1git push
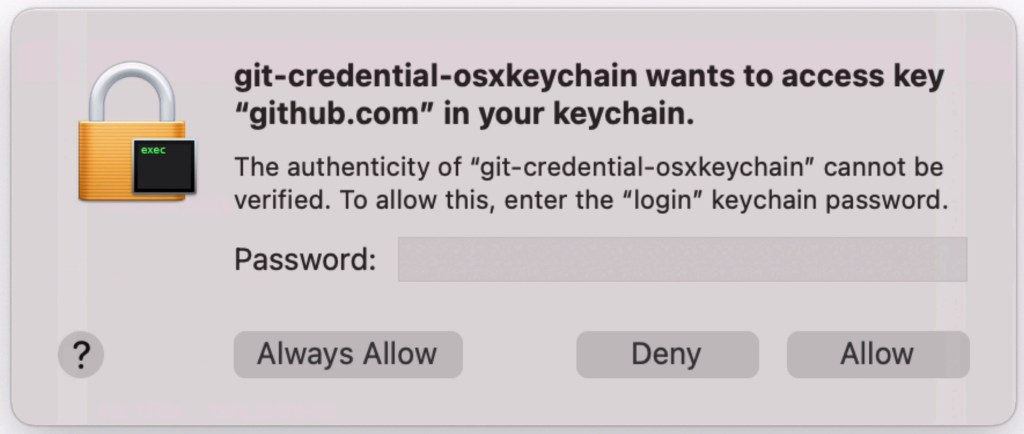
Once you press Enter, you may be asked for your password if you're on MacOS. This is related to the keychain feature on MacOS. In this popup, enter your computer password and press Allow. This is the password to log into your Mac, not the GitHub password.
Back on the Terminal, you'll see some new lines that indicate a few steps were performed, and ideally no errors.
Here's the output:
1MacBook-Pro:sql_sample BB$ git push
2Enumerating objects: 4, done
3Counting objects: 100% (4/4), done.
4Delta compression using up to 8 threads
5Compressing objects: 100% (2/2), done.
6Writing objects: 100% (3/3), 305 bytes | 305.00 Kib/s, done.
7Total 3 (delta 0), reused 0 (delta 0)
8To https://github.com/bbrumm/sql_sample
9   6576d32..092418e  main -< main
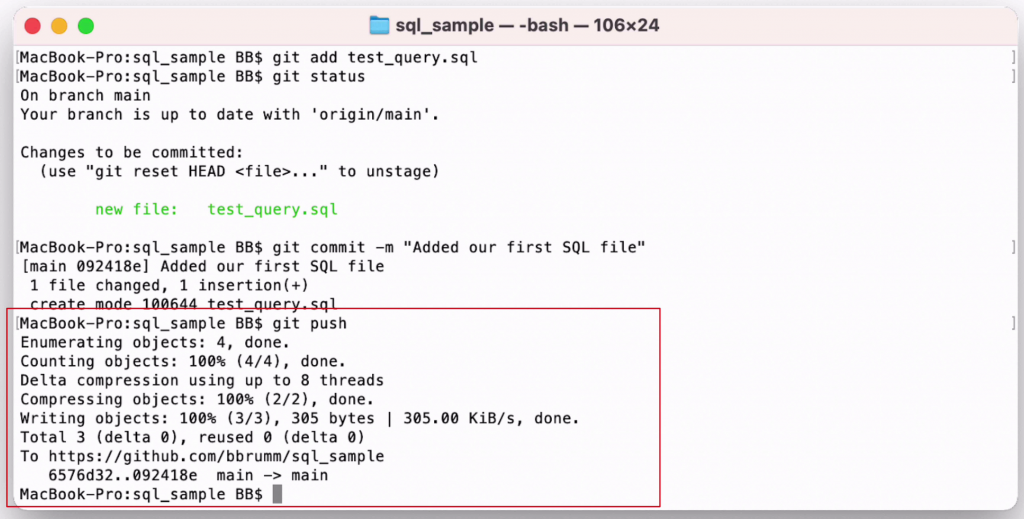
The outcome is that the file should now have been added to your GitHub account repository, which is also known as the remote repository.
Check the GitHub Repository
On your GitHub page for your repository, you can refresh the page and it should look like this.
You'll see a few things.
There's a new SQL file here in the list.
You'll see a commit message in the second column. This is from the recent commit we did for that file. On the right, it says when the file was last updated, which was a few minutes ago.
On the top of the table it says "2 commits". You can click on that to see a history of the commits or changes made to the repository.
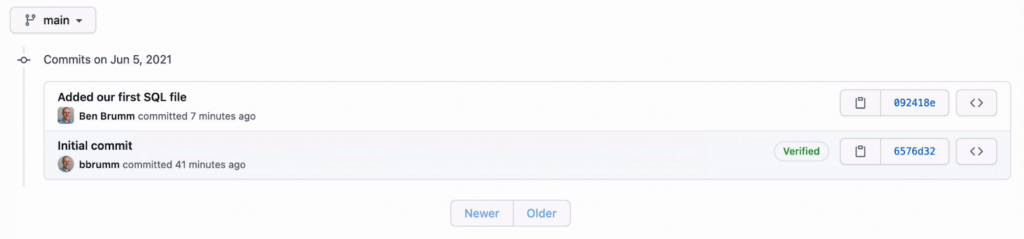
Here we can see the first one, called Initial Commit. We can then see the one we just did, with the message "Added our first SQL file". This is where a good commit message comes in. We can see what the commit was about.
Click Back, or click on the sql_sample repository name on the top left to go back to the repository.
You can even click on the SQL file to see what's in the file.
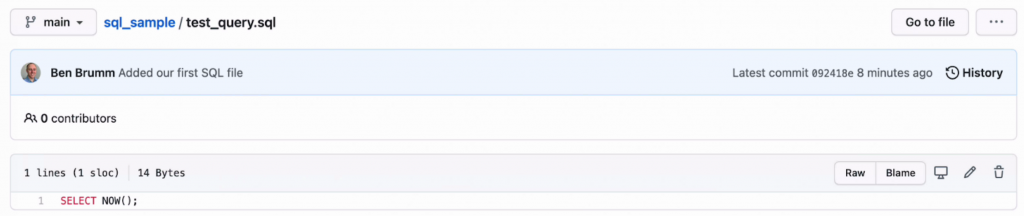
In this case, it's the SELECT NOW() query we wrote.
Conclusion
Well done! You've done a lot in this tutorial:
- created a repository
- added an SQL file
- ran a few commands to get it on the GitHub.com website
Here's a visual summary of what we did.
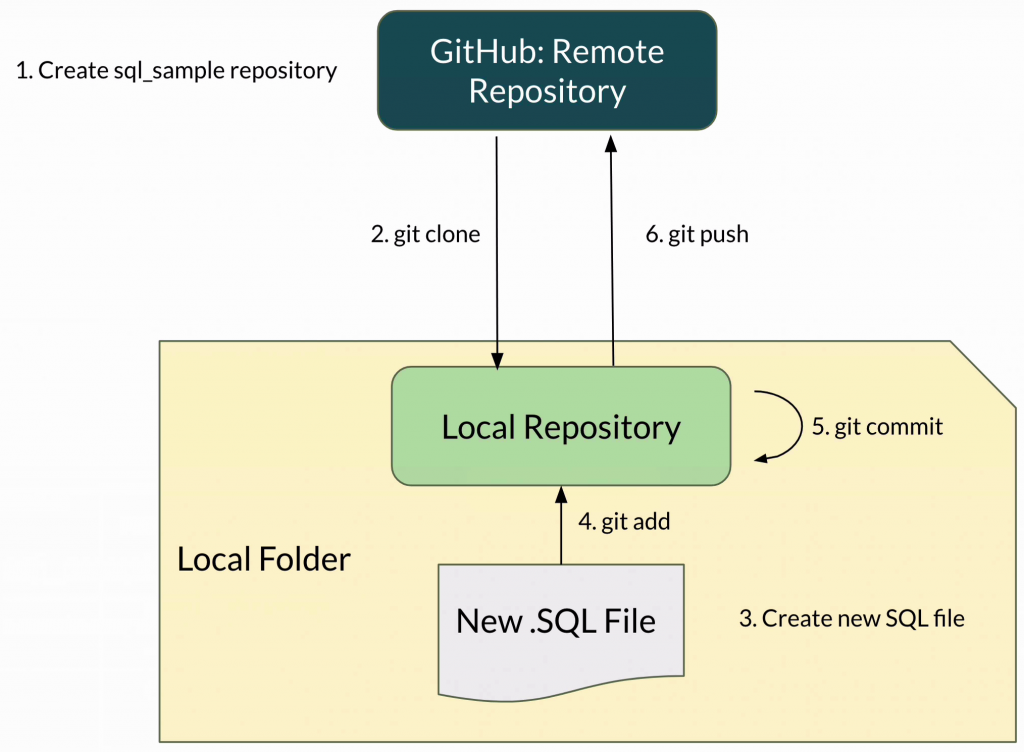
- The account on GitHub contains our remote repository, called sql_sample.
- We created a folder on our own computer and ran git clone, which downloaded the remote repository onto our computer. This created a local repository.
- We created a new SQL file in that folder, which didn't do anything to the repository.
- We used the git add command to add this new file to the list of files that the local repository should track.
- We then used the git commit command to save the changes made to this file, which was the fact the file was created, to our local repository as an update we've made to it.
- Finally, we used git push to add these changes to the remote repository, which involved uploading that SQL file to the GitHub website, adding the commit and message.
What's next?
You can grow your repository by making changes to files, adding more files and folders, and updating the readme file to make it more descriptive of what's in your repository.
If you have any questions or issues about this process, let me know in the comments below.