MySQL Workbench Export and Import Database: How To
Are you using MySQL Workbench and want to export your database? Or do you have an export file and want to import your database?
In this guide, you'll learn how to export a database and import a database in MySQL Workbench, with screenshots and step-by-step instructions.
Let's get into it.

How to Export a MySQL Database
To export the MySQL database from MySQL Workbench:
Step 1: Go to Server > Data Export.
Alternatively you can right click on a table in the Schema Browser on the left and select Data Export. However, this only exports a single table (even if you select multiple tables). To use the MySQL Workbench export database feature, you have to use the Server > Data Export option.
The screen will look like this.
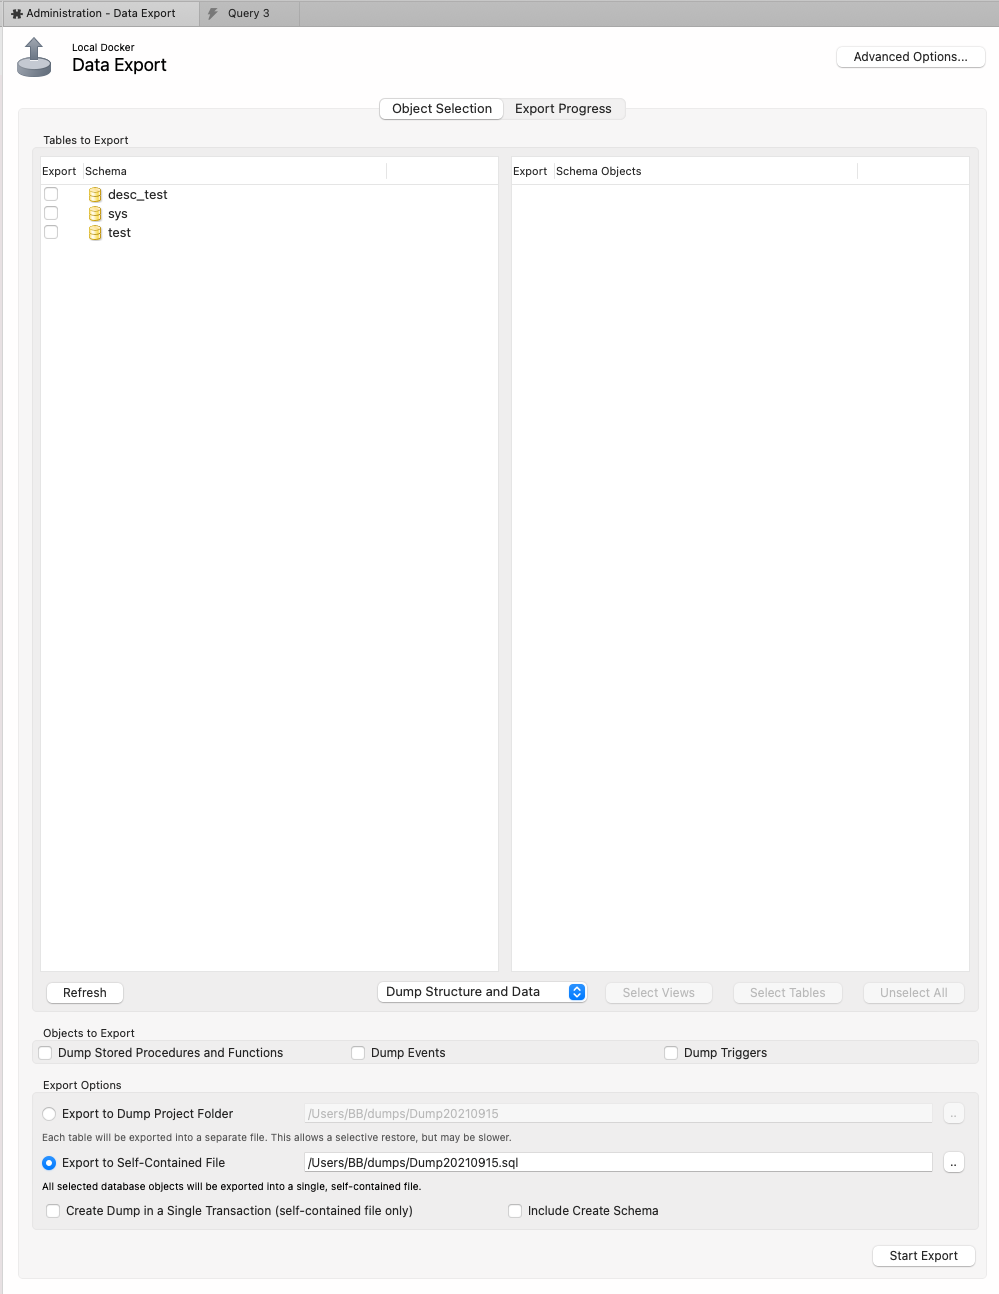
Step 2: Select the tables you wish to export by clicking on the database or schema on the left panel, then clicking the checkbox next to the table name on the right panel.

If you want to export all tables in a schema or database, click the checkbox on the database on the left.

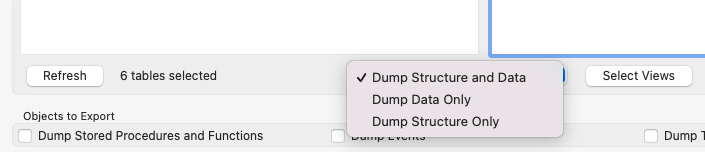
Step 3: Select whether you want the data, structure, or both, by selecting one of the following options from the drop-down under the panels:
- Dump Structure and Data: include the table structure and the data in the tables
- Dump Data Only: include the data in the tables only, no tables
- Dump Structure Only: include the table structure only, no data
Step 4: Decide if you want to export stored procedures, functions, events, or triggers, and select the relevant check boxes if you do.

Step 5: Select to export the data in one of two ways:
- Export to Dump Project Folder: select the folder, and each table will be exported to a separate file. This will let you select which tables to restore, but would be slower.
- Export to Self-Contained File: select the folder and file, and all tables will be exported to a single SQL file.
Step 6: Indicate if you want to create the dump in a single transaction (which only applies to the "self-contained file" export option).

Step 7: Indicate if you want to include the Create Schema step.
Step 8: Click Start Export.
The export process will begin. Depending on the amount of data, it may take some time.
Here's what it looks like when it's completed:
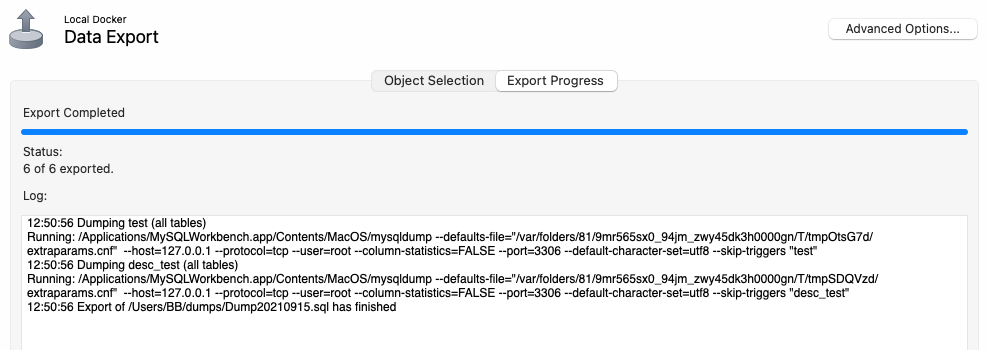
The text in this example says:
112:50:56 Dumping test (all tables)
2Running: /Applications/MySQLWorkbench.app/Contents/MacOS/mysqldump --defaults-file="/var/folders/81/9mr565sx0_94jm_zwy45dk3h0000gn/T/tmpOtsG7d/extraparams.cnf"  --host=127.0.0.1 --protocol=tcp --user=root --column-statistics=FALSE --port=3306 --default-character-set=utf8 --skip-triggers "test"
312:50:56 Dumping desc_test (all tables)
4Running: /Applications/MySQLWorkbench.app/Contents/MacOS/mysqldump --defaults-file="/var/folders/81/9mr565sx0_94jm_zwy45dk3h0000gn/T/tmpSDQVzd/extraparams.cnf"  --host=127.0.0.1 --protocol=tcp --user=root --column-statistics=FALSE --port=3306 --default-character-set=utf8 --skip-triggers "desc_test"
512:50:56 Export of /Users/BB/dumps/Dump20210915.sql has finished
We can see it took about 1 second, but the tables I chose were very small.
We can also see it uses the tool "mysqldump" to perform the export. If you want to see how to do this directly using the command line, check out the guide here.
Your database has now been exported from MySQL Workbench! Browse to the location you specified to see the single or multiple files generated.
Optional: Advanced Options
Before you export the data, you can set some additional options by clicking the Advanced Options button.
You'll see a screen like this:
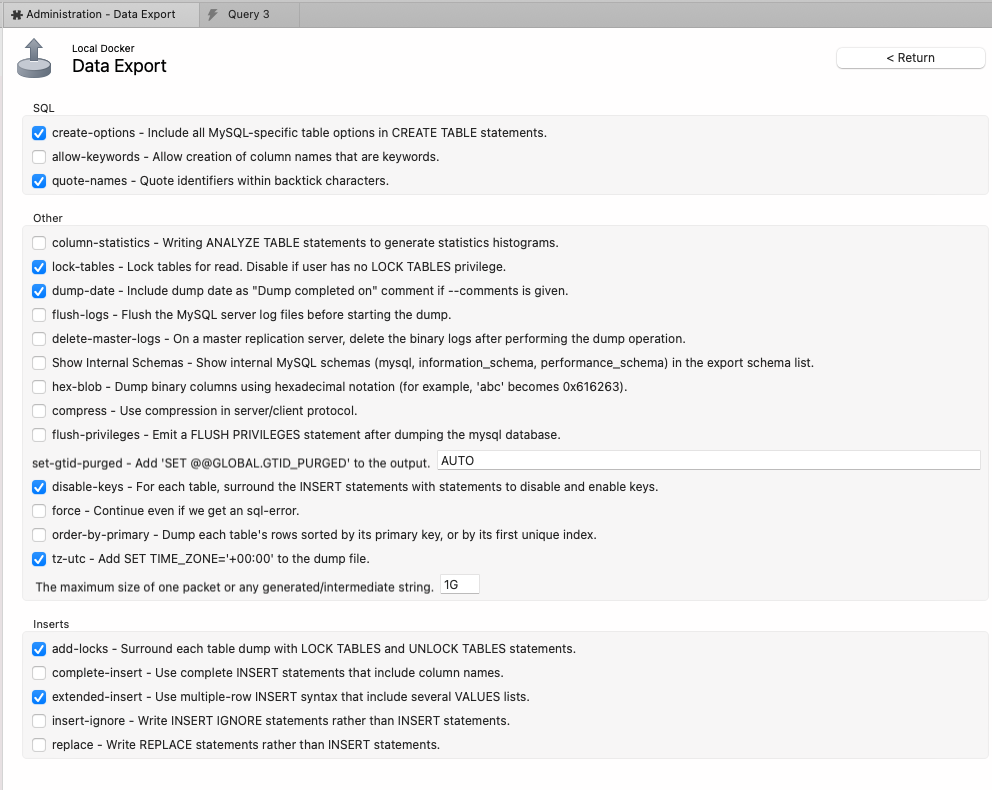
Here are the options you can choose:
- create-options: Include all MySQL-specific table options in CREATE TABLE statements.
- allow-keywords: Allow creation of column names that are keywords.
- quote-names: Quote identifiers with backtick characters.
- column-statistics: Writing ANALYZE TABLE statements to generate statistics histograms
- lock-tables: Lock tables for read. Disable if user has no LOCK TABLES privilege.
- dump-date: Include dump date as "Dump completed on" comment if --comments is given.
- flush-logs: Flush the MySQL serve log files before starting the dump.
- delete-master-logs: On a master replication server, delete the binary logs after performing the dump operation.
- Show Internal Schemas: Show internal MySQL schemas (mysql, information_schema, performance_schema) in the export schema list.
- hex-blob: Dump binary columns using hexadecimal notation (for example, 'abc' becomes 0x616263)
- compress: Use compression in server/client protocol.
- flush-privileges: Emit a FLUSH PRIVILEGES statement after dumping the MySQL database.
- set-gtid-purged: Add 'SET @@GLOBAL.GTID_PURGED' to the output
- disable-keys: For each table, surround the INSERT statements with statements to disable and enable keys.
- force: Continue even if we get an sql-error.
- order-by-primary: Dump each table's rows sorted by its primary key, or by its first unique index.
- tz-utc: Add SET TIME_ZONE='+00:00' to the dump file.
- Maximum size of one packet or any generated/intermediate string
- add-locks: Surround each table dump with LOCK TABLES and UNLOCK TABLES statements.
- complete-insert: Use complete INSERT statements that include column names.
- extended-insert: Use multiple-row INSERT syntax that include several VALUES lists.
- insert-ignore: Write INSERT IGNORE statement rather than INSERT statements.
- replace: Write REPLACE statements rather than INSERT statements.
These options adjust the mysqldump command that is run as part of the export process.
How to Import a MySQL Database
You can use MySQL Workbench to import data that has been exported using the Data Export operation shown earlier, or using the mysqldump command.
This MySQL Workbench import database feature is done using the Server > Data Import menu item.
There is also a function called Table Data Import Wizard. However, that's used for importing CSV or JSON files into the database, and not files generated using the export process above. We want to use the MySQL import sql file functionality.
Let's see how to do this.
Step 1: In MySQL Workbench, go to Server > Data Import.
The screen should look like this.
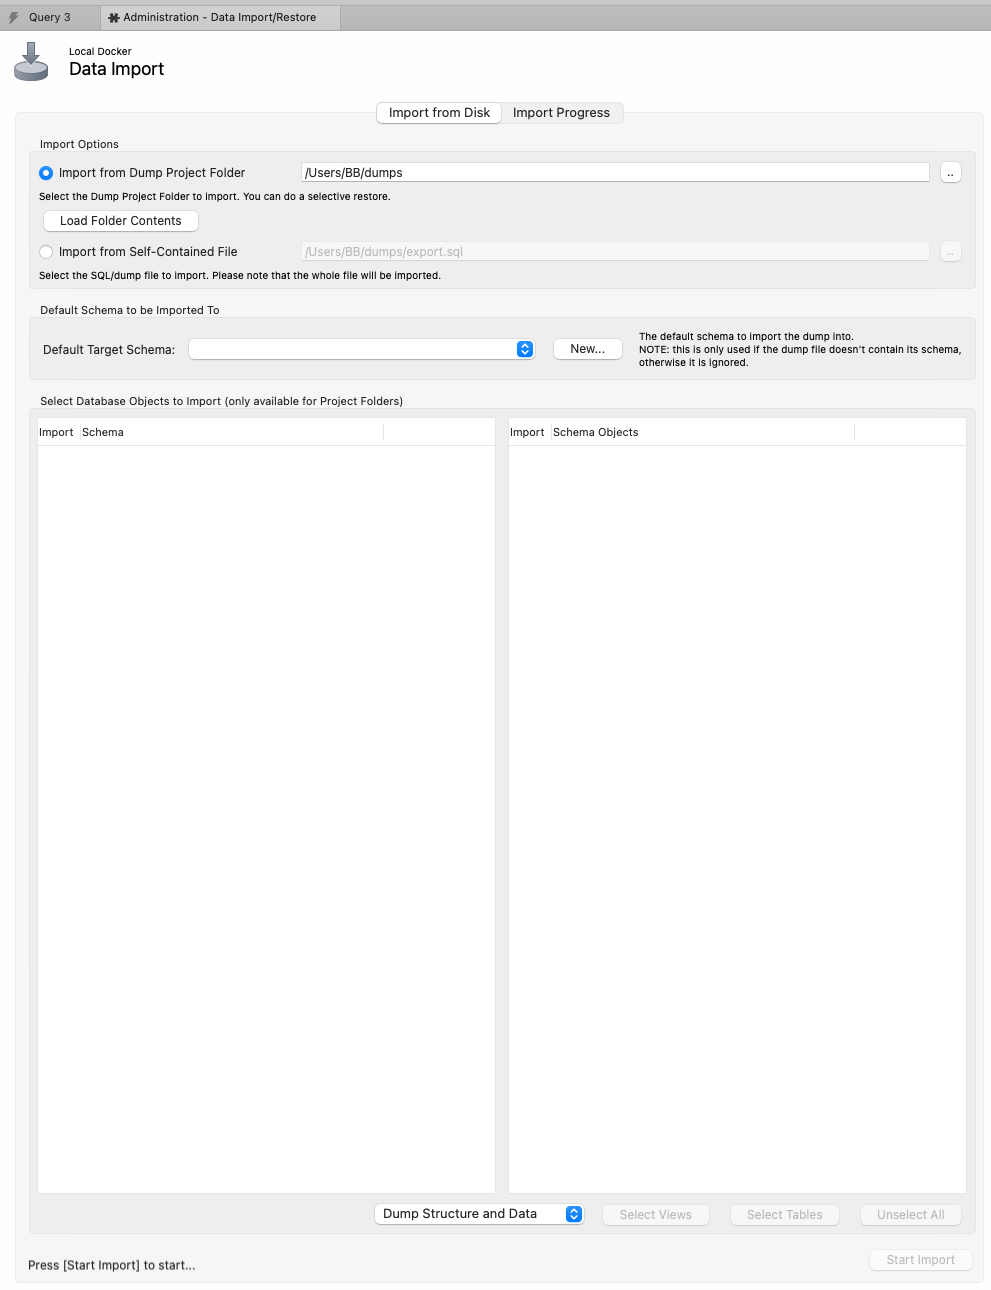
Step 2: Select either "Import from Dump Project Folder" or "Import from Self-Contained File", depending on how your data is stored. This would have been specified during the Data Export process.
Step 3: Select either the folder to import from (if you selected "Import from Dump Project Folder") or the self-contained SQL file (if you selected "Import from Self-Contained File").

Step 4: Select the default target schema to import into.
This is only used if the dump file does not contain a schema.
Step 5: If you have selected "Import from Dump Project Folder", select the schemas and tables to import in the panels on the screen.
Step 6: Select whether you want the data, structure, or both, by selecting one of the following options from the drop-down under the panels:
- Dump Structure and Data: include the table structure and the data in the tables
- Dump Data Only: include the data in the tables only, no tables
- Dump Structure Only: include the table structure only, no data
Step 7: Click Start Import.
Here's what the screen looks like once the import is finished:

The commands shown here are:
1Creating schema newschema
213:10:08 Restoring /Users/BB/dumps/Dump20210915.sql
3Running: /Applications/MySQLWorkbench.app/Contents/MacOS/mysql --defaults-file="/var/folders/81/9mr565sx0_94jm_zwy45dk3h0000gn/T/tmpmT9LmF/extraparams.cnf"  --protocol=tcp --host=127.0.0.1 --user=root --port=3306 --default-character-set=utf8 --comments --database=newschema  < "/Users/BB/dumps/Dump20210915.sql"
413:10:09 Import of /Users/BB/dumps/Dump20210915.sql has finished
Your data has now been imported using MySQL Workbench!
Conclusion
So that's how you can export and import data in MySQL Workbench. Both the import and export options are available in the Server menu.