Flyway DB Tutorial: How to Set Up Flyway
If you want to set up Flyway DB on your database, you've come to the right place.
In this guide, you'll learn:
- What Flyway is
- A step-by-step guide to setting it up on your database
- Create a couple of SQL scripts to demonstrate the process
Let's get into it.

What is Flyway DB?
Flyway DB is a tool that lets you handle version control of your database.
Before tools like Flyway, if you wanted to update your database, you needed to run SQL scripts on the database directly. It was hard to keep track of the state of the database, even if you were using source control.
With Flyway, you can easily maintain the status of your database (which tables exist, what they look like, other objects, etc), to make it easier for you and your team to work with the database.
It makes it easier to use continuous integration with database code.
Let's get into the tutorial.
What You'll Need
For this tutorial, the only thing you'll need is access to a database.
In this tutorial, I'll be demonstrating a locally installed MySQL database, because it's simple and popular.
However, Flyway DB works on many databases:
- MySQL
- PostgreSQL
- Oracle
- SQL Server
- MariaDB
- And many more
Flyway DB also works on many different configurations:
- Local database
- Docker
- Cloud-hosted
- And more
The tutorial on the Flyway website mentions using Spawn to create a cloud-hosted database, but for this tutorial, I'll use a locally installed MySQL database.
You can use whatever other database you like.
I'll also demonstrate this using MacOS. The process is very similar for Windows, but some of the setup steps would be different.
We'll also be using the command-line tool, which we'll download shortly. Other options such as using Maven or Gradle are possible, but I won't demonstrate them here.
Let's get started!
Step 1: Download the Flyway Command Line Tool
The first step is to download the Flyway Command Line tool. This will let you run the Flyway tool and update your database as needed.
To do this:
Step 1.1: Visit the Flyway DB website at flywaydb.org.
Step 1.2: Click on "Download + pricing".
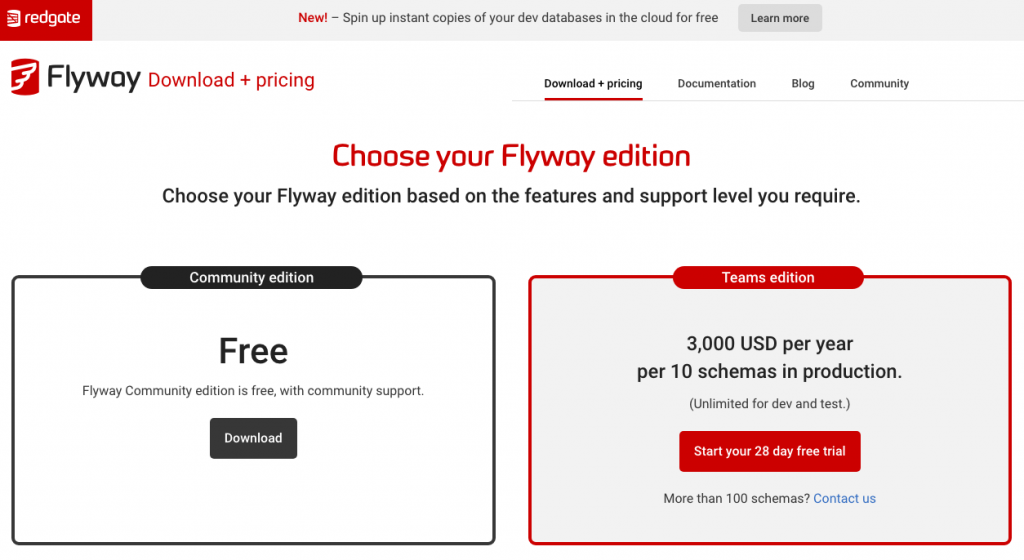
On the download page, you'll see the two options that are currently offered. The Community option is a free edition and includes all of the core features. The Teams edition is aimed at larger teams and is priced for 10 production schemas.
For our purposes, we'll use the Community edition.
Step 1.3: Click the Download button for the Community edition.
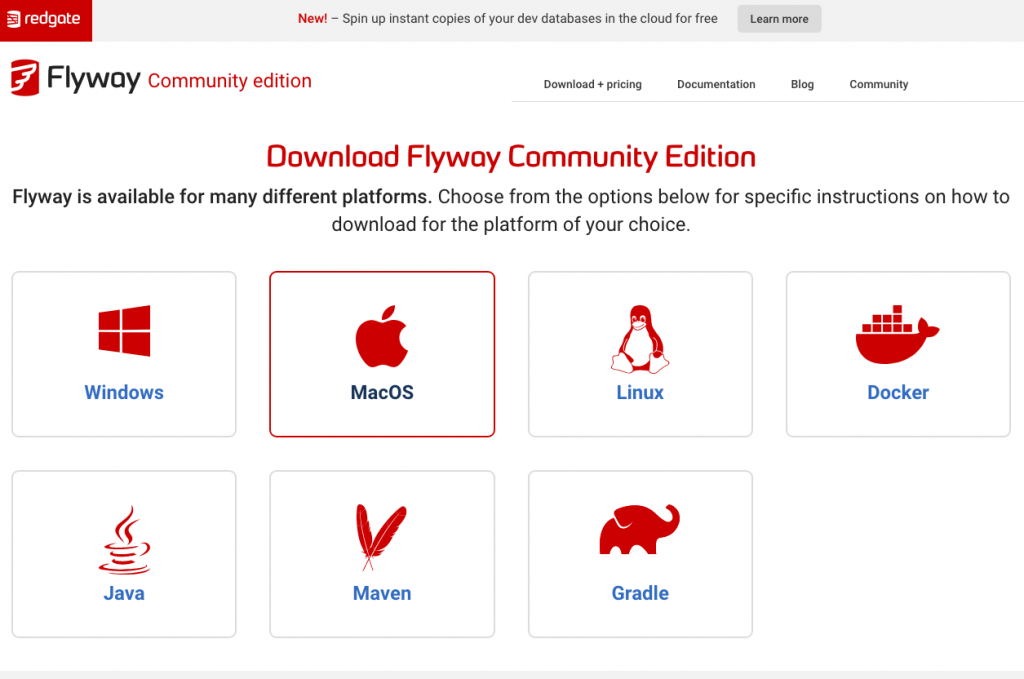
On the Download page, you'll see a range of platforms you can download it for.
Step 1.4: Click the link for your operating system.
In this tutorial, I'll just be setting it up on a Mac, so I'll select MacOS.
If you're running Windows select the Windows button.
Both links actually take you to the same place.
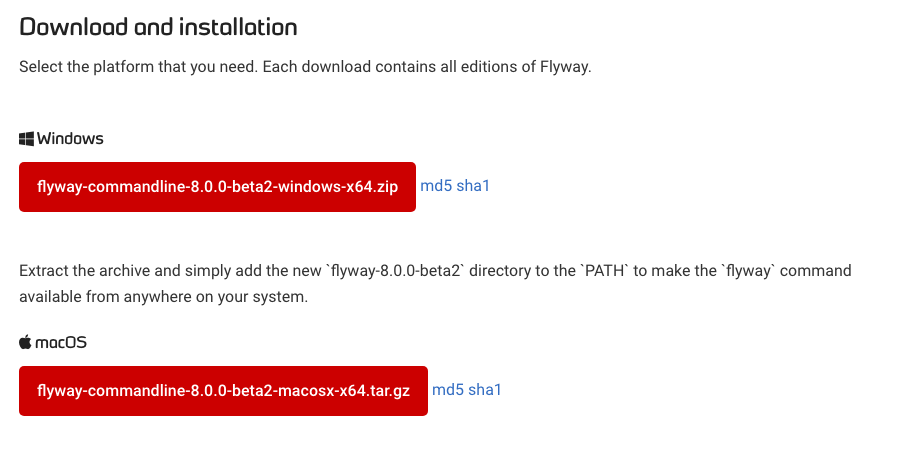
You'll be taken to the documentation page with a link to download the file.
Step 1.5: Click on the file for your operating system and it will be downloaded.
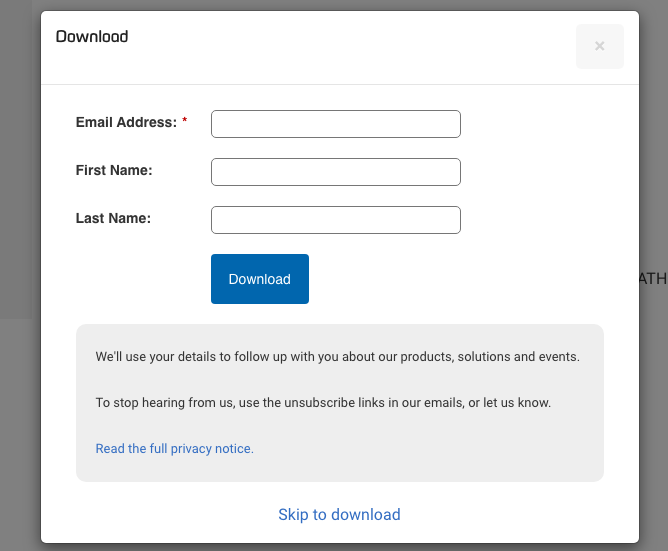
Step 1.6: Enter email or click Skip to Download
Once you click on the download link, you'll be asked to enter your email address and name. This is so you can keep up to date with Flyway products. If you don't want to, you can click Skip to Download at the bottom.
The file will then be downloaded. It's just over 100MB so will take a bit of time depending on your connection.
Step 1.7: Extract the file
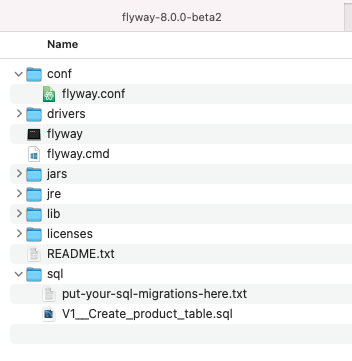
Next, extract the file into a location that you like. For this tutorial, I've just extracted it into the Downloads folder on my Mac, and I haven't had a problem with it so far. There may be a better place to extract it, so if you want to, you can move it to another folder.
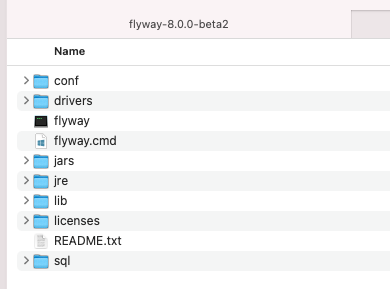
You should now have the files extracted into a folder, as shown above. Whether you use Mac or Windows you should have a similar result. The folder name for this version is "flyway-8.0.0-beta2".
Step 2: Edit the Flyway Configuration File
The next step is to configure Flyway to connect to your database.
To do this:
Step 2.1: Browse to the flyway > conf folder.
Browse to the flyway folder that you just extracted (such as "flyway-8.0.0-beta2").
Inside this folder, open the conf folder.
Inside the conf folder is a single file.
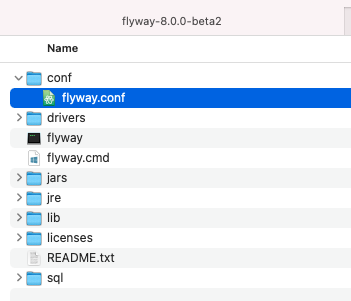
This file is called flyway.conf and contains the configuration settings for Flyway.
Step 2.2: Open the flyway.conf file
Open this flyway.conf in a text editor.
I'll use Atom but you can use whatever you like.
Here's what the file looks like.
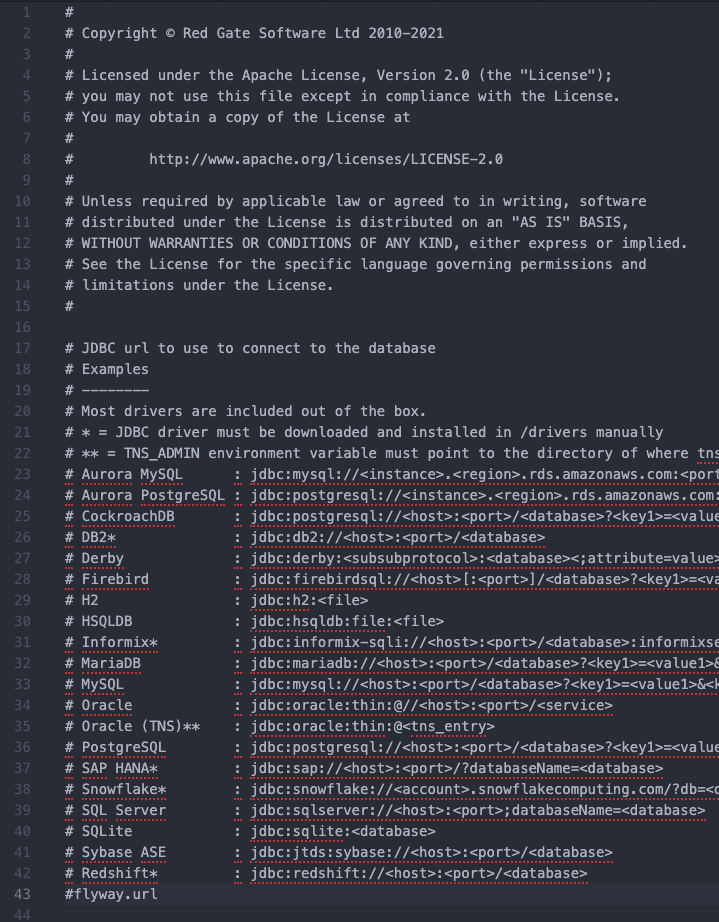
There is a range of settings and comments for each setting.
We'll need to change three things:
- The database connection string
- The username
- The password
Step 2.3: Set the flyway.url property to your database
The flyway.url property is the connection string, or the setting that Flyway uses to find and connect to your database.
The string is different depending on the database and where you're hosting it.
The great thing about this file is that there are many examples for each different database. This was very helpful in getting the right url property.
I copied the MySQL example and changed the host, port, and database.
I have MySQL running on my computer, so the host is localhost, and the port is 3306.
So, my url property looks like this:
1flyway.url=jdbc:mysql://localhost:3306/fwtest
The final part of the string is "fwtest". This is the database that I'll use for this tutorial.
We'll create the database shortly, as it does not exist at the moment.
Step 2.4: Set the flyway.user property
A little further down in the file is the flyway.user property. This should be set to the user for your database.
In this example, I'm using the root account on my local MySQL database. You may want to use a different account for this tutorial, and if this is going into a real system you probably don't want to use the root account.
1flyway.user=root
For other database vendors you'll have a different user.
Step 2.5: Set the flyway.password property
The password for the user you specified also goes into the configuration file in the flyway.password property.
There are other methods for storing these properties, such as environment variables, which may be more secure.
But for this tutorial, we'll keep it simple.
1flyway.password=root
Here's what the file looks like at the moment:
 1# SQLite            : jdbc:sqlite:<database>
 2# Sybase ASE        : jdbc:jtds:sybase://<host>:<port>/<database>
 3# Redshift*         : jdbc:redshift://<host>:<port>/<database>
 4flyway.url=jdbc:mysql://localhost:3306/fwtest
 5
 6# Fully qualified classname of the JDBC driver (autodetected by default based on flyway.url)
 7# flyway.driver=
 8
 9# User to use to connect to the database. Flyway will prompt you to enter it if not specified, and if the JDBC
10# connection is not using a password-less method of authentication.
11flyway.user=root
12
13# Password to use to connect to the database. Flyway will prompt you to enter it if not specified, and if the JDBC
14# connection is not using a password-less method of authentication.
15flyway.password=root
The url, user, and password properties are all uncommented and set. We don't need to use the driver property so that remains commented out.
Step 2.6: Start your database (if it's not running already)
Now we've specified the database connection string, we need to start the database. In my example, I'll start the MySQL database.
Step 2.7: Create the database you want to use for the tutorial
This tutorial will demonstrate how to start flyway on a new database. So let's create one now.
In MySQL, this is done using the Create Database command.
I'll open MySQL Workbench and connect to the database server.
Then in the new query window, run this command:
1CREATE DATABASE fwtest;
If you're on a different database, you'll be using a different IDE.
The aim is to create a new database, so use whatever IDE and command you would normally use to do this.
Now we have the fwtest database created, we can proceed with setting up our data with Flyway.
Step 3: Create Your First Migration
We've got Flyway installed and we have a database created.
The next step is to write a script to do something on the database, then get Flyway to run the script.
Any database change made by Flyway is called a migration. We migrate the database from one state to another state.
Migrations can be written as SQL scripts or in other files. In this tutorial, we'll write our first migration or first change as an SQL script.
The change we'll make is to create a table.
Step 3.1: Open a text editor or IDE to create an SQL file.
We'll create an SQL file, so open whatever IDE or text editor you want to use to create it. I'll use Atom but you can use whatever you like.
Step 3.2: Write a Create Table script to create a new table.
We'll create a table called product:
1CREATE TABLE product (
2  id INT,
3  product_name VARCHAR(200)
4);
If you're running this on a database other than MySQL, you may need to change the data types.
Step 3.3: Save the file inside flyway/sql as "V1__Create_product_table.sql"
Inside your flyway folder, there is an sql folder. This is where all of the sql scripts go that flyway will run on your database.
We save our new file here with a specific filename of "V1__Create_product_table.sql":
- Starts with "V" which indicates it's a "versioned migration". Flyway has different types of migrations, and this just tells Flyway to run it in a certain way.
- Then a "1", which is the version number. This is the first script we're running, so we start with a version of 1.
- Then two underscores: __
- Then a description of the script, with words separated by underscores: "Create_product_table"
- Then a .sql extension.
The filename is written this way so that Flyway can interpret it and run it correctly.
That's all we need to do for now! As long as this file is saved in this format in the sql folder, Flyway can pick it up.
Here's what your folders should look like:
Let's get Flyway to do something.
Step 4: Migrate the Database
Now that we have our first SQL file created, we can get Flyway to run this script. This is called migrating the database.
Step 4.1: Open the Terminal or Command Prompt
If you're on Mac, open the Terminal. If you're on Windows, open the Command Prompt.
We'll run our Flyway commands from the command line.
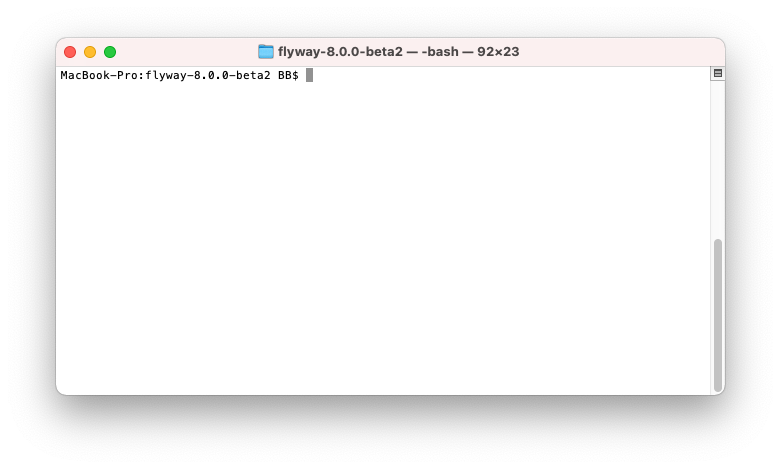
Step 4.2: Change to the flyway directory
Use the cd command to navigate to the flyway directory "flyway-8.0.0-beta2".
For me, this was:
1cd Downloads cd flyway-8.0.0-beta2
Step 4.3: Run the migrate command.
To get Flyway to run the scripts in the sql folder, run:
flyway migrate
Your terminal could look like this:

When you run this command, you should get an output like this:
1MacBook-Pro:flyway-8.0.0-beta2 BB$ flyway migrate Flyway Teams Edition 8.0.0-beta2 by Redgate Database: jdbc:mysql://localhost:3306/fwtest (MySQL 5.7) ---------------------------------------- Flyway Teams features are enabled by default for the next 27 days. Learn more at https://rd.gt/3A4IWym ---------------------------------------- Successfully validated 1 migration (execution time 00:00.022s) Creating Schema History table \`fwtest\`.\`flyway\_schema\_history\` ... Current version of schema \`fwtest\`: << Empty Schema >> Migrating schema \`fwtest\` to version "1 - Create product table" Successfully applied 1 migration to schema \`fwtest\`, now at version v1 (execution time 00:00.059s) MacBook-Pro:flyway-8.0.0-beta2 BB$
When I ran this command, however, I had two issues:
- bash: flyway: command not found
- Several "developer cannot be verified" messages.
I'll explain how I resolved them in the sections below.
If you did not get these issues, you can skip past this to Step 5 below.
Bash Flyway Command Not Found
If you run "flyway migrate" you may get this message:
1MacBook-Pro:flyway-8.0.0-beta2 BB$ flyway migrate -bash: flyway: command not found
This happens because the operating system cannot find the flyway command, or does not know what it is.
I ran this command inside the folder where the flyway file exists, but still got the error.
The solution is to add the folder with the flyway command to your PATH variable on your operating system.
You can see your PATH variable by running this command:
1echo $PATH
Here's what mine shows:
1MacBook-Pro:flyway-8.0.0-beta2 BB$ echo $PATH /Library/Frameworks/Python.framework/Versions/3.9/bin:/Applications/MAMP/bin/php/php7.4.9/bin:/Applications/MAMP/bin/php/php7.2.8/bin:/usr/local/bin:/usr/bin:/bin:/usr/sbin:/sbin
Next, add the folder that has the flyway files to the PATH variable by running the export command and appending this to the current PATH variable:
1export PATH=$PATH:/Users/BB/Downloads/flyway-8.0.0-beta2
Now, when you run flyway migrate, you should not get this error again.
Flyway Script Cannot Be Opened Because the Developer Cannot Be Verified
Once I resolved the issue above, I ran flyway migrate but got a range of error messages like this:
1“libjvm.dylib” cannot be opened because the developer cannot be verified. “libjimage.dylib” cannot be opened because the developer cannot be verified. “libnio.dylib” cannot be opened because the developer cannot be verified. “libnet.dylib” cannot be opened because the developer cannot be verified.
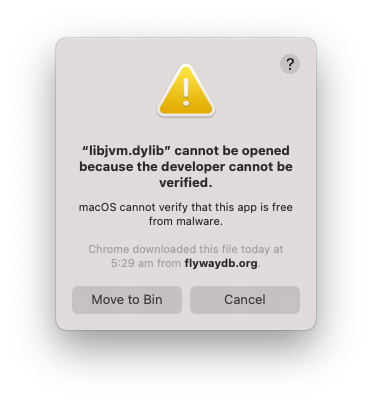
The only options I had were Move to Bin or Cancel.
I clicked Cancel, and the flyway migrate command failed.
After some research, I found this occurs on macOS Catalina due to a change in security settings.
To resolve it:
Open Preferences then Security & Privacy.
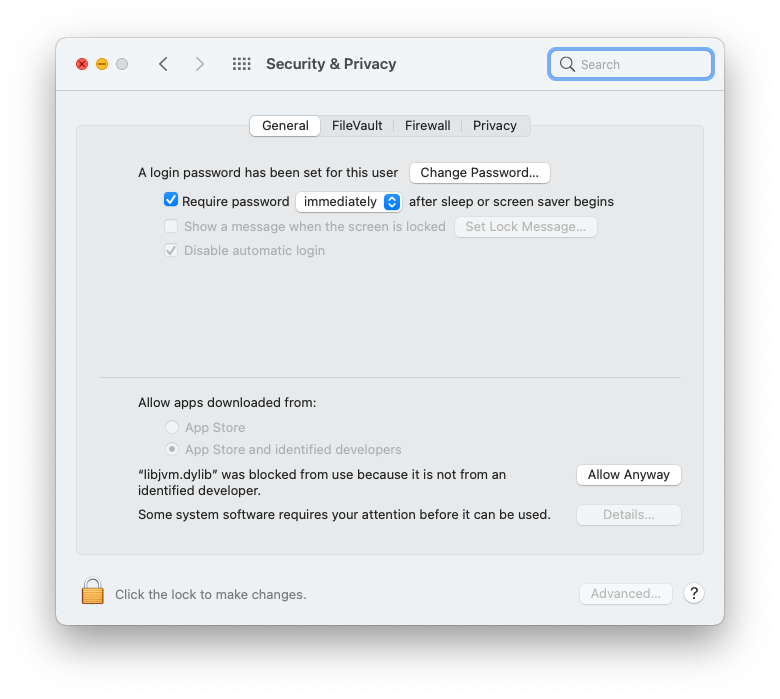
Click "Allow Anyway" at the bottom of the General tab. This will ensure that the next time this file/library/script is run, you won't see that error.
If you don't see this text and Allow Anyway, run flyway migrate again with this Security & Privacy window open. Once you click Cancel, it should appear in the window.
Once you click Allow Anyway, try running flyway migrate again.
You may get another error message about the same file:
"macOS cannot verify the developer of “libjvm.dylib”. Are you sure you want to open it?"
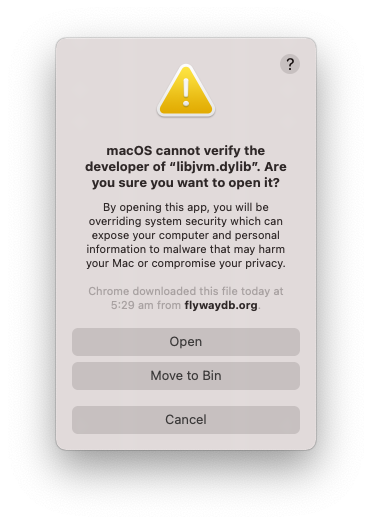
This is progress! Click Open to proceed with running the file.
However, you may get a similar "cannot be opened" message for a different file.
Repeat the same steps above for this file:
- click Cancel
- then click Allow Anyway in Security & Privacy
- then run flyway migrate
- then click Open on the new error message
I had to do this for maybe 5-8 different files until I got the successful output.
Step 5: Add Another Migration
If you look at your fwtest database, you should see the table you created.
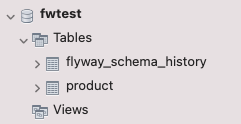
We can also see a table called flyway_schema_history. This table is used by flyway to keep track of the changes.
It's created automatically the first time you run flyway migrate. I'll explain how the table works in another guide, but you can query it to see what's inside it if you like.
We've successfully got an SQL script created and ran it using Flyway. What if we want to make another change?
We can add another migration, or another script, to be run.
It's a similar process to creating the file as before.
Step 5.1: Open your IDE or text editor.
Once again, open your IDE or text editor to create an SQL file.
Step 5.2: Write some SQL to insert data
We'll write some INSERT statements to add data to the product table.
1INSERT INTO product (id, product_name) VALUES (1, 'Chair');
2INSERT INTO product (id, product_name) VALUES (2, 'Table');
3INSERT INTO product (id, product_name) VALUES (3, 'Couch');
4INSERT INTO product (id, product_name) VALUES (4, 'Dining Table');
Step 5.3: Save the file as V2
Once we've written the SQL script, we can save the file.
Save it with this name: V2__Add_products.sql.
This includes:
- "V" to indicate it's a versioned migration.
- "2" which is the version number. This means it will run after the V1 file we wrote earlier. Flyway executes the scripts in order of the version number.
- Double underscore.
- Then a description, separated by underscores between words: Add_products.
- An extension of .sql.
The file should be saved in the same sql folder in your flyway folder.
The folder should look like this:
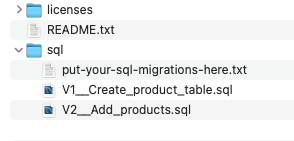
There's no need to delete the V1 SQL file. We need that file there.
Step 5.4: Run flyway migrate again
Now you can run flyway migrate again.
Your output should look like this:
1MacBook-Pro:flyway-8.0.0-beta2 BB$ flyway migrate Flyway Teams Edition 8.0.0-beta2 by Redgate Database: jdbc:mysql://localhost:3306/fwtest (MySQL 5.7) ---------------------------------------- Flyway Teams features are enabled by default for the next 27 days. Learn more at https://rd.gt/3A4IWym ---------------------------------------- Successfully validated 2 migrations (execution time 00:00.020s) Current version of schema \`fwtest\`: 1 Migrating schema \`fwtest\` to version "2 - Add products" Successfully applied 1 migration to schema \`fwtest\`, now at version v2 (execution time 00:00.047s) MacBook-Pro:flyway-8.0.0-beta2 BB$
You can check the database in your IDE to see the data in the table:
1SELECT id, product_name
2FROM product;

And we are done! The data is in the table. This was populated by our flyway tool by running flyway migrate.
If you want to make more changes to your database, such as adding more data or running more commands, simply create more SQL files and run flyway migrate.
If you want to reset your database to a point before all scripts were run, you can run "flyway clean". This will delete the flyway_schema_history table and all tables that were created from your scripts.
Conclusion
So that's how you can use Flyway DB on your own database. We used the command line method on a local MySQL database, but there are many other database platforms and methods that can be done.
What did you think of using Flyway? Do you have any questions on how to set it up? Let me know in the comments below.